Frontend Product Editor for WooCommerce
Articles
Getting Started
How to Install Frontend Product Editor Plugin
After purchasing the plugin, you will receive a confirmation email on the email address associated with your purchase. This email serves as proof of your purchase and contains important information about the plugin.
The confirmation email you receive will include important information, such as your Username and Password, license key, and temporary download link for the installation files. Additionally, you can conveniently manage your downloads, license key, and associated sites through our website.
- To access your account on our website, please use the login credentials provided in the confirmation email.
- After successfully logging in, you can navigate through the dashboard and click on the “Downloads” option.
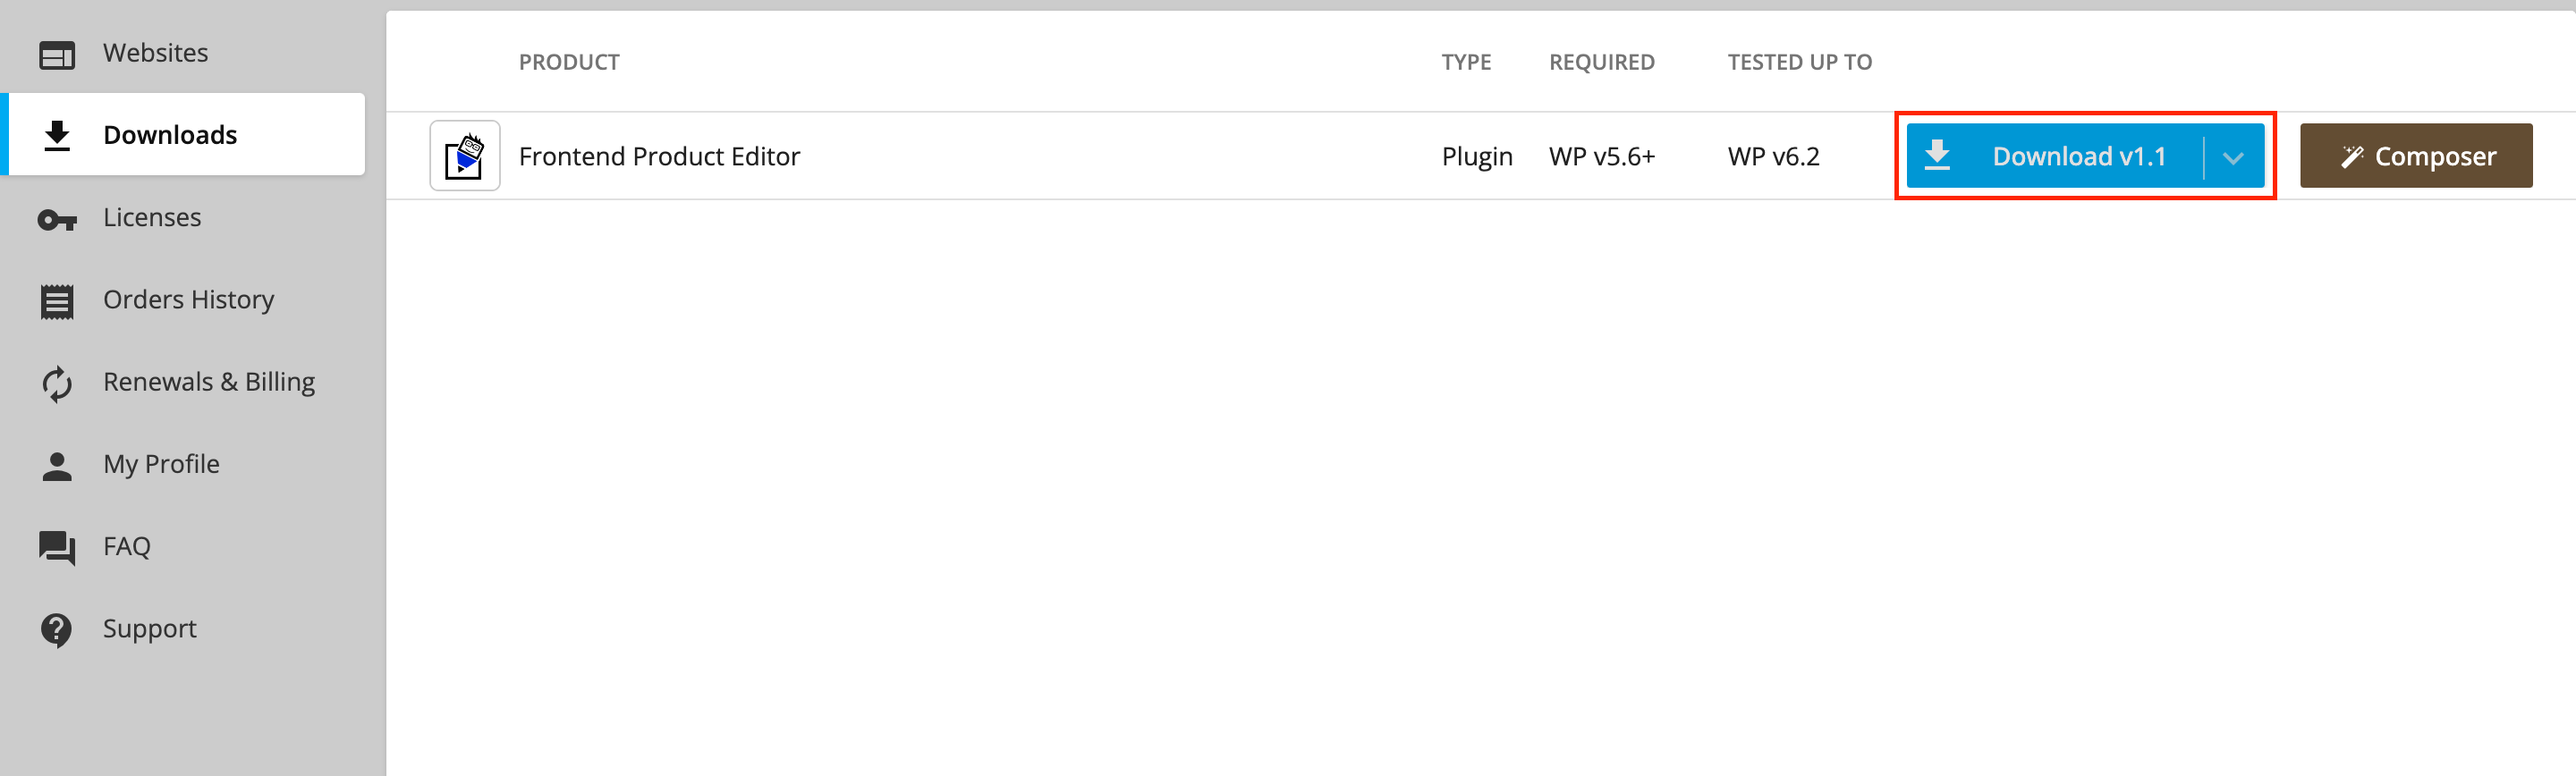
- In the Downloads section, a popup window will appear, allowing you to conveniently copy the license key of the product and download the zip file directly from that interface.
- Once you have downloaded the zip file, proceed to your WordPress dashboard. From there, navigate to the Plugins >> Add New >> Upload Plugins.
- Upload the plugin zip file that you downloaded from our store.
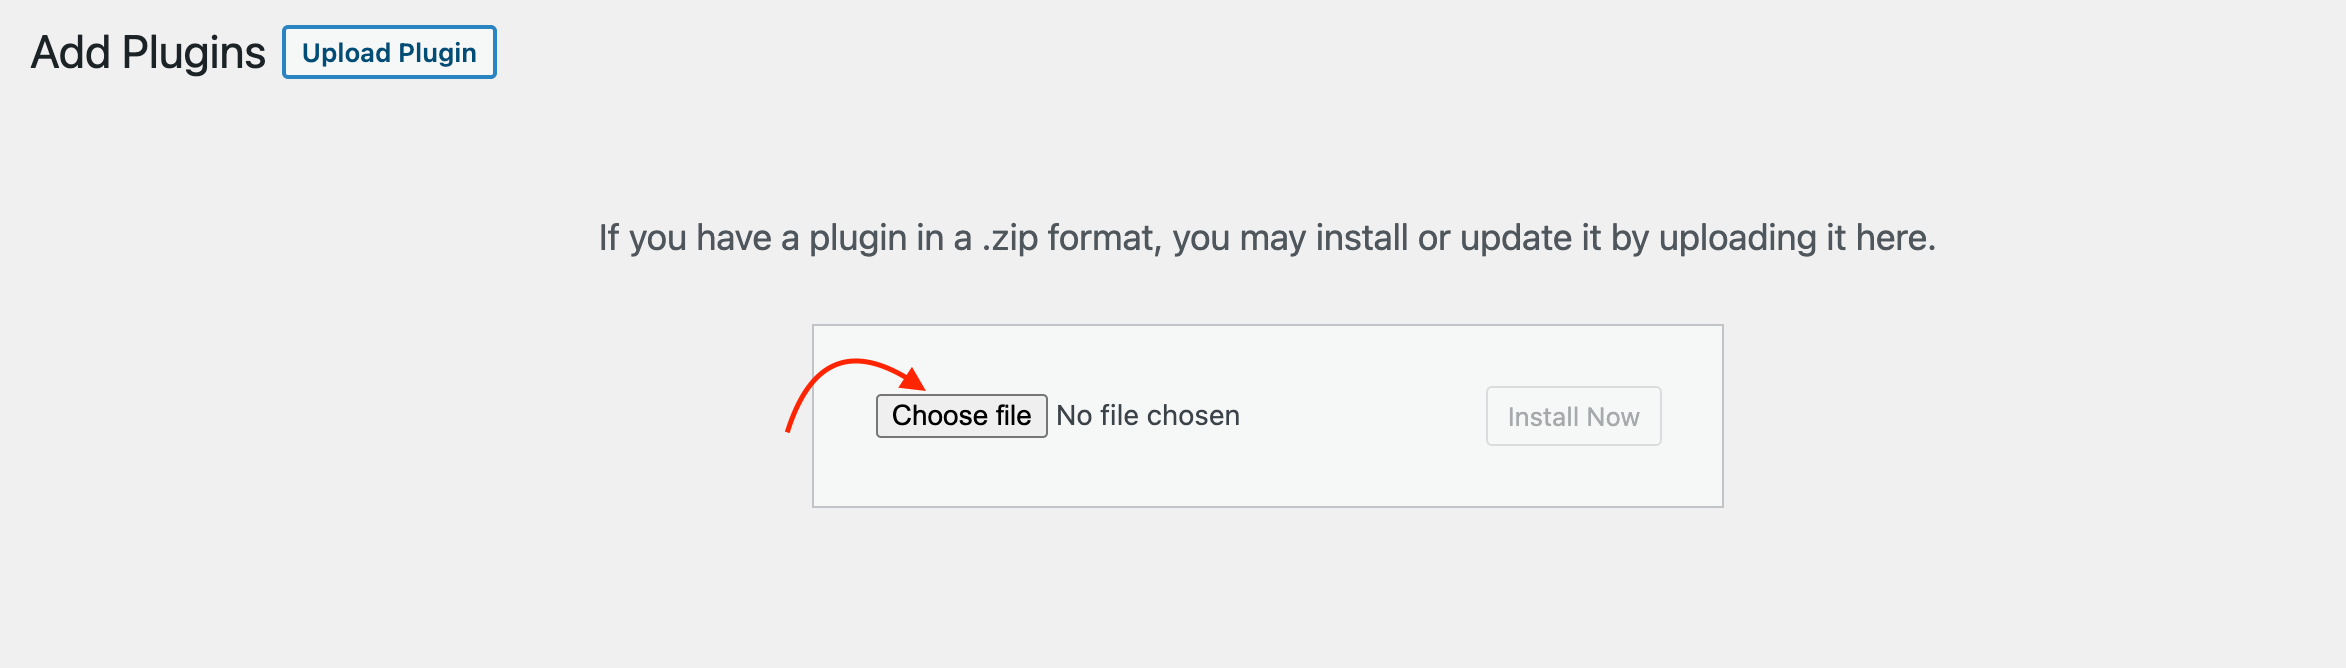
- Once you have activated the plugin, you will be prompted to enter the license key. Simply input your license key and proceed to activate it.
How to Upgrade Frontend Product Editor License
You have the flexibility to upgrade your Frontend Product Editor license at any time you want. The upgrade charges will be calculated on a prorated basis, ensuring you are charged accurately for the remaining duration of your current license.
To upgrade the license, follow these steps:
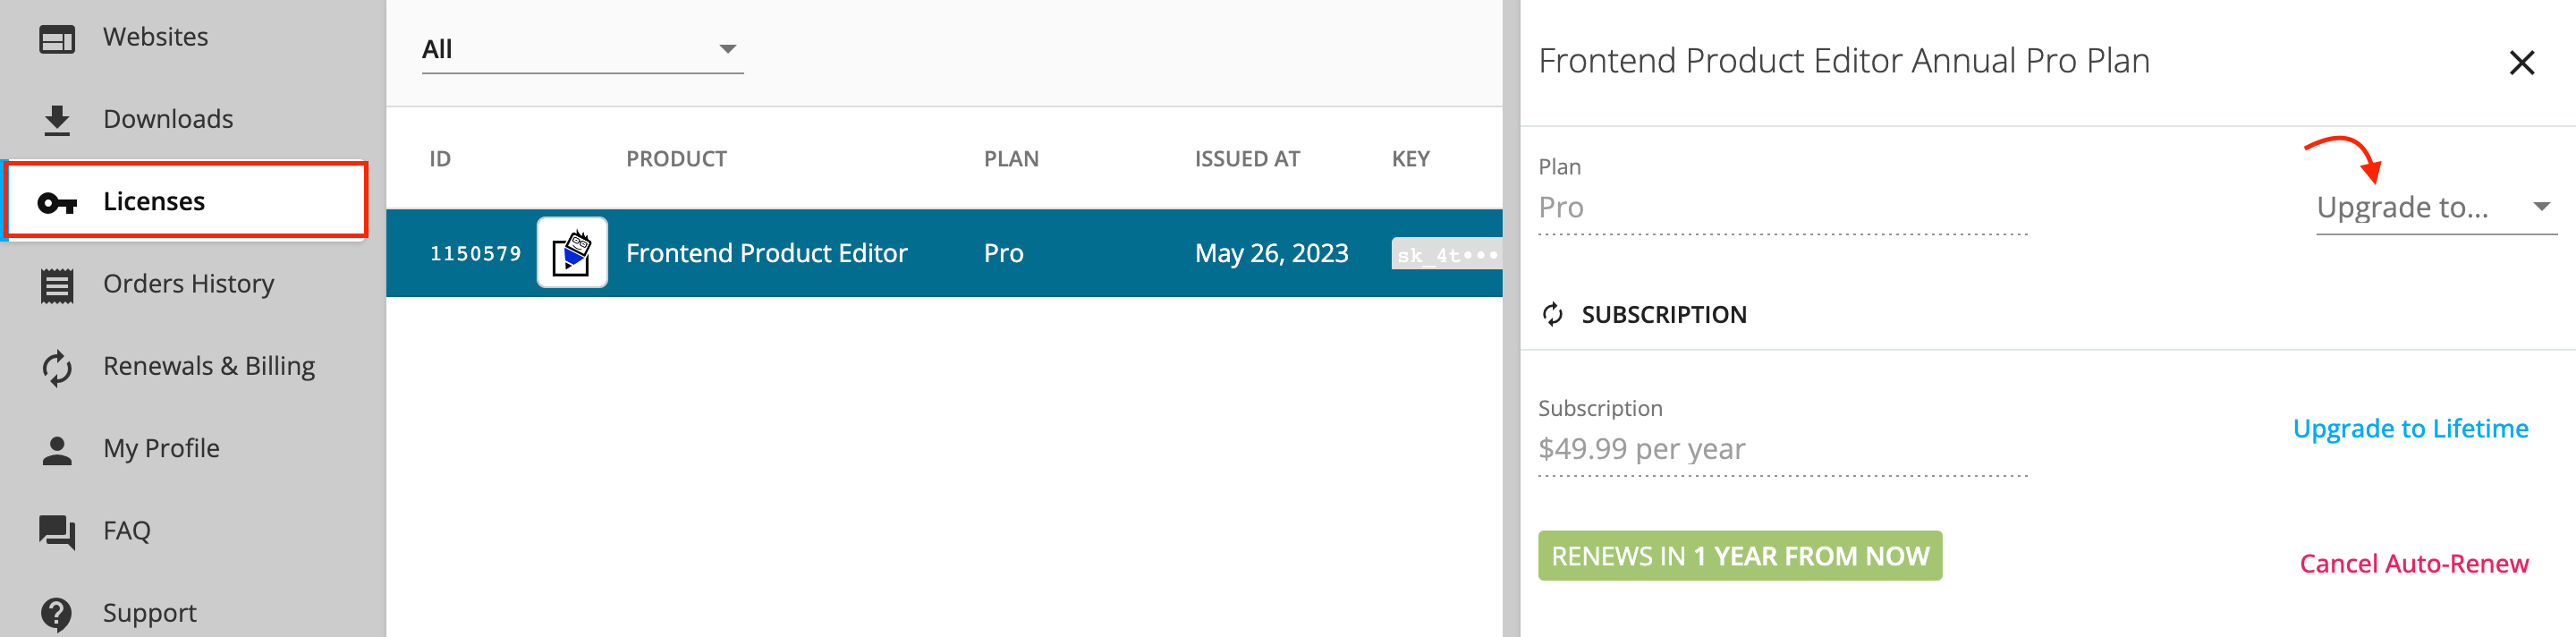
- Navigate to the License option and select the plugin for which you wish to upgrade the license; you will find all the details associated with the selected plugin displayed in that section.
- Next, Click on the “Upgrade To” dropdown.
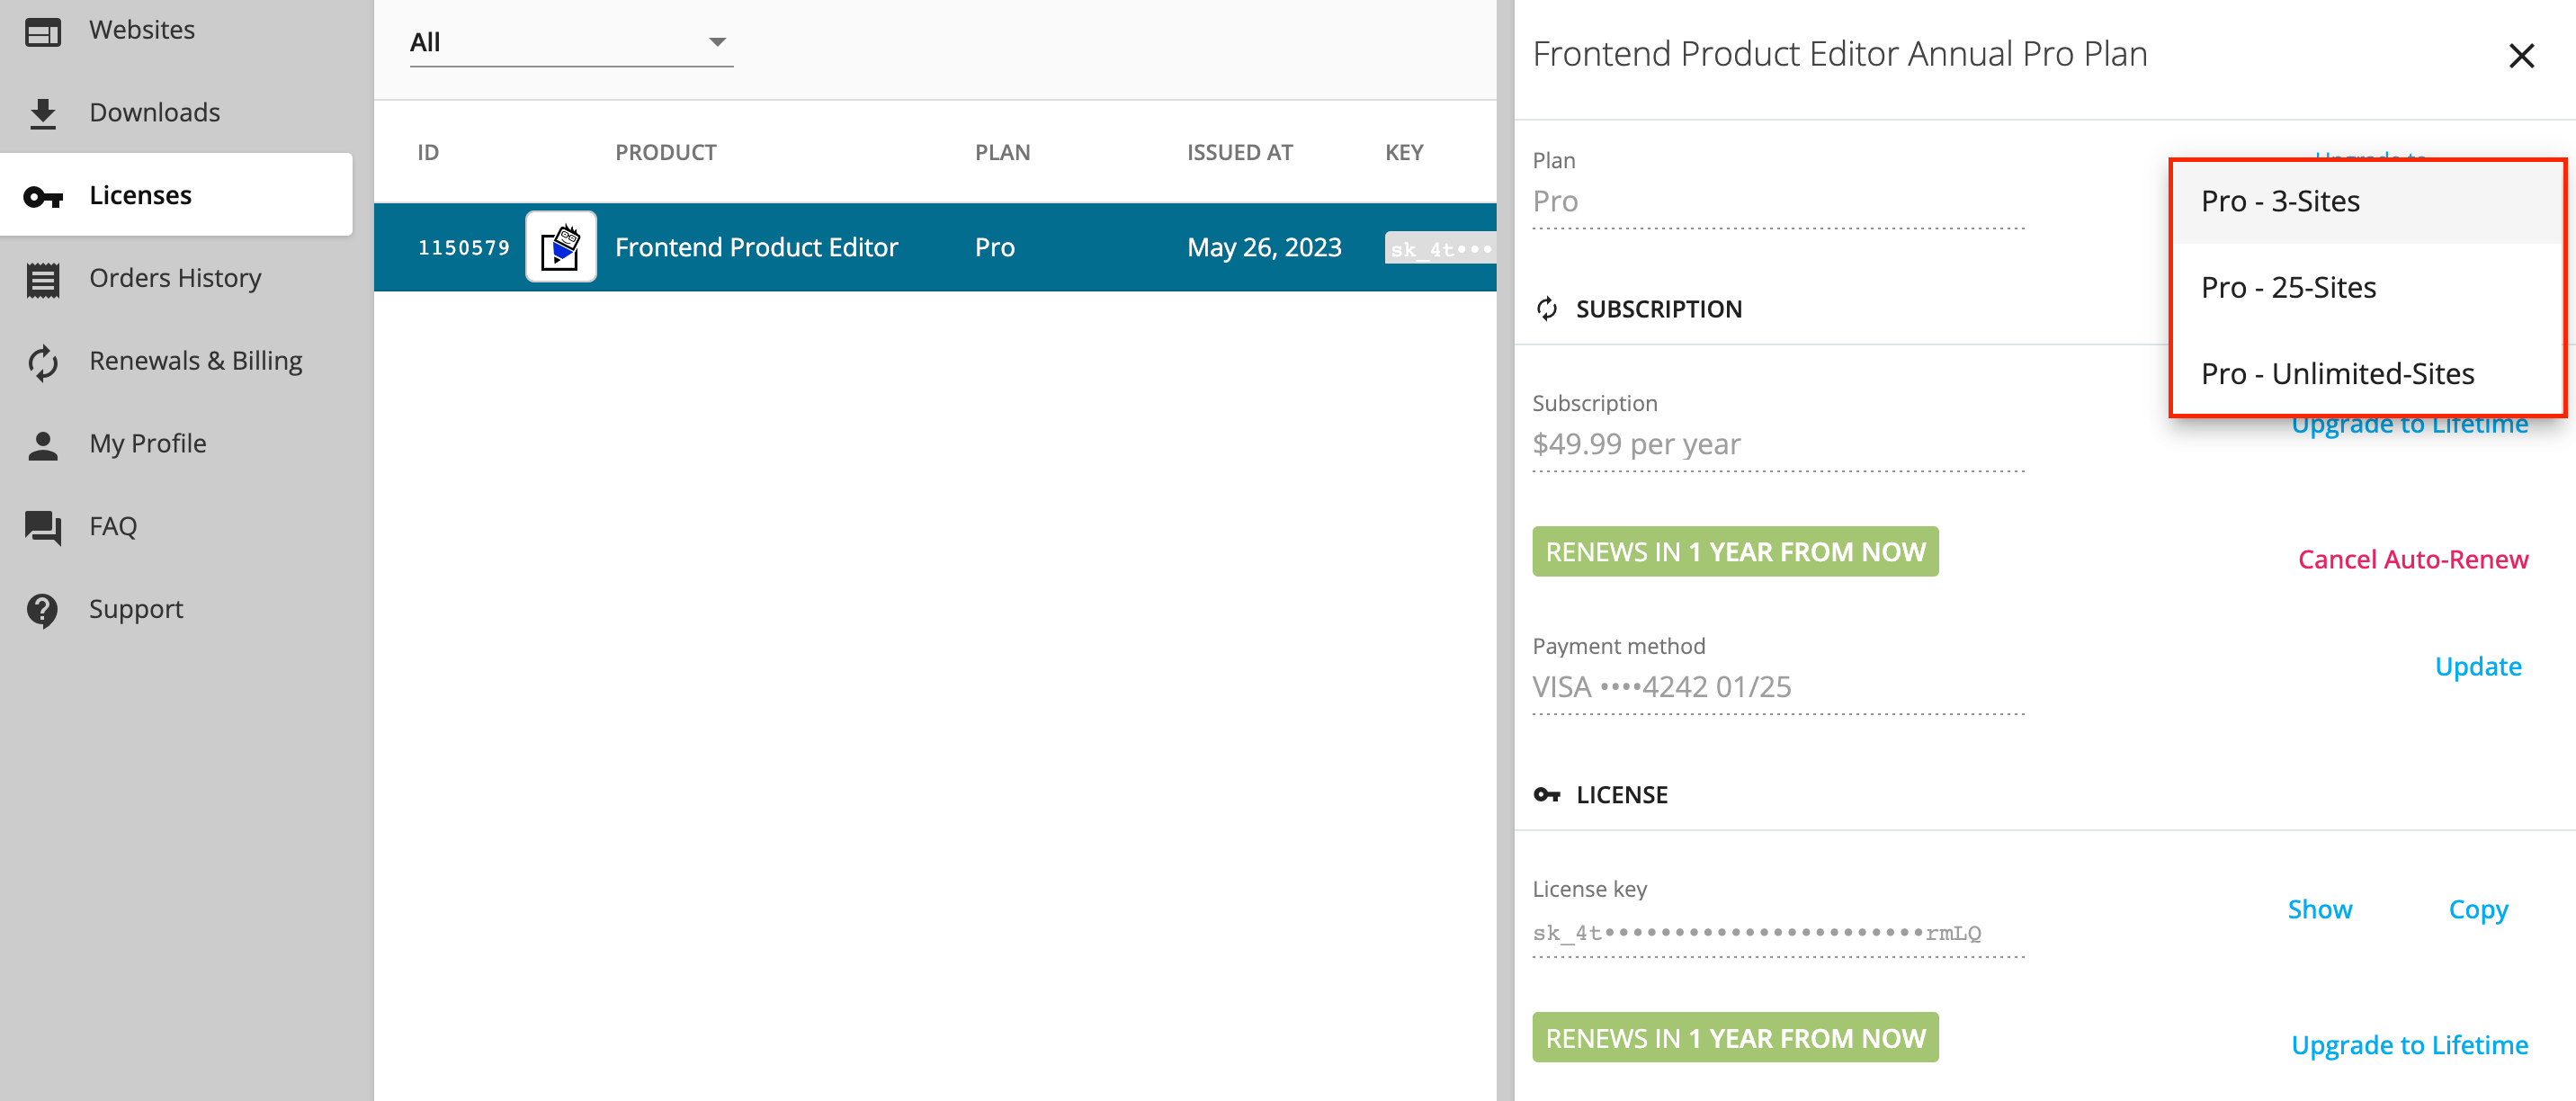
- After clicking on the dropdown menu, simply select the desired upgrade plan, and you will redirect to the Checkout page, where you can proceed to make the payment for the selected upgrade.
- Once your payment is confirmed, your subscription will be upgraded accordingly.
How is the Proration Discount Calculated?
When users upgrade a plan that was initially purchased as a subscription, they will receive a proration discount. This discount is calculated based on the remaining unused portion of their previous plan.
remaining_period = (1 - number_of_days_past_from_the_old_plan_last_payment / number_of_days_in_past_billing_cycle )

proration_discount = max(0, remaining_period x old_plan_last_payment )
Migrate License from One Site to Another
To migrate license of Frontend Product Editor from the old site to the new one, follow the steps below:
- Navigate to the “Website” Section to view the list of websites where the license is currently activated.
- Click on the site whose license you want to deactivate.
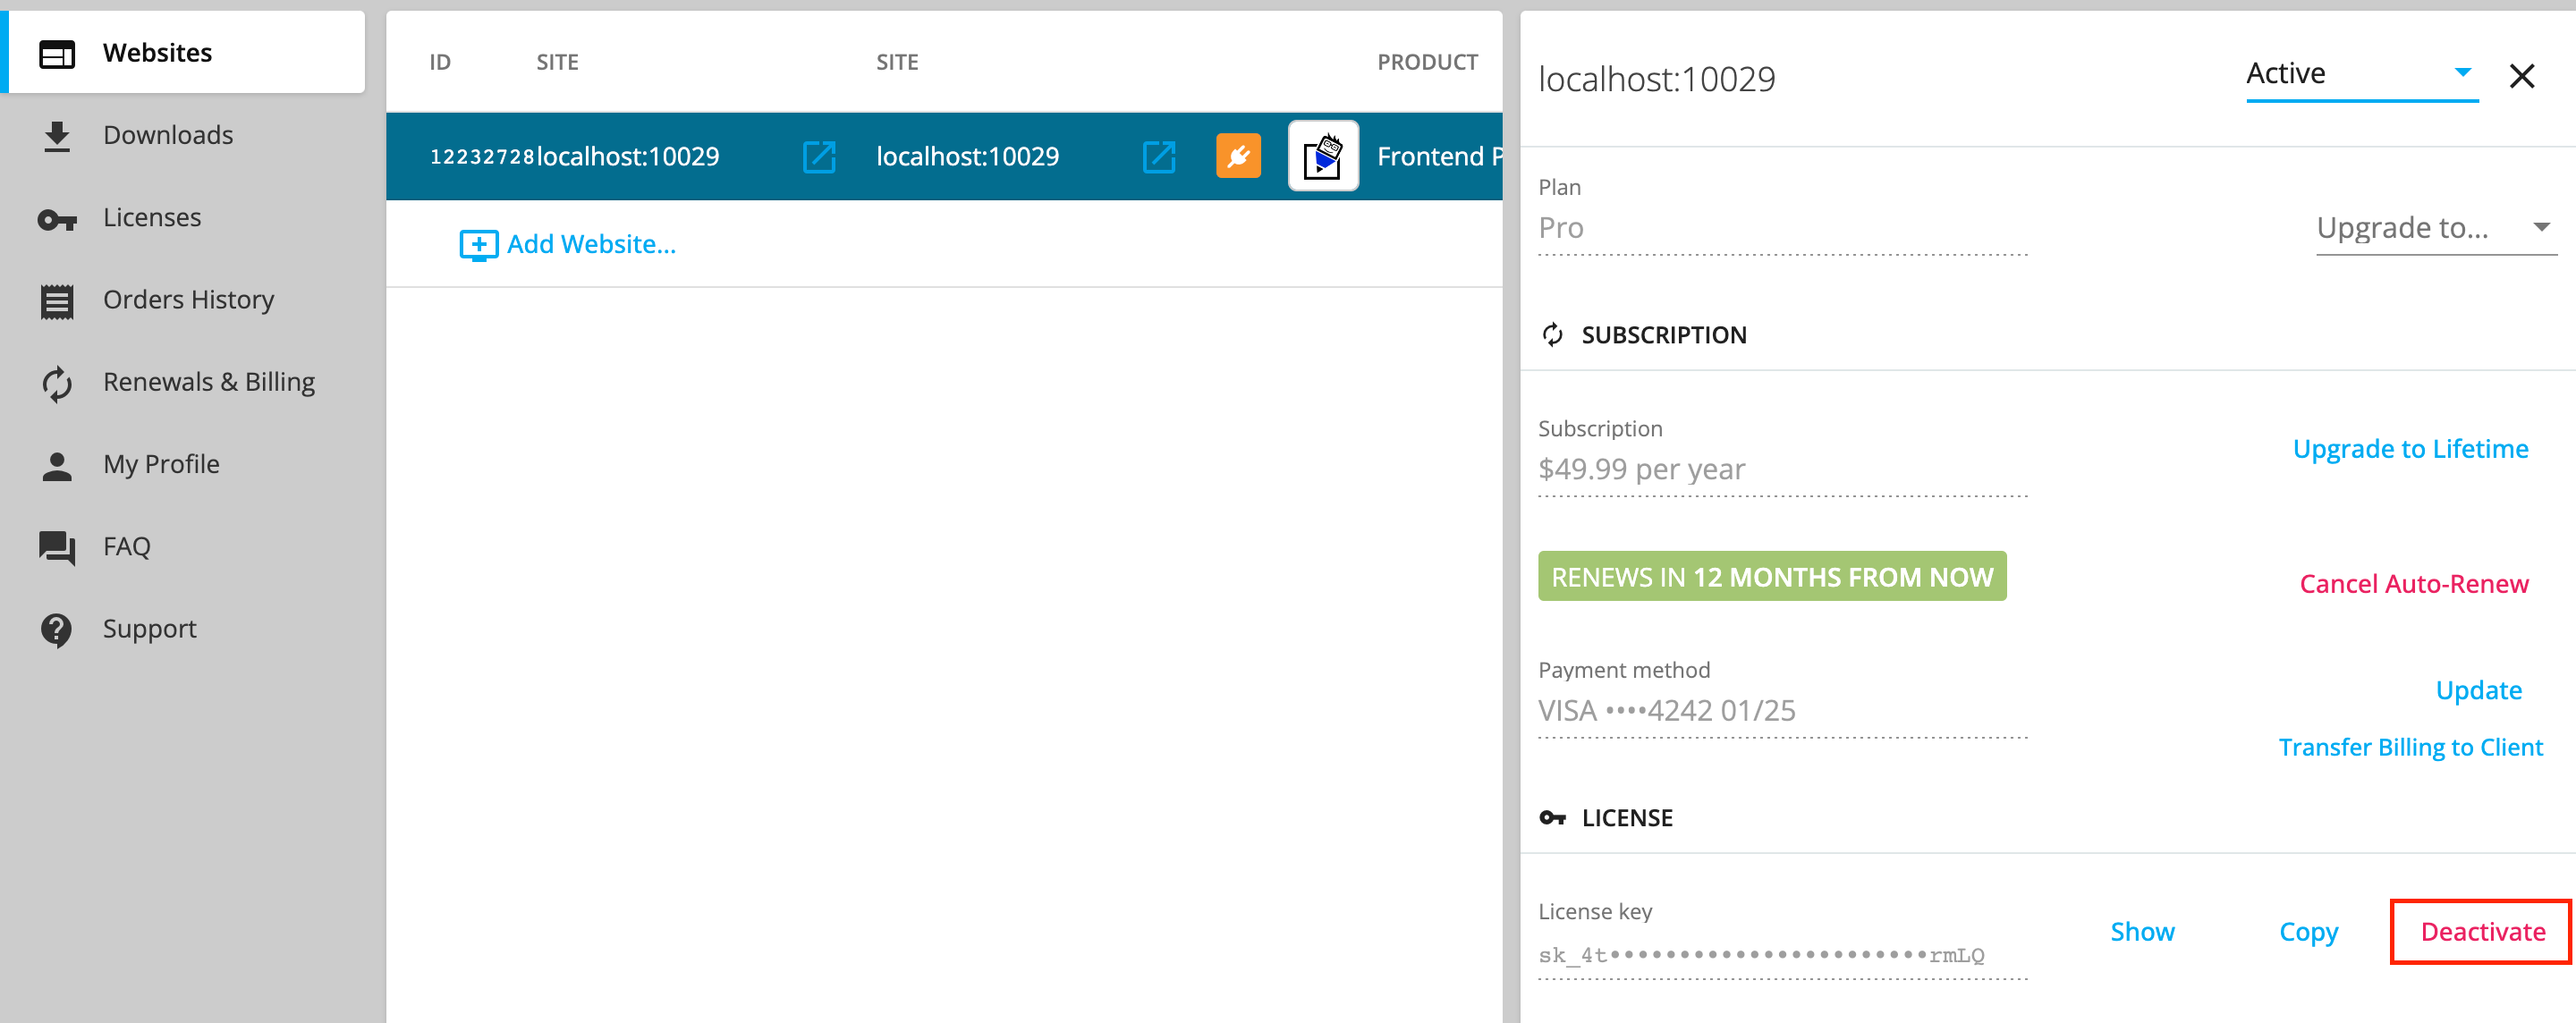
- After selecting the desired website, locate the “Deactivate” link associated with that site.
- Click on the “Deactivate” link to remove the license from the selected site and proceed to activate the license on your live website.
Access & Download Frontend Product Editor Installation Files
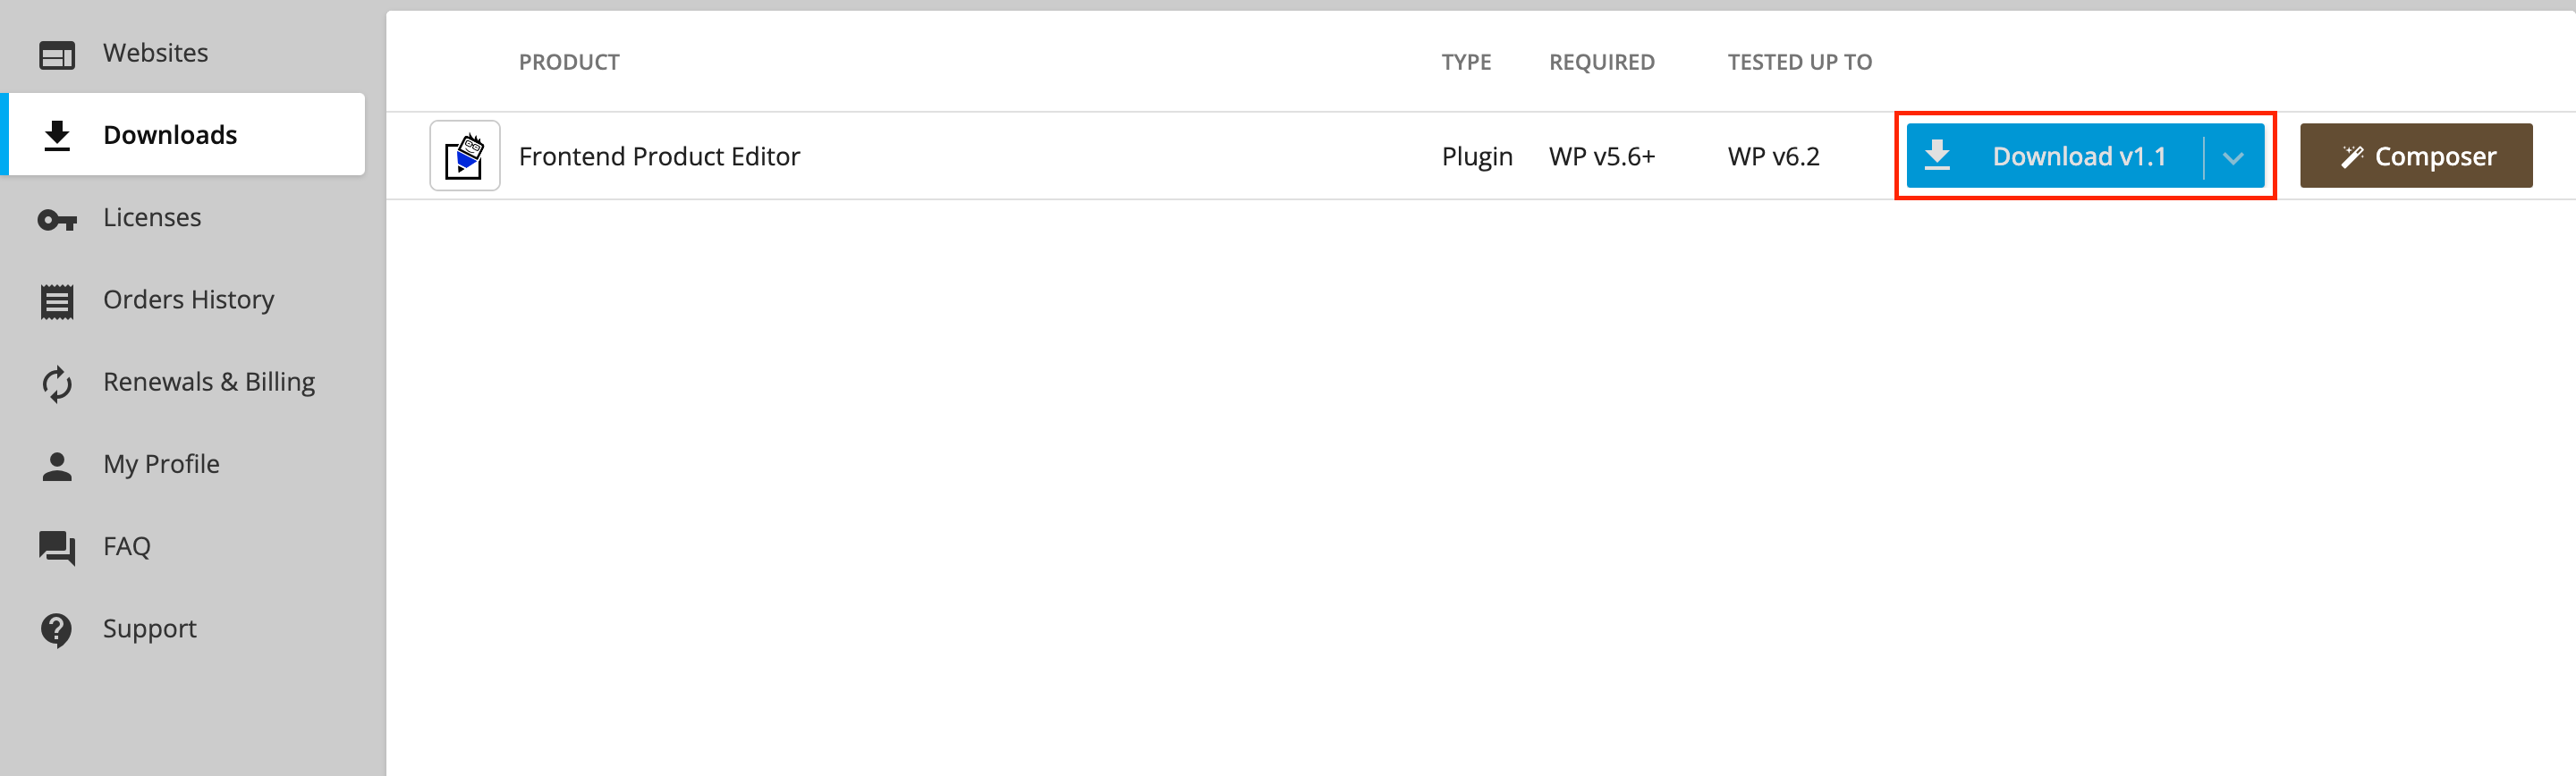
- To access the most recent version of Frontend Product Editor, proceed by Login to the website.
- Once logged in, navigate to the Download section, where you will find a plugin file available for download. Simply click on the Download button to initiate the process.
Use Frontend Product Editor on Localhost/Development Site
We provide support for staging and local development websites. To ensure compatibility, your site URL should match one of the following patterns.
TLDs that are considered as dev or staging:
*.dev*.dev.cc(DesktopServer)*.test*.local*.staging*.example*.invalid*.myftpupload.com(GoDaddy)*.cloudwaysapps.com(Cloudways)*.wpsandbox.pro(WPSandbox)*.ngrok.io(tunneling)
Subdomains that are considered as dev or staging:
local.*dev.*test.*stage.*staging.*stagingN.*(SiteGround;Nis an unsigned int)*.wpengine.com(WP Engine)dev-*.pantheonsite.io(Pantheon)test-*.pantheonsite.io(Pantheon)staging-*.kinsta.com(Kinsta)staging-*.kinsta.cloud(Kinsta)*.mystagingwebsite.com'(Pressable)
Moreover, if your domain includes “localhost” (with any port), it will also be recognized as a localhost domain.
In case you wish to use a license on a dev site that doesn’t meet the criteria listed above, you have the option to deactivate the license from the Account page in your WP Admin dashboard. Once deactivated, you can then reuse the license for another site.
Frontend Product Editor Settings Page
The settings page provides you with the ability to effectively manage advanced Frontend Product Editor setting configurations.
You can find Frontend Product Editor Settings under the WooCommerce menu.
- Go to WooCommerce -> Frontend Product Editor.

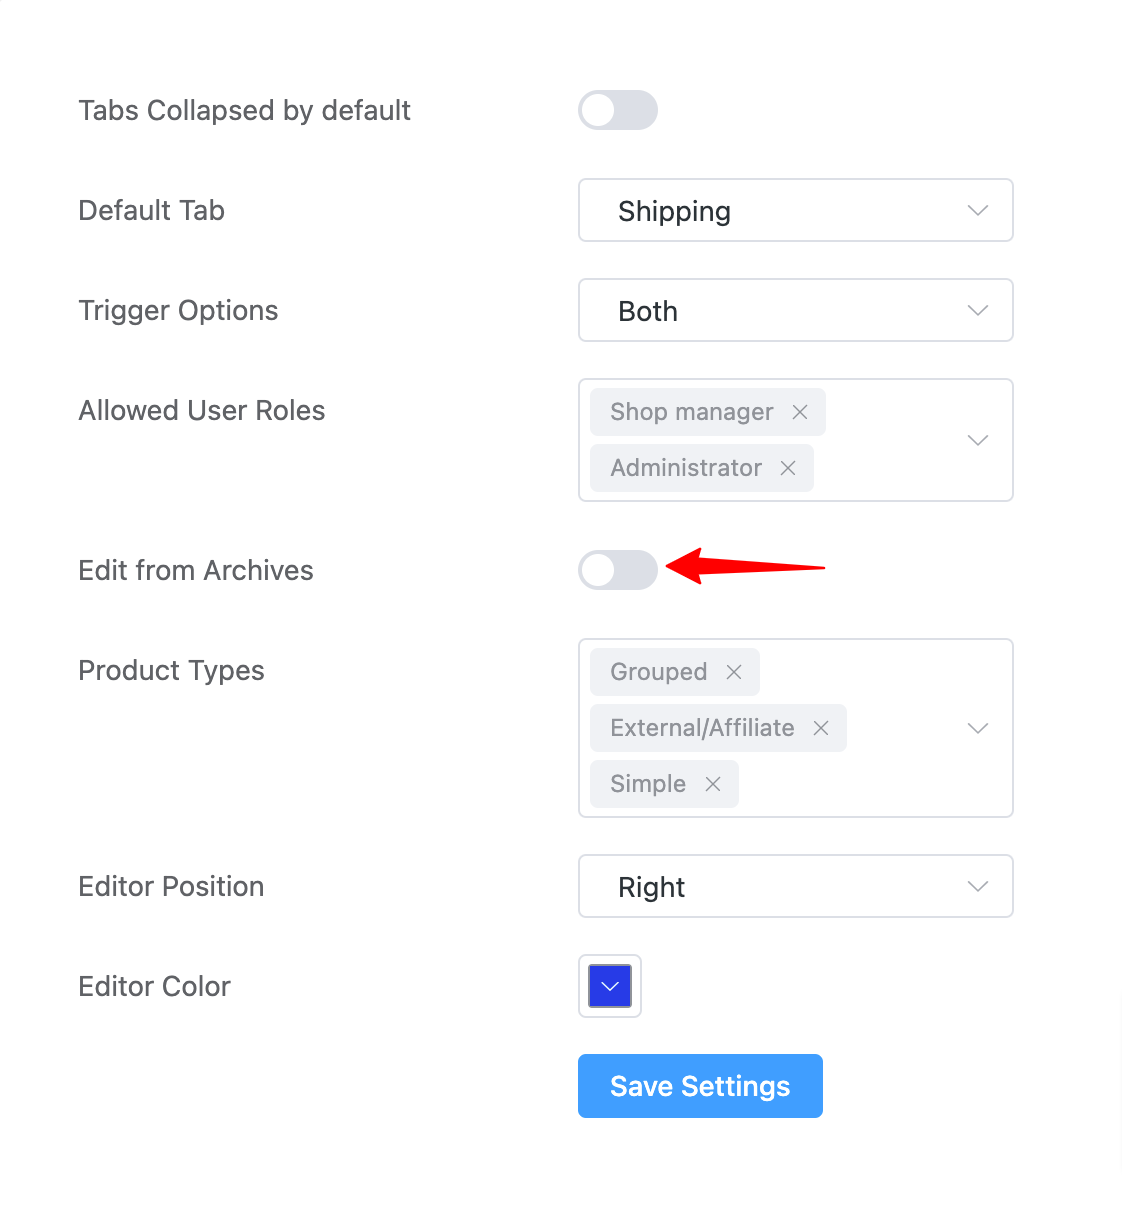
Various configuration options are available for effectively managing the settings of Frontend Product Editor.
- Tabs Collapsed by Default: If you prefer the tabs to be collapsed by default, you can enable this option.
- Default Tab: Choose the default tab that you would like to open.
- Trigger Option: Choose your preferred trigger option from the following: admin bar, floating button, or both.
- Allowed User Roles: You can specify the permitted user roles that have the authority to edit the details, such as Administrator or Shop Manager.
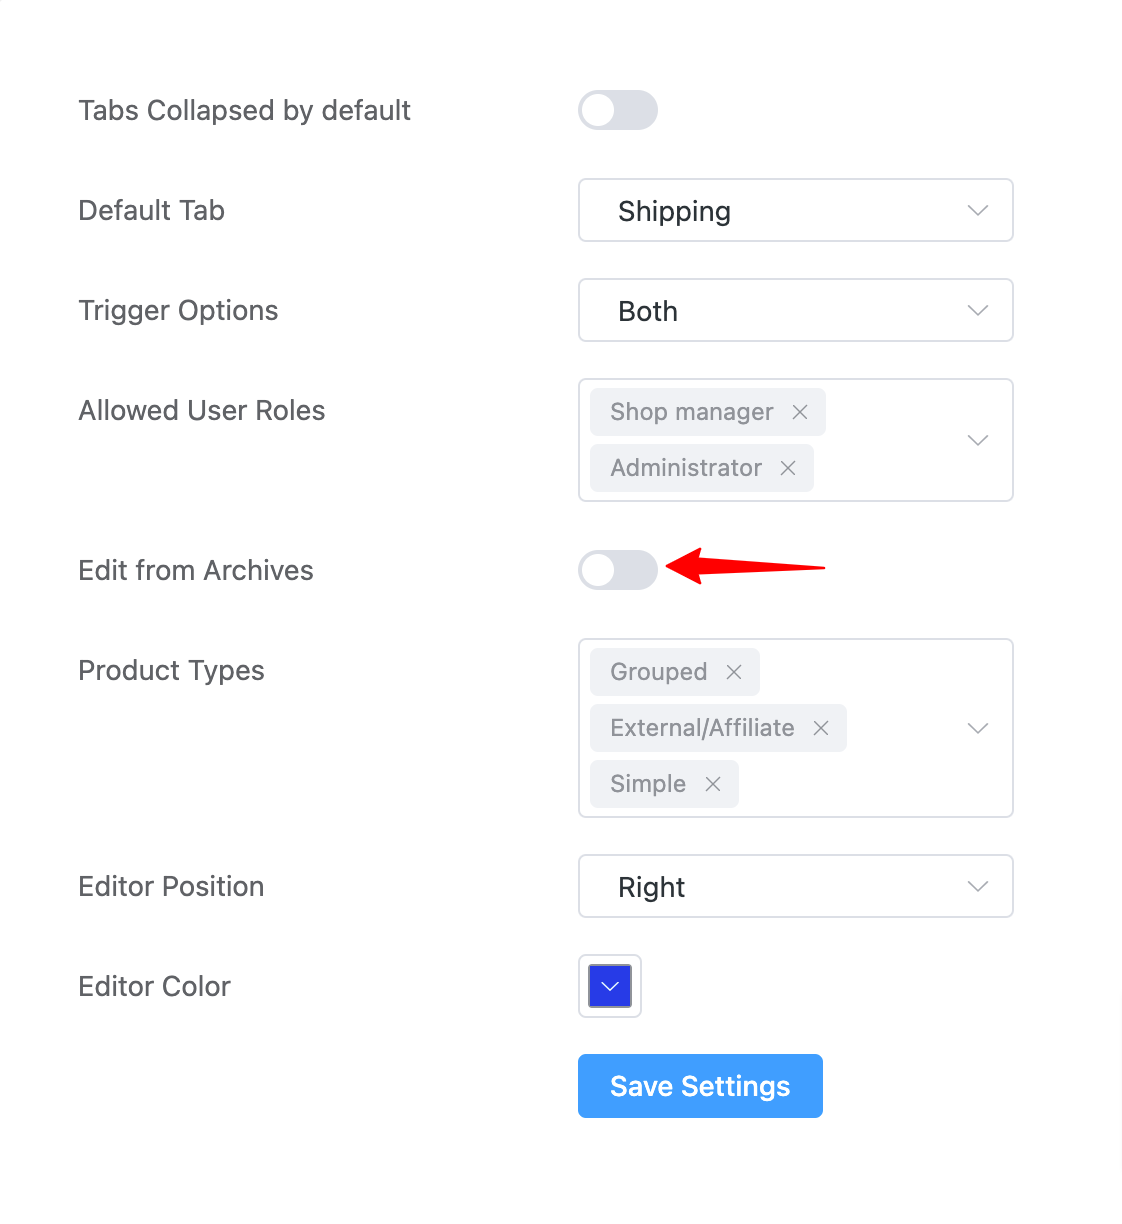
- Edit from Archives: Enable the option to edit product details on the archive(Shop) page.
- Product Types: Select the type of product you want: Simple, Grouped, or External/Affiliate.
- Editor Position: Select the edit icon position from right or left.
- Editor Color: Select the editor color.
How to Edit Products On Frontend?
After activating the plugin, you will get two options to edit products on frontend. These buttons provide a convenient way to edit details or perform specific actions directly from the frontend without having to access the WordPress Admin.
In the free version of the Frontend Product Editor plugin, you are limited to editing only simple products, excluding virtual products and downloadable products. However, with the pro version of the plugin, you gain the ability to edit various types of products, such as Downloadable, Virtual, Grouped Product, and External/Affiliate Products.
Please check our detailed doc on How to install Frontend Product Editor.
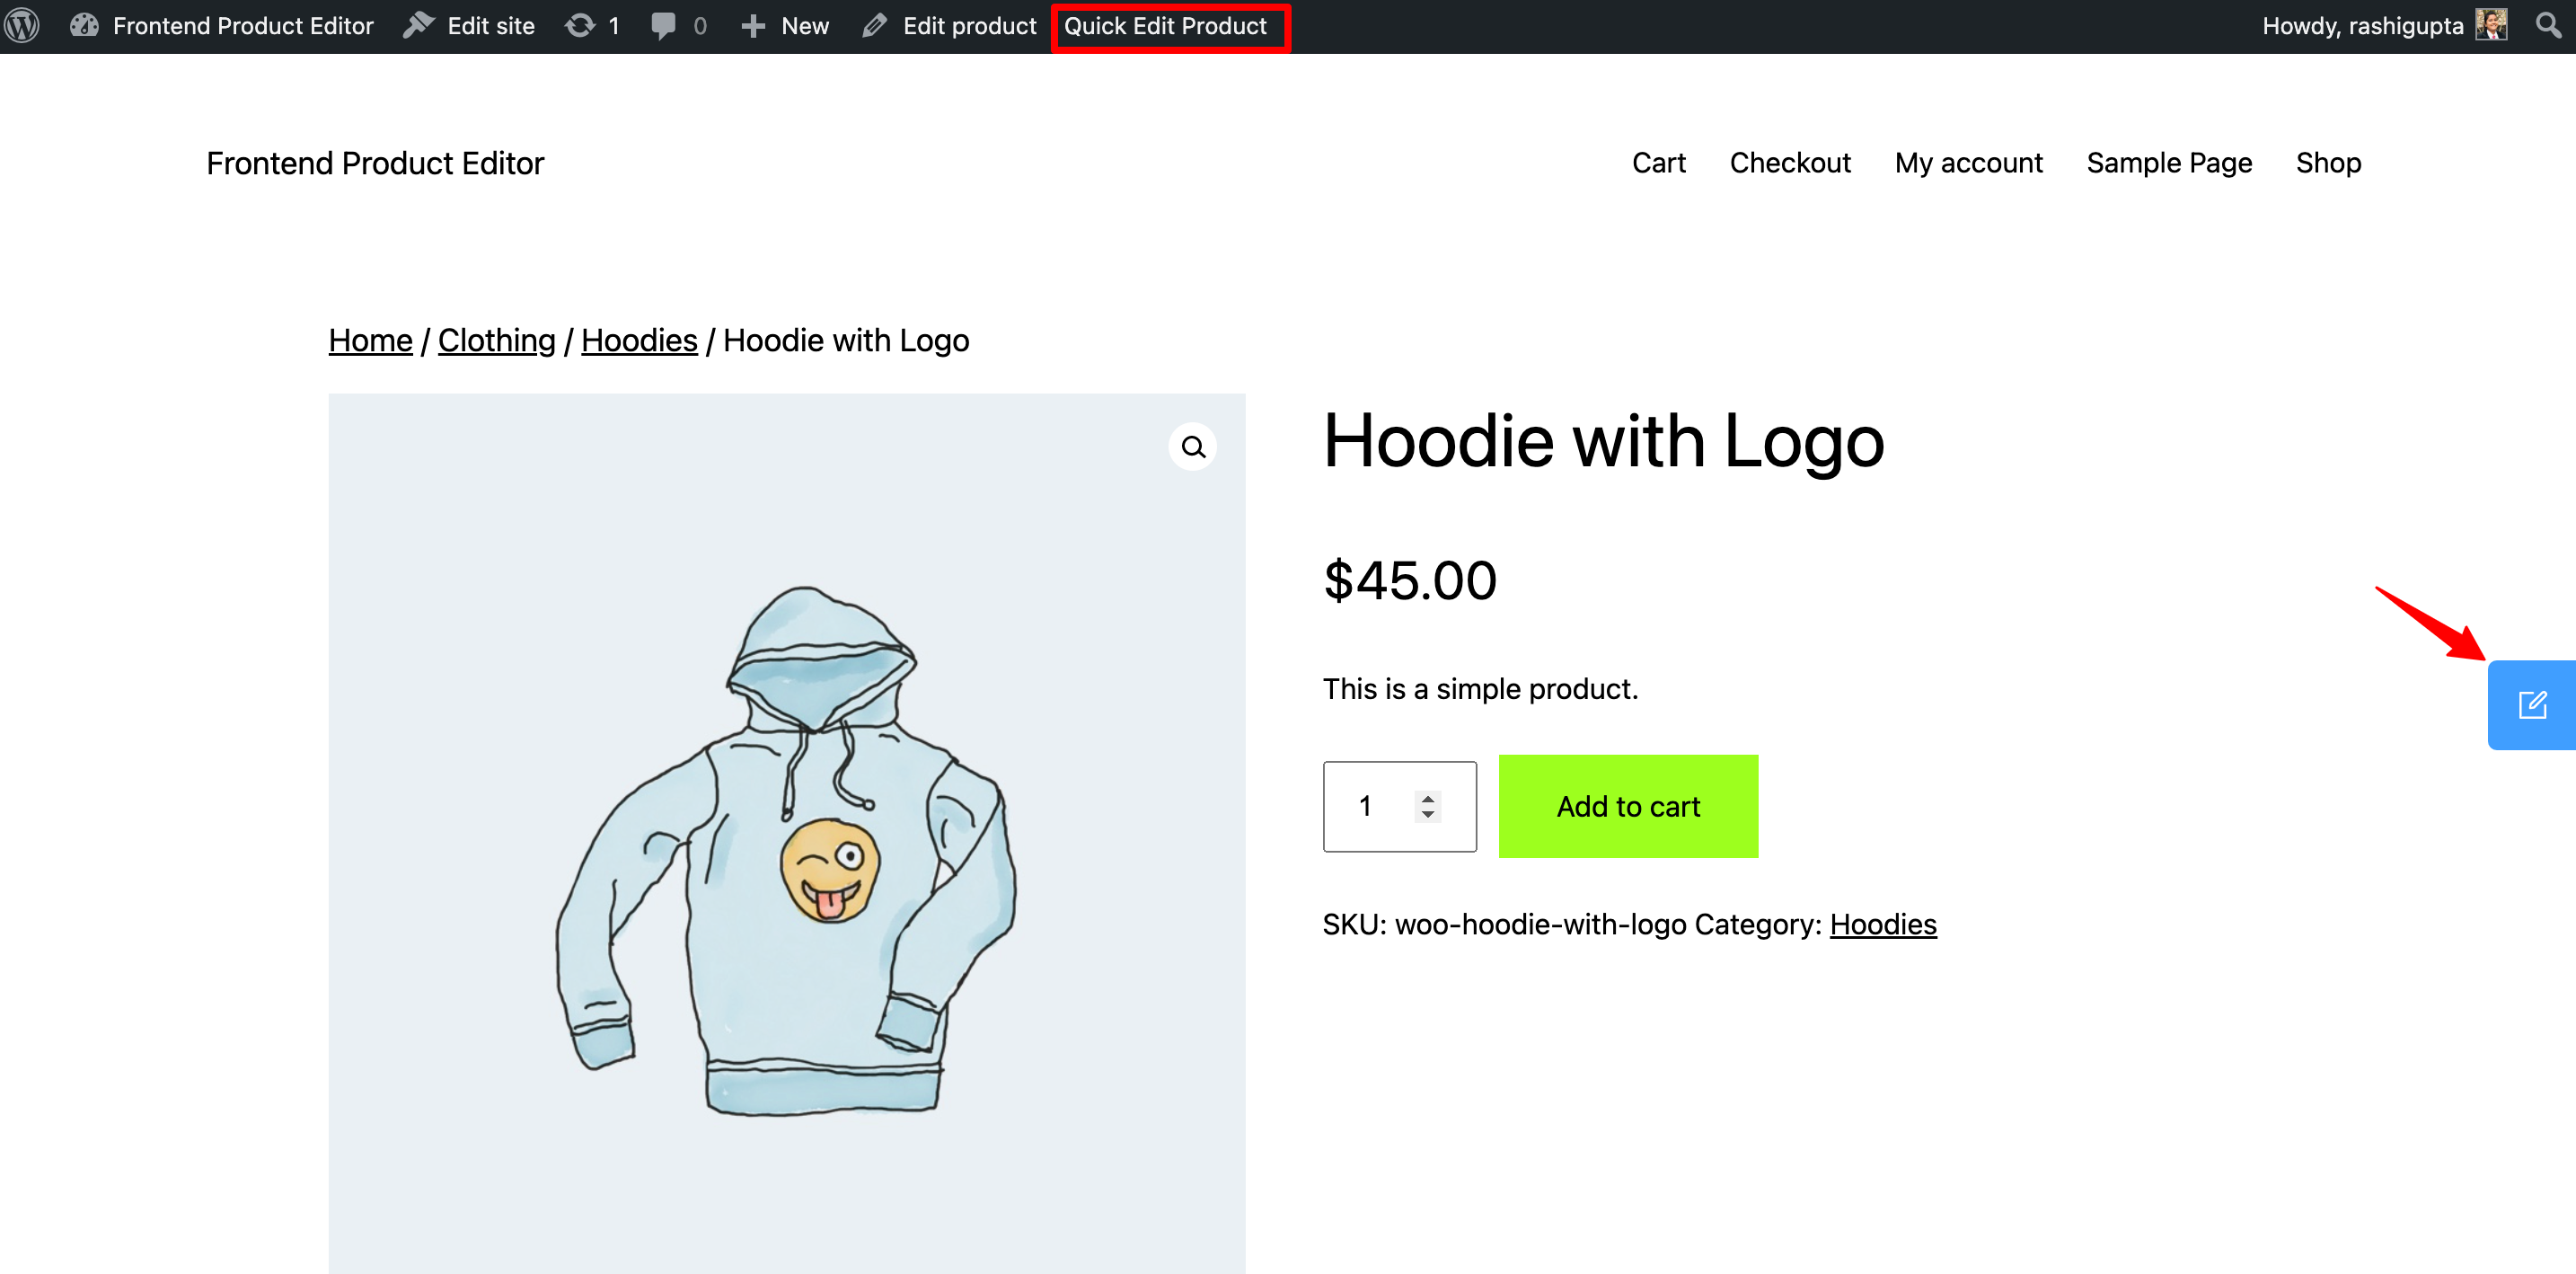
When you access the frontend of your WooCommerce single product, our plugin offers two easy-to-go buttons for editing.
- When you are logged in as an admin and visit any WooCommerce product page, you’ll find an editing button located in the admin bar named “Quick Edit Product,” giving you easy access to make changes without navigating away from the current page.
- Additionally, we provide a floating button positioned on the right edge of the browser. This button remains accessible as you scroll, ensuring you can quickly initiate edits regardless of your position on the page.
How to?
How to Edit Simple Products on the Frontend
Editing a simple product on frontend allows you to update the essential details and attributes of a product listed on your online store. Whether you’re adjusting the pricing, adding a description, or specifying inventory information, Frontend Product Editor provides a user-friendly interface to make these modifications.
Furthermore, with our pro version, you have the ability to edit both Virtual and Downloadable products. Here, you will learn about How to Edit Products On Frontend?
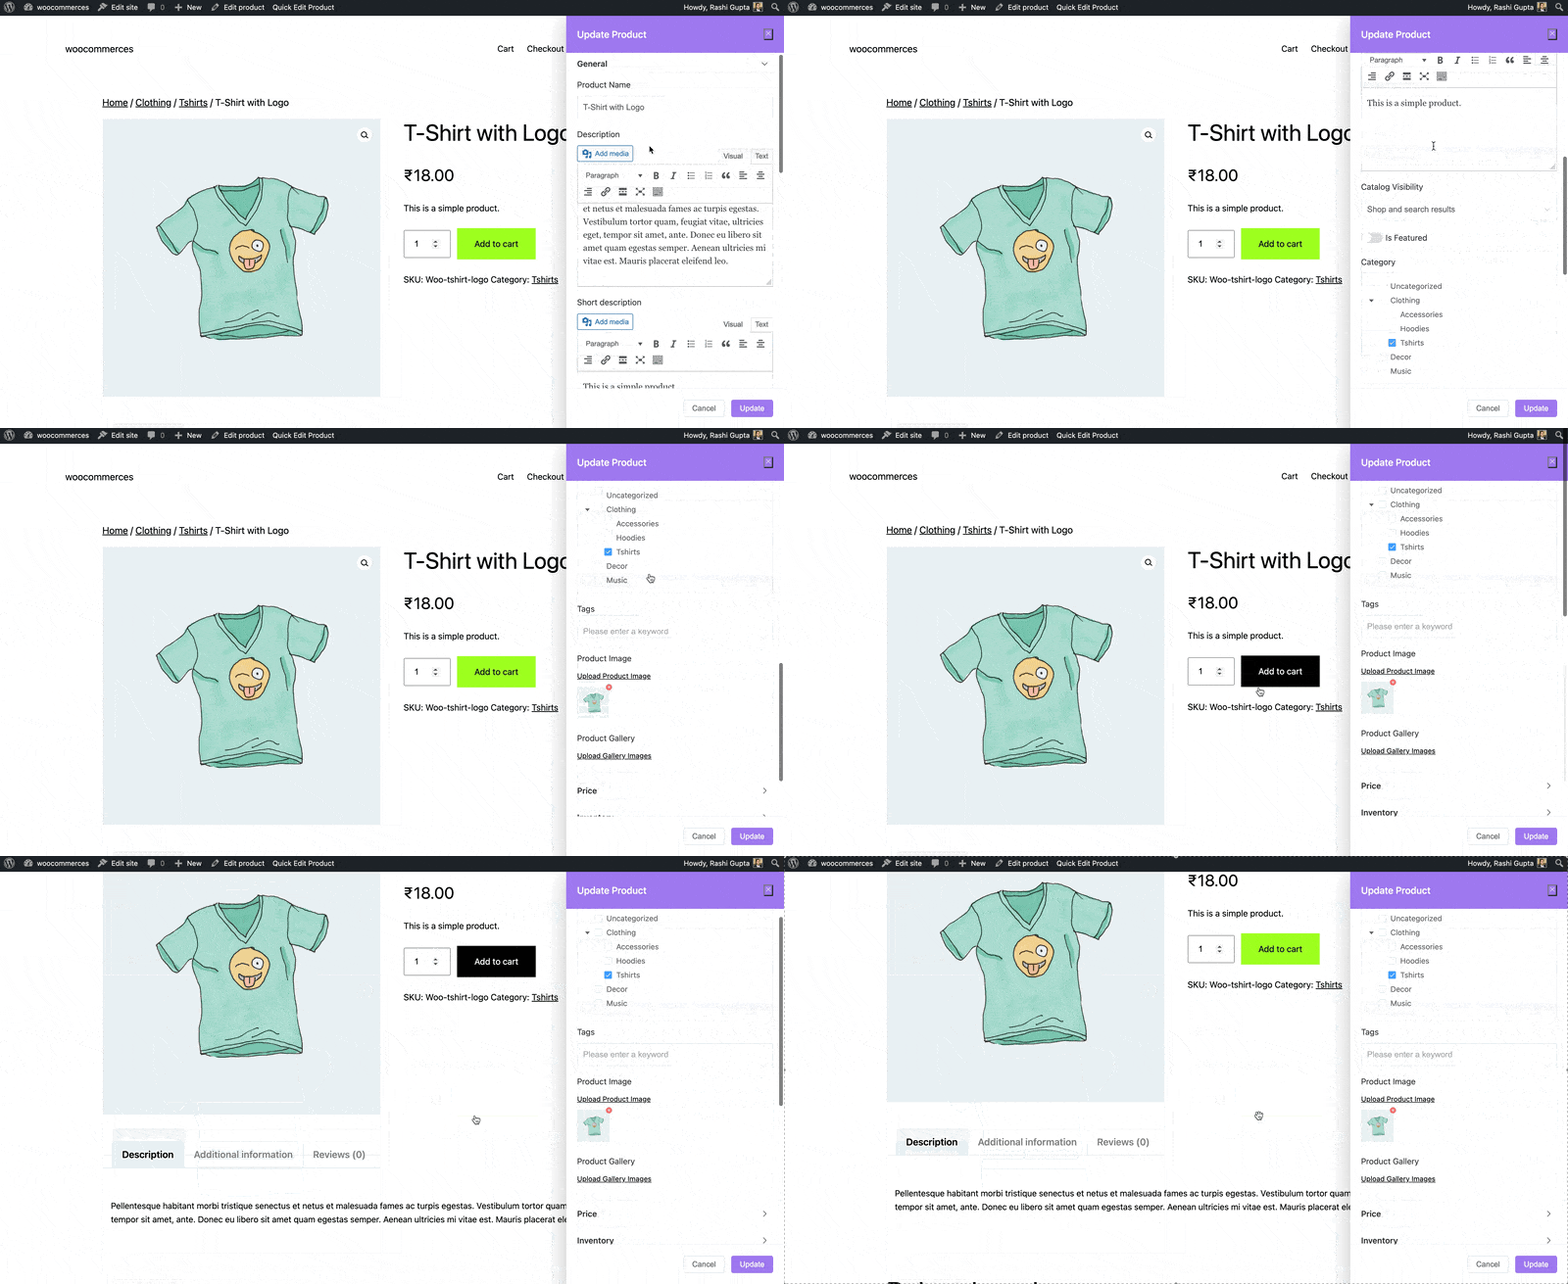
Once you click on the edit button, you will have access to a set of settings that allow you to edit the product details. Once you made the desired changes, simply click on the “Update” button to save the updated details.
General
- Product Name: Enter the name of the product.
- Description: Set the description for the product.
- Short Description: Enter the short description of the product.
- Catalog Visibility: Select the catalog visibility from the available options.
- Is Featured: Enable the option if you want to feature this product.
- Categories: Select the categories for product.
- Tags: Add the tags for product, if any.
- Product Image: Add the image of the product.
- Product Gallery: Add the gallery of product images, if needed.
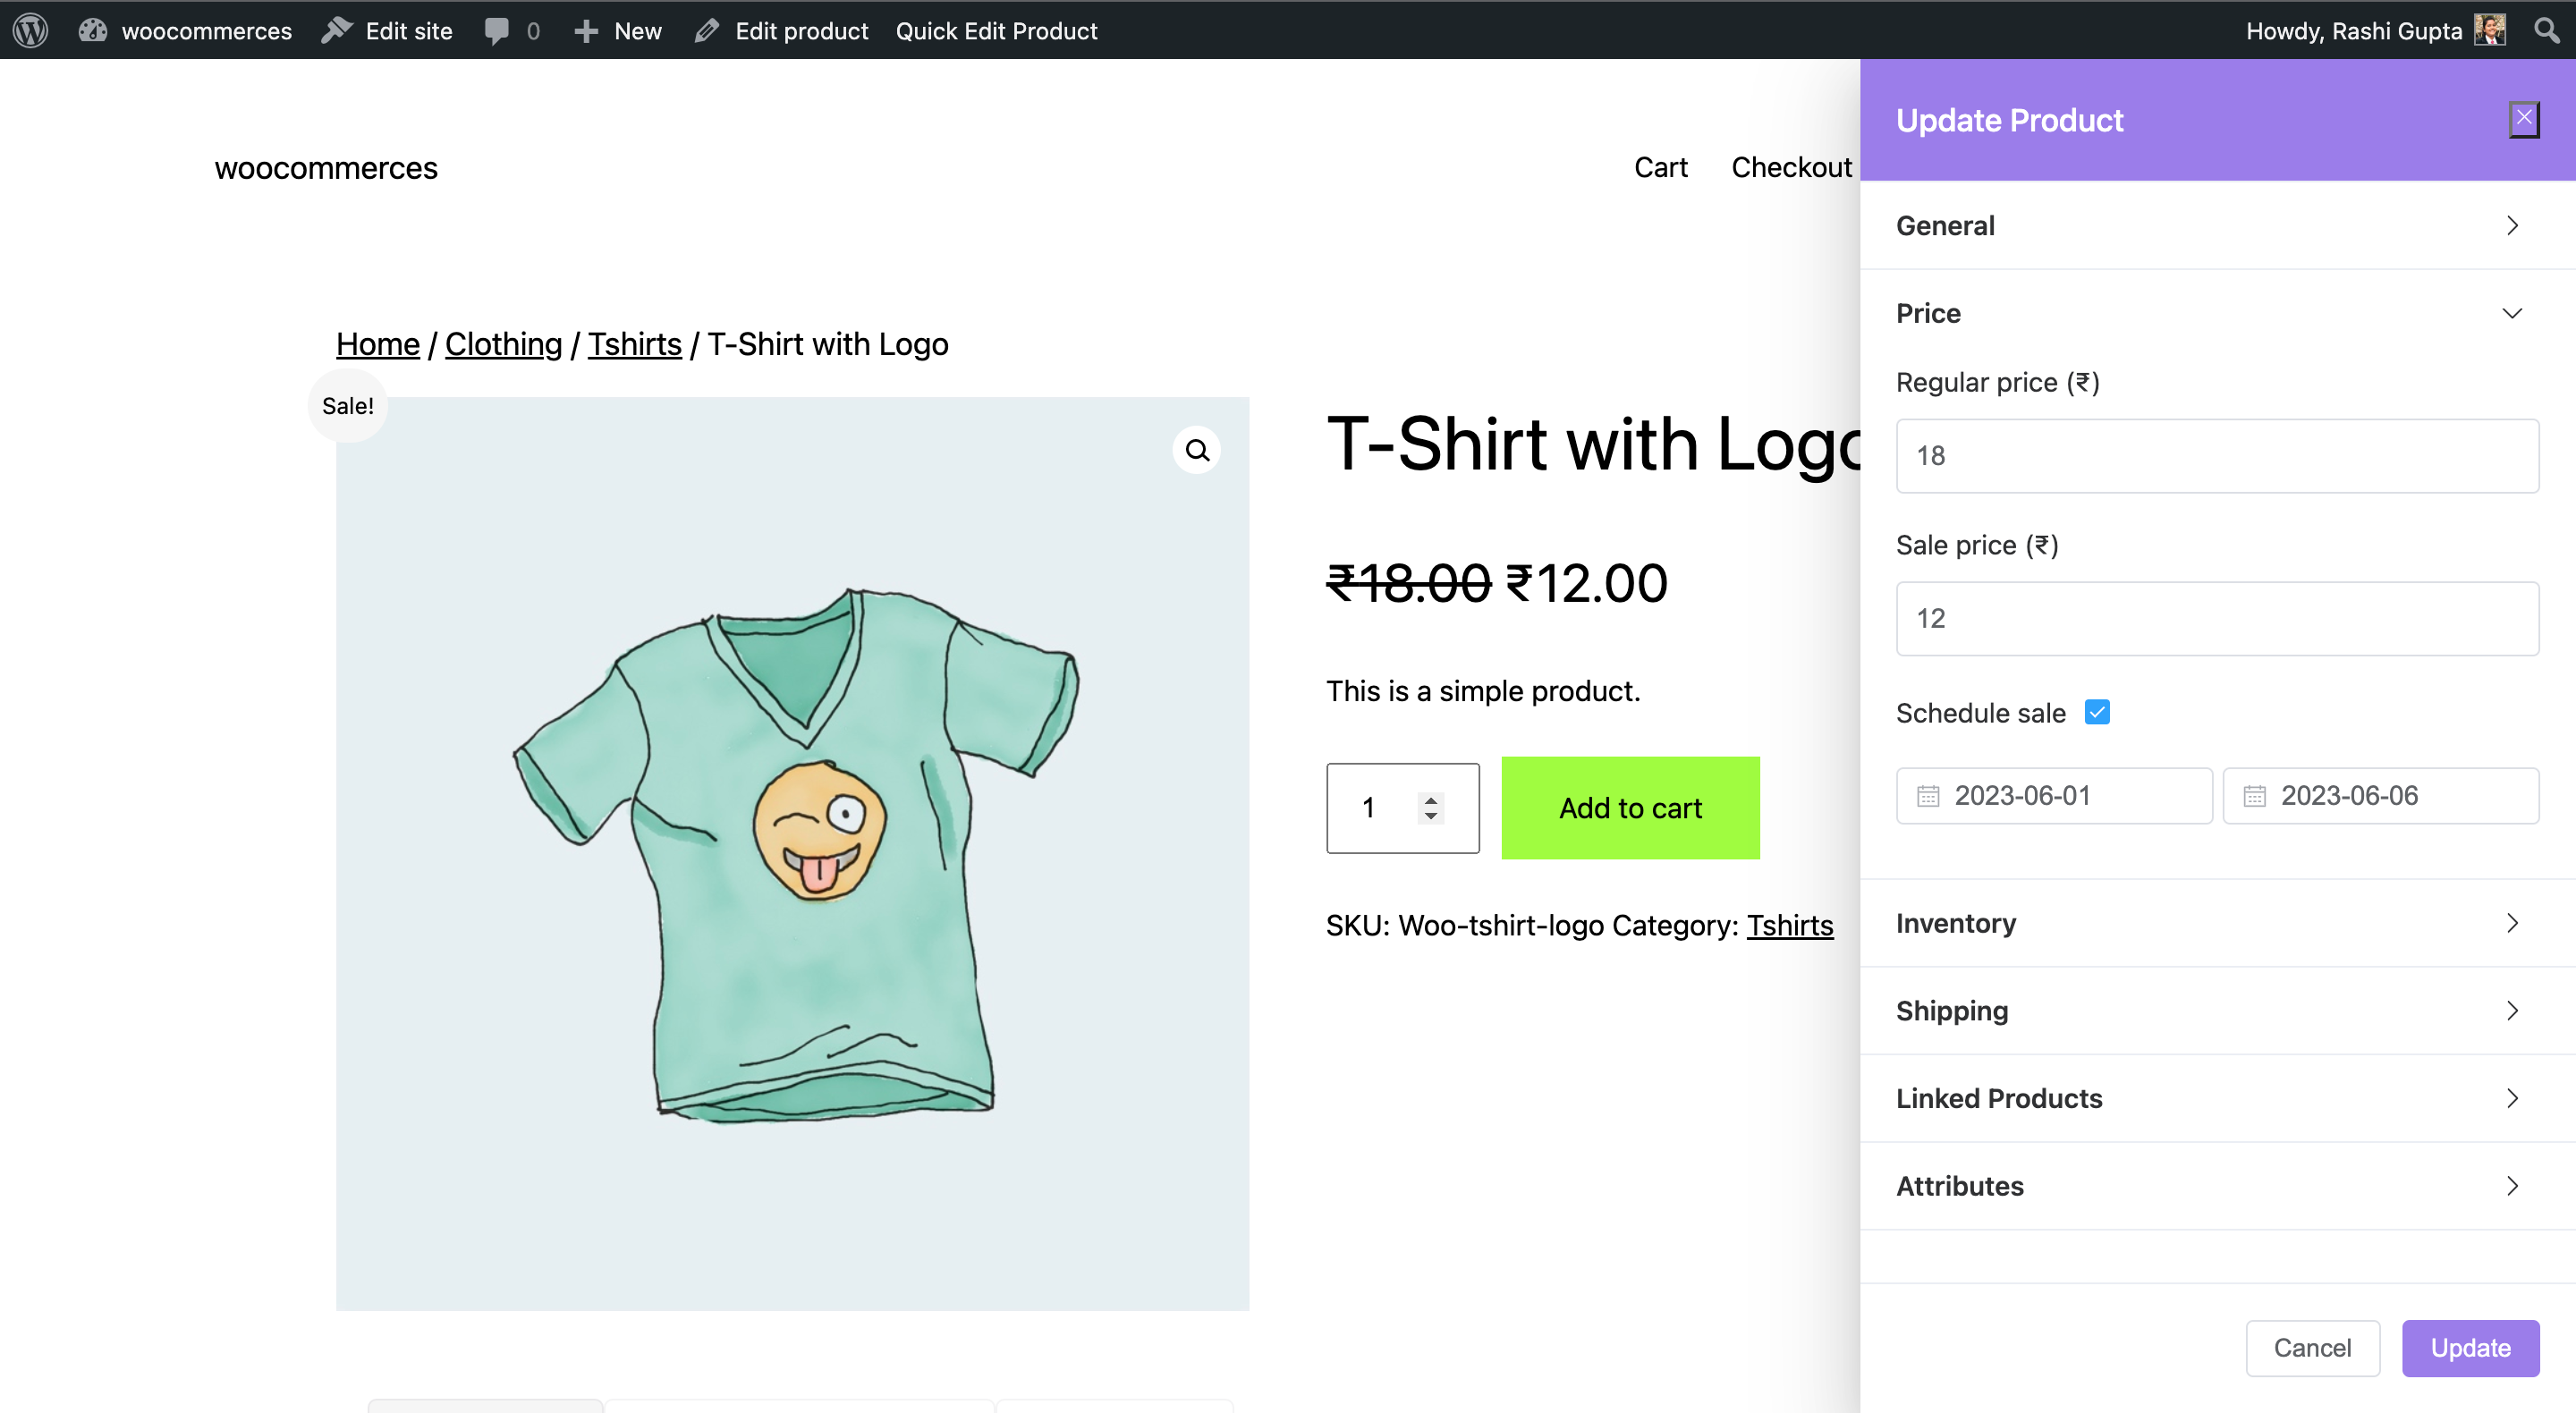
Price
- Regular Price: Set the price of the product.
- Sale Price: Enter the sale price.
- Schedule Sale: Enable the option if you wish to schedule the sale.
- Start Date: Set the sale start date.
- End Date: Set the sale end date.
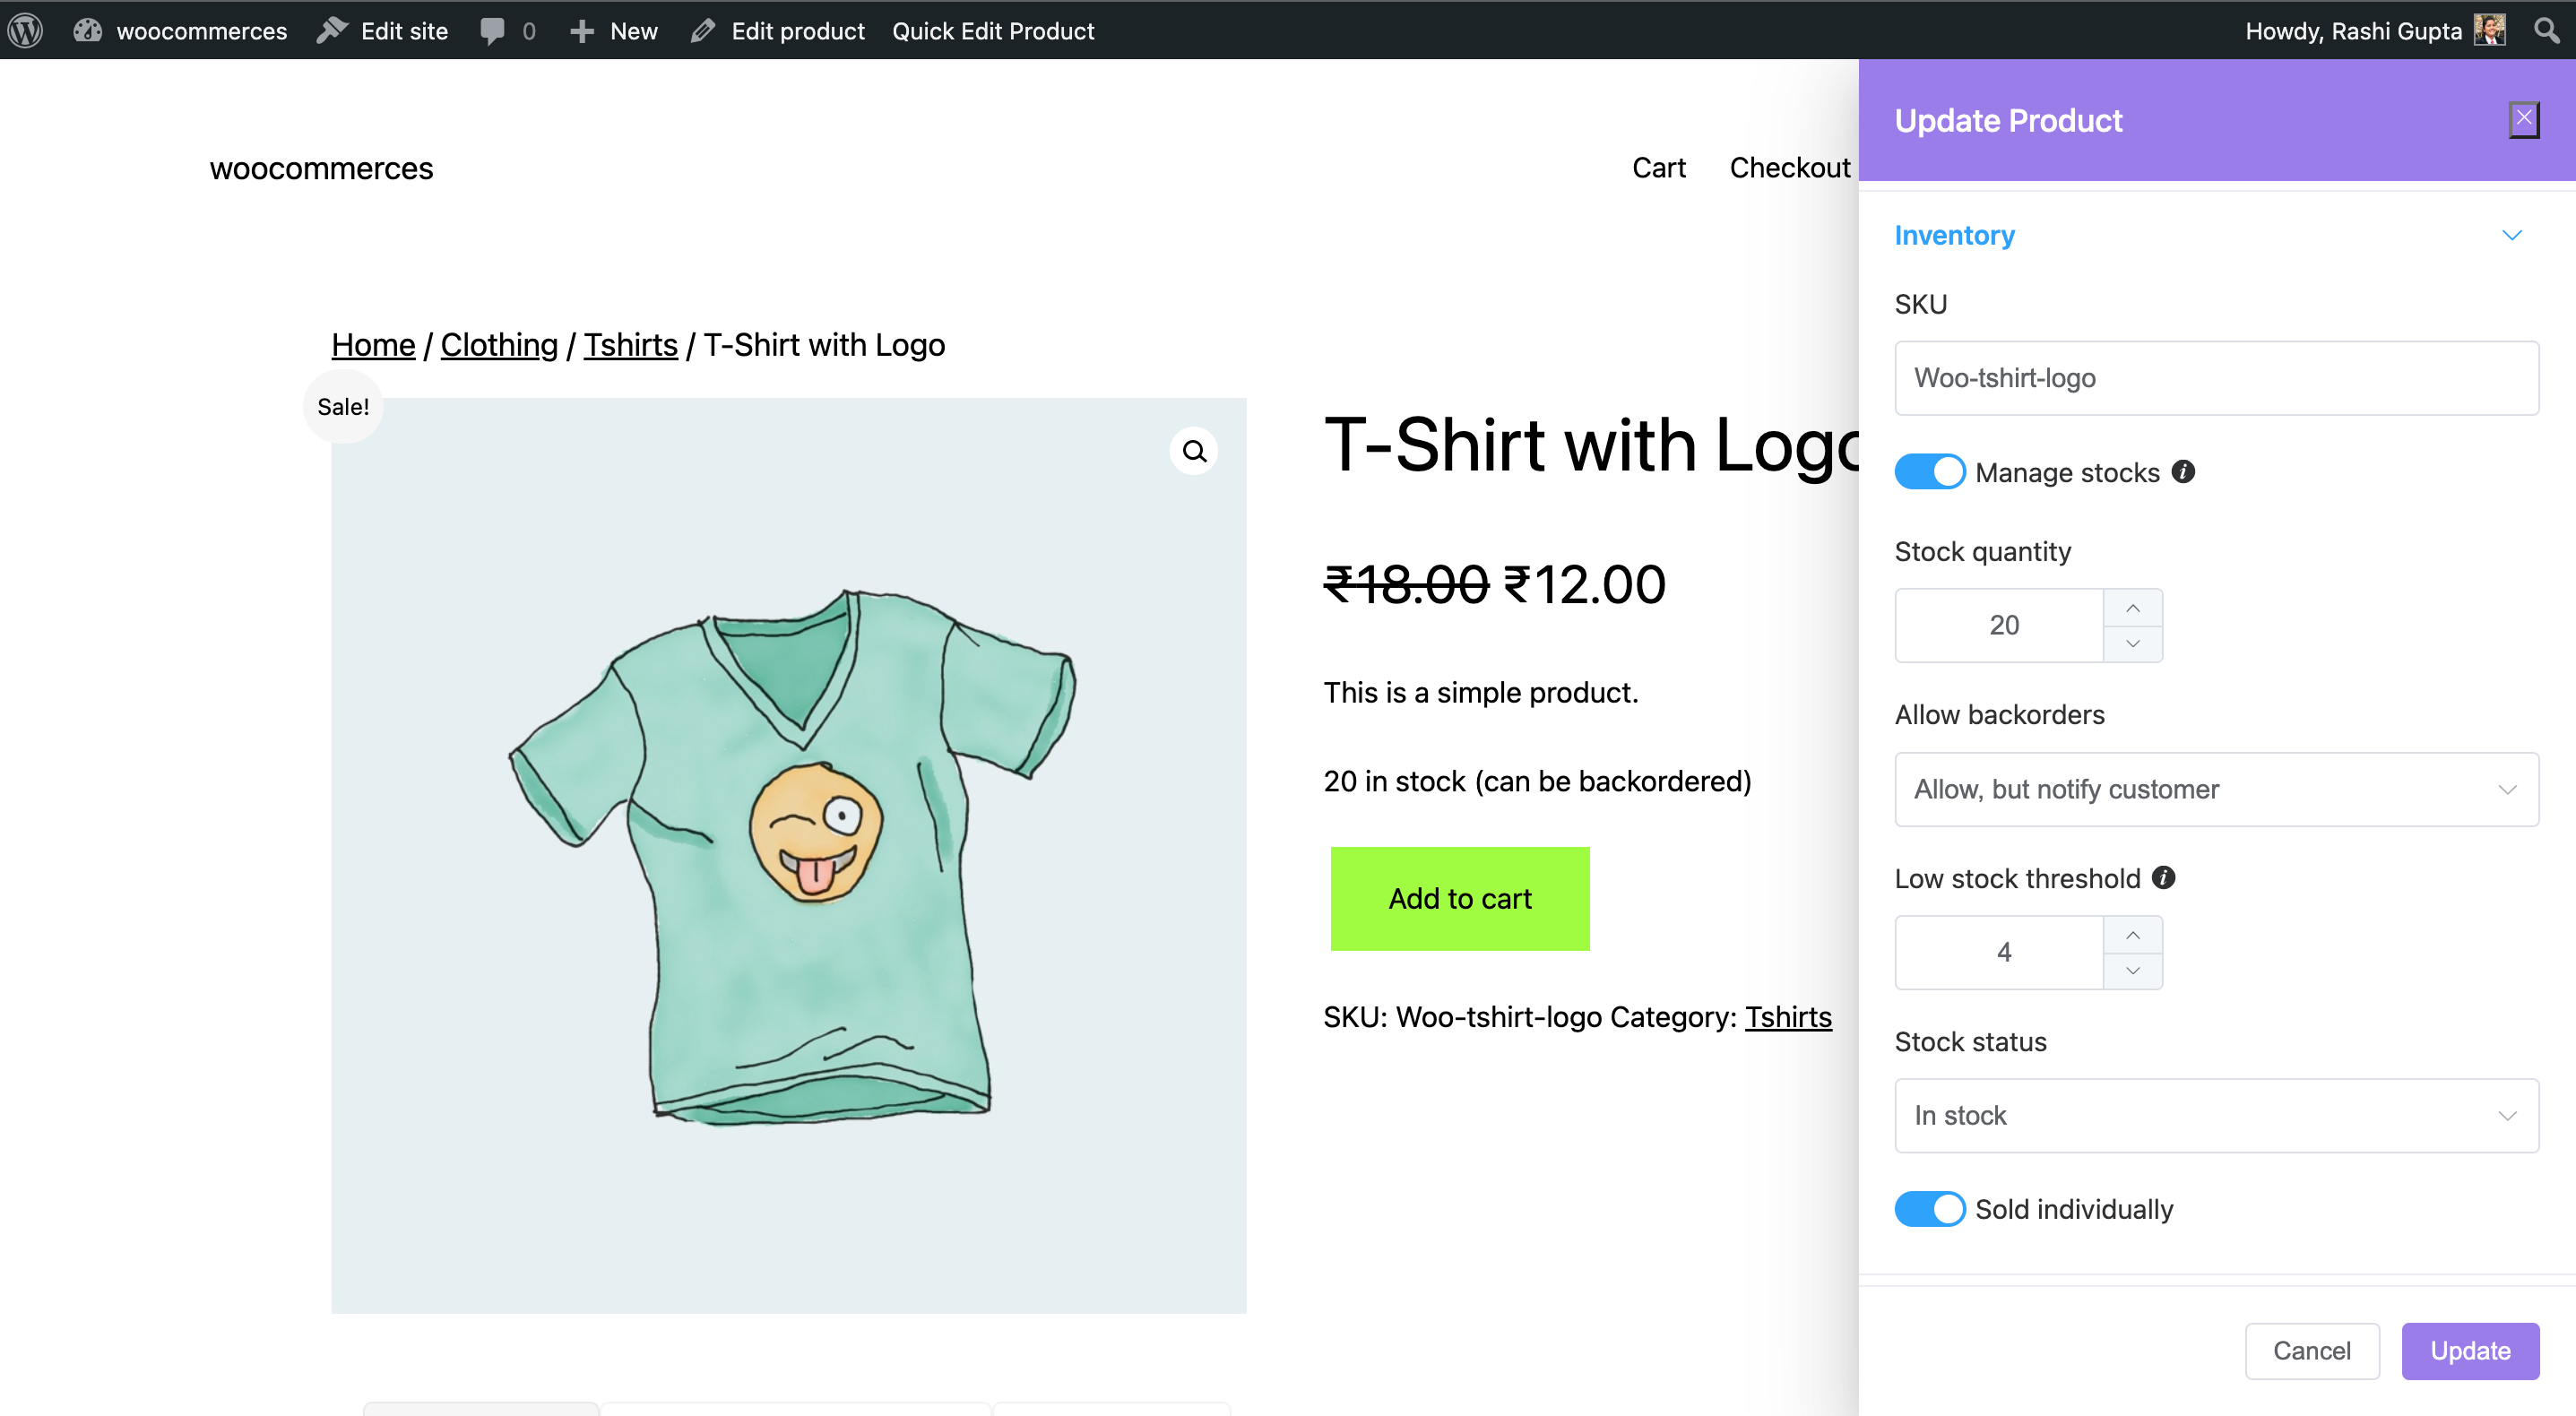
Inventory
- SKU: Enter the unique SKU for that product.
- Manage Stocks: Enable the option to manage the stock.
- Stock Quantity: Enter the quantity of product available.
- Allow backorders: Select whether to allow backorders.
- Low Order Threshold: Enter a number upon which you are notified.
- Stock Status: Select the option based on the product stock.
- Sold Individually: Enable the option to restrict the product to one per order.
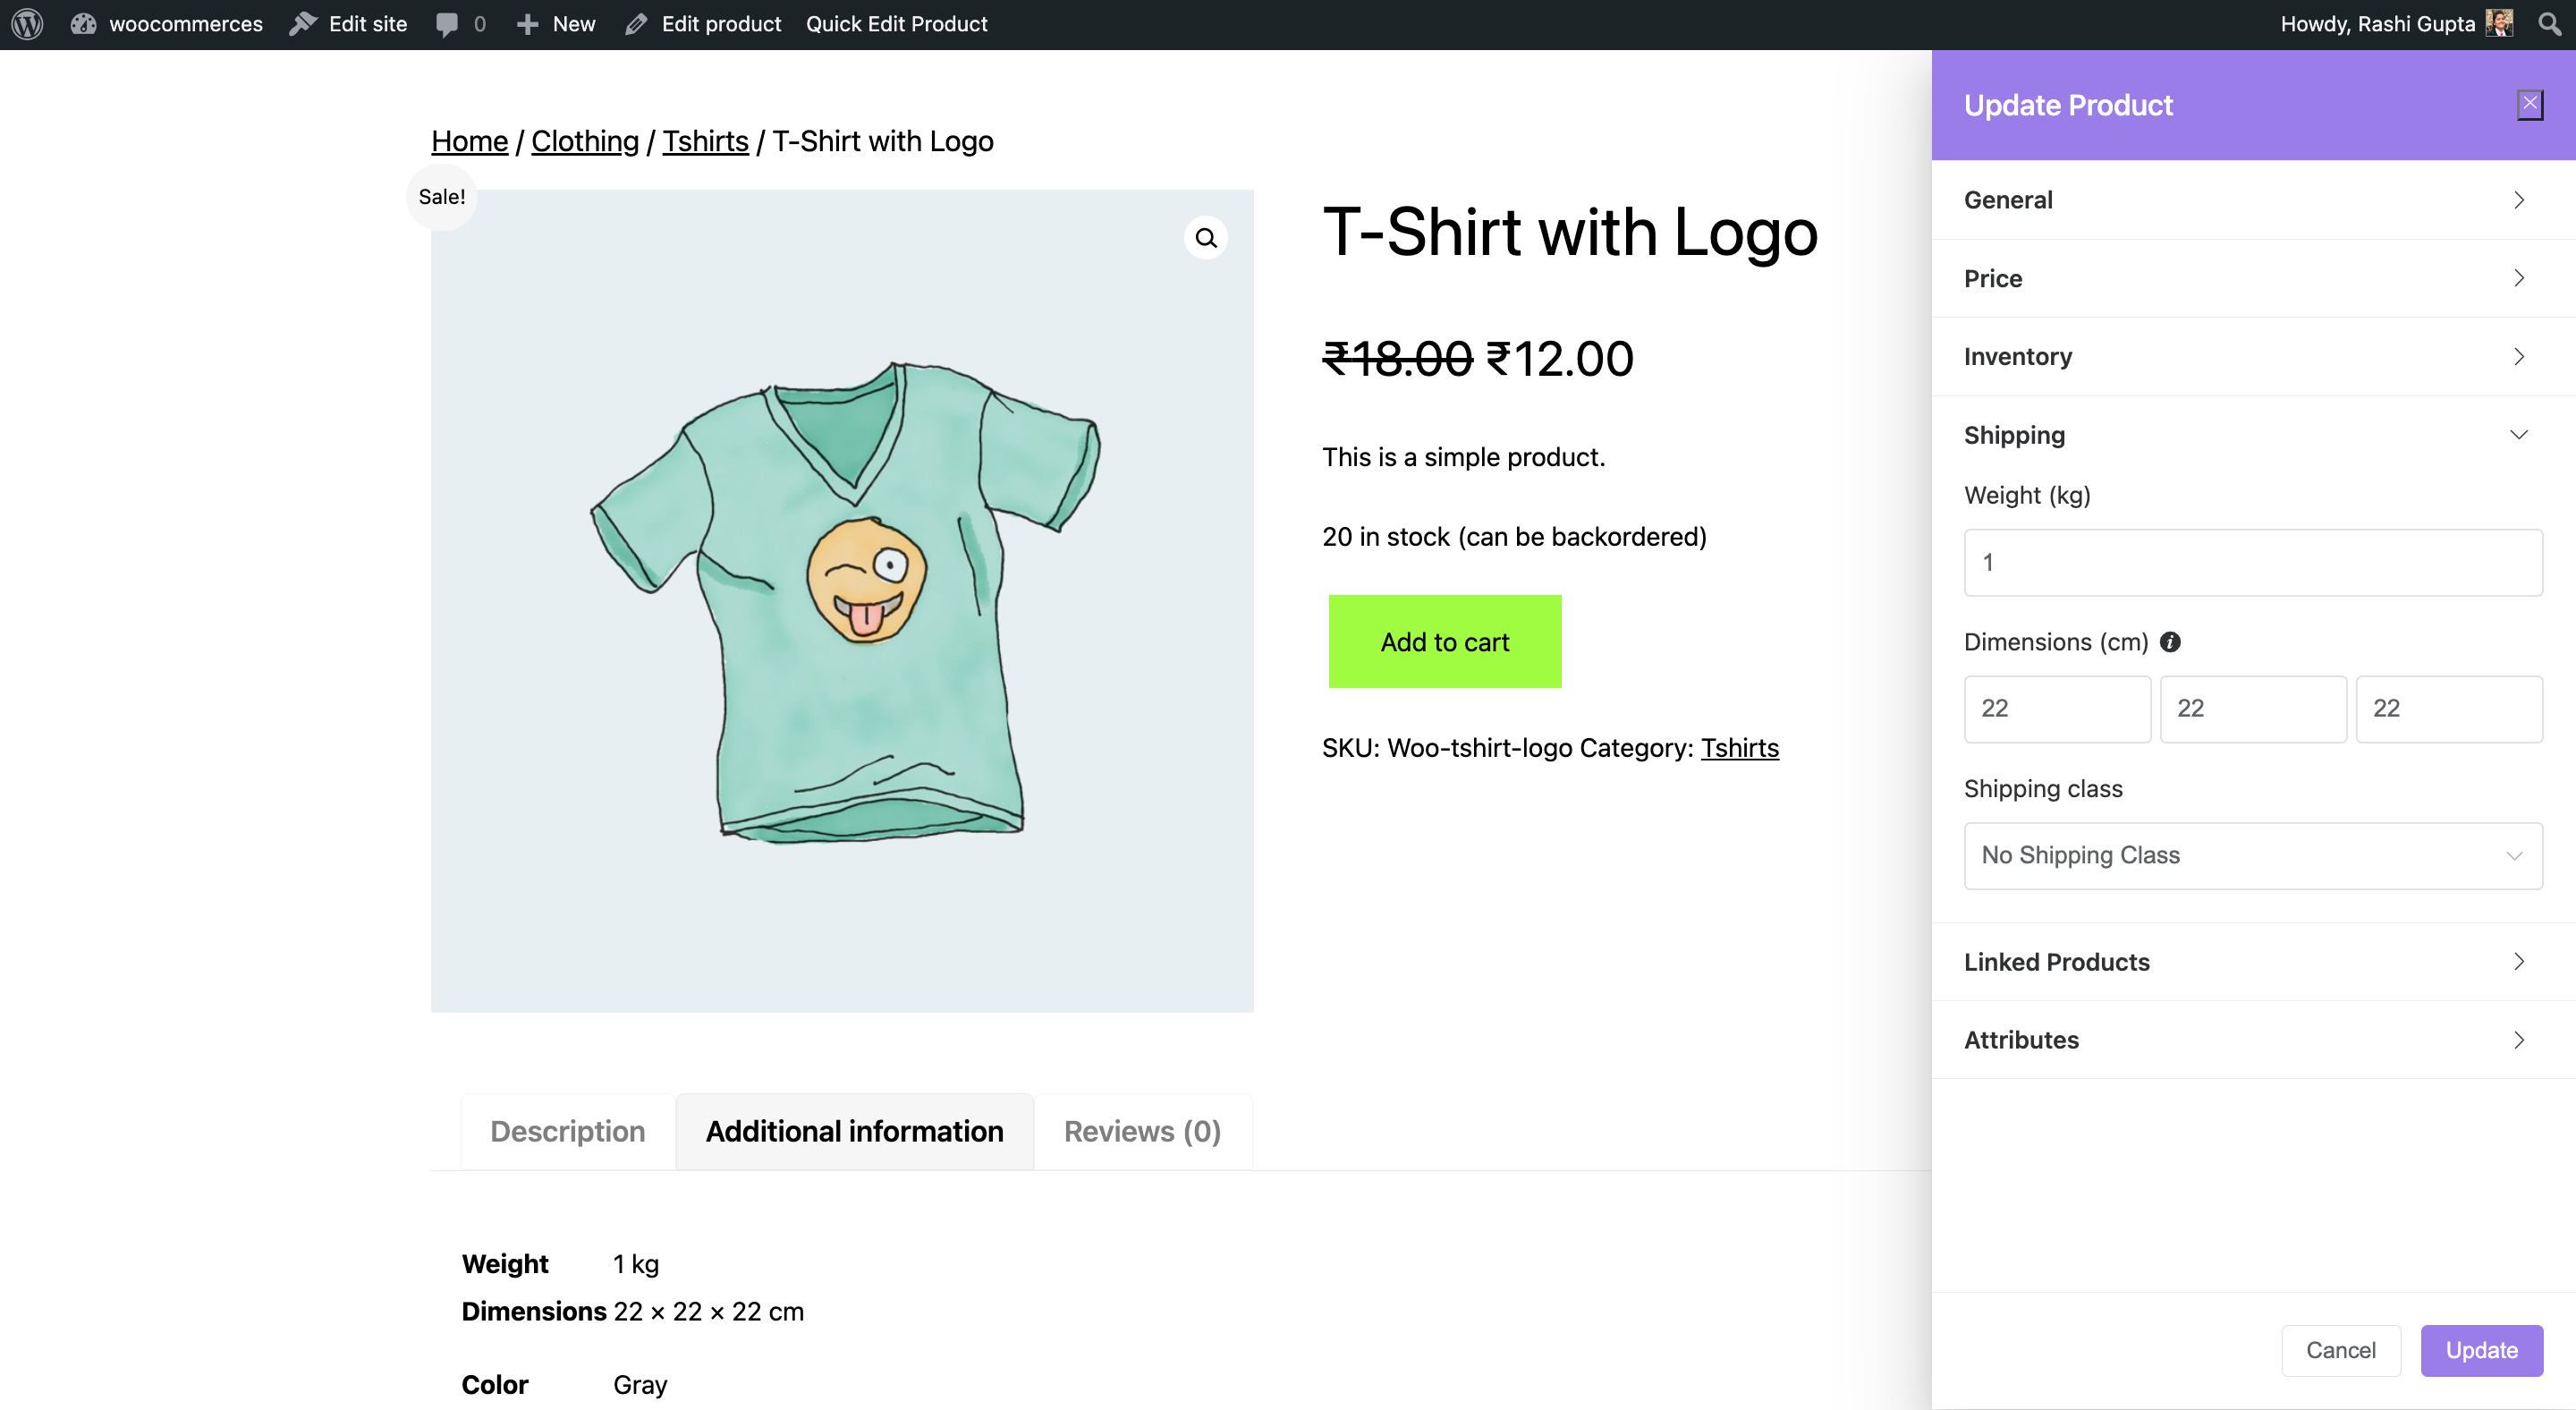
Shipping
- Weight: Enter the weight of the product.
- Dimension: Length, Width, and Height of the product.
- Shipping Class: Shipping classes are utilized by specific shipping methods to group similar products.
Linked Products
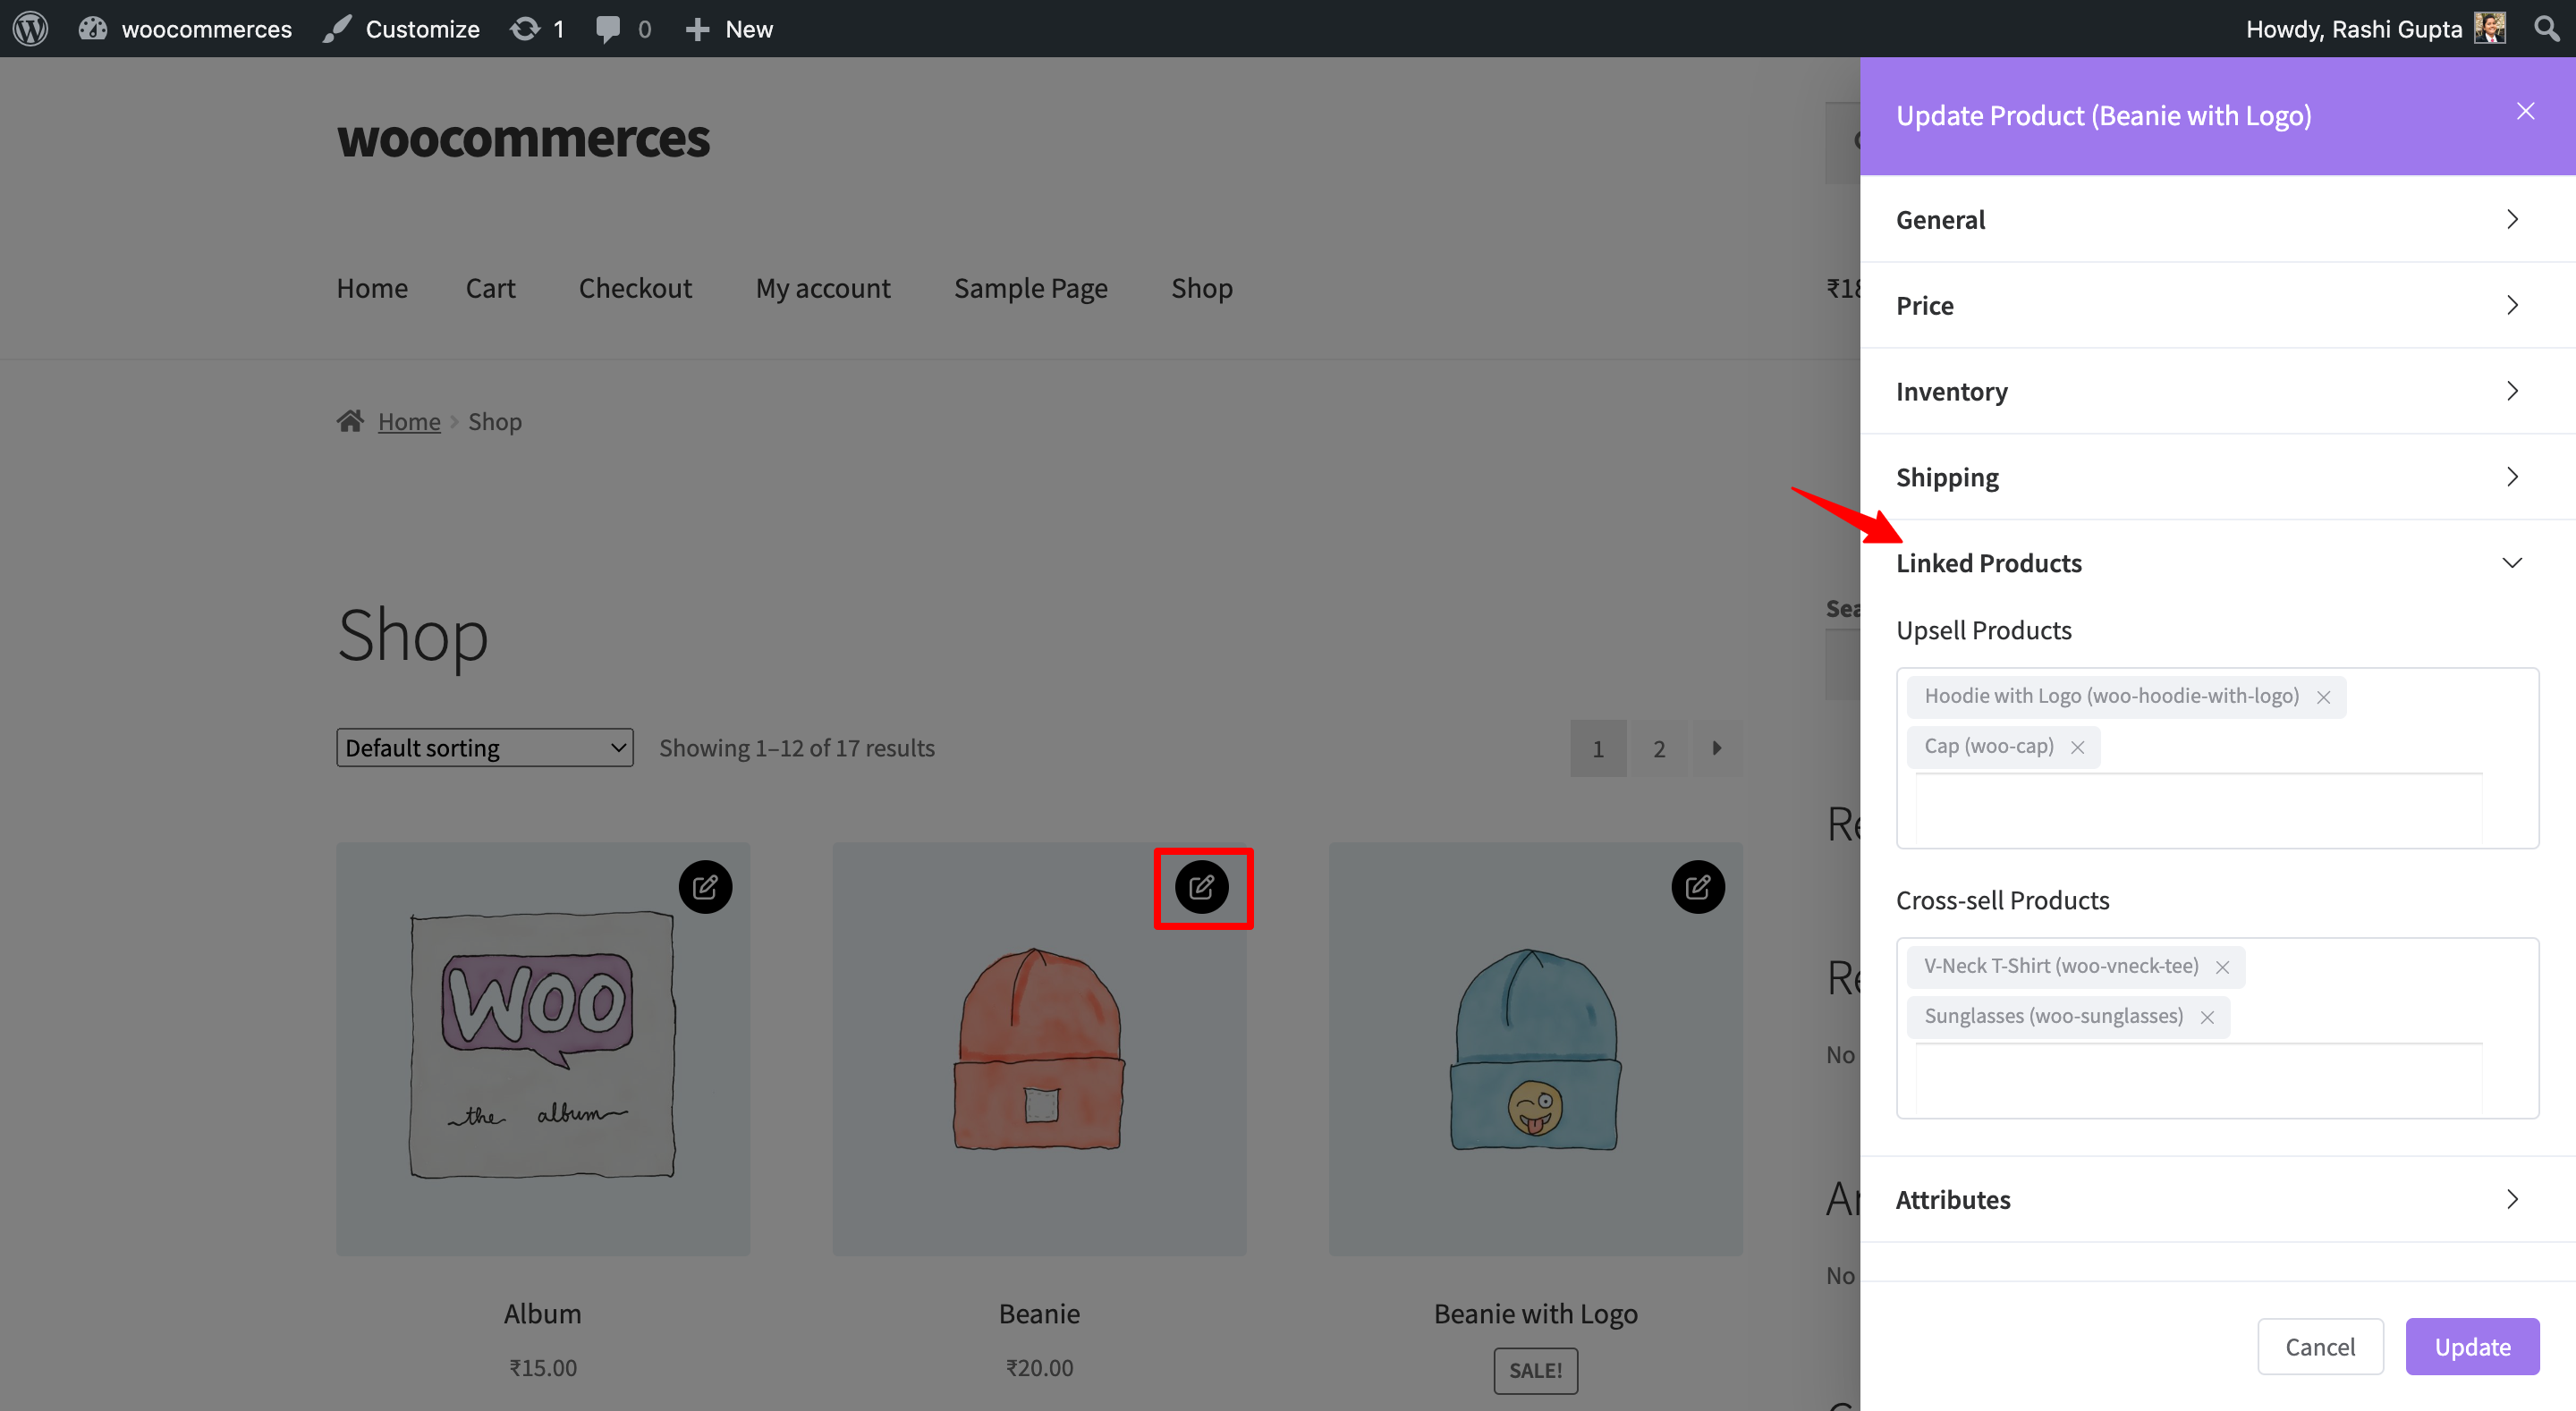
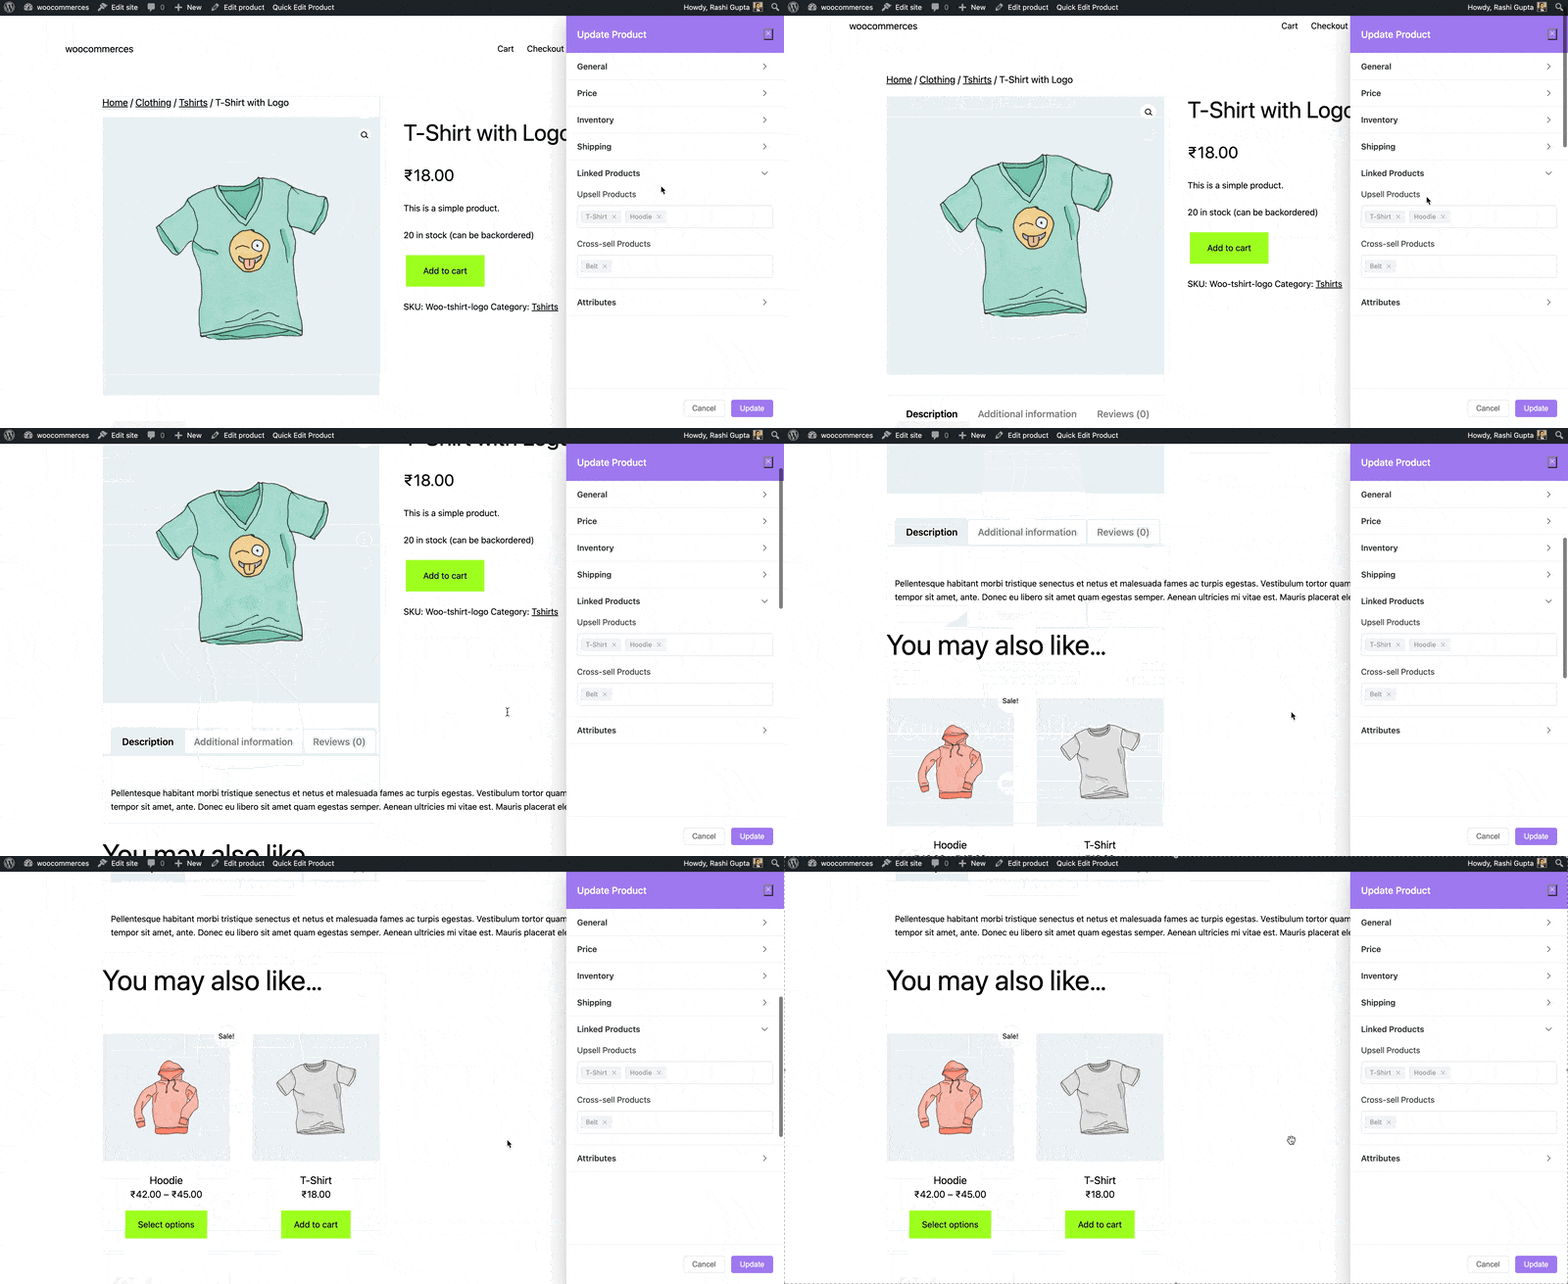
- Upsell Products: They are shown on the single product page. These are products that you may want to promote to users as upgrades based on the product they are currently viewing. For example, if a user is browsing the T-Shirt product listing page, you can display the Plain T-Shirt and Hoodie on that same page as an up-sell.
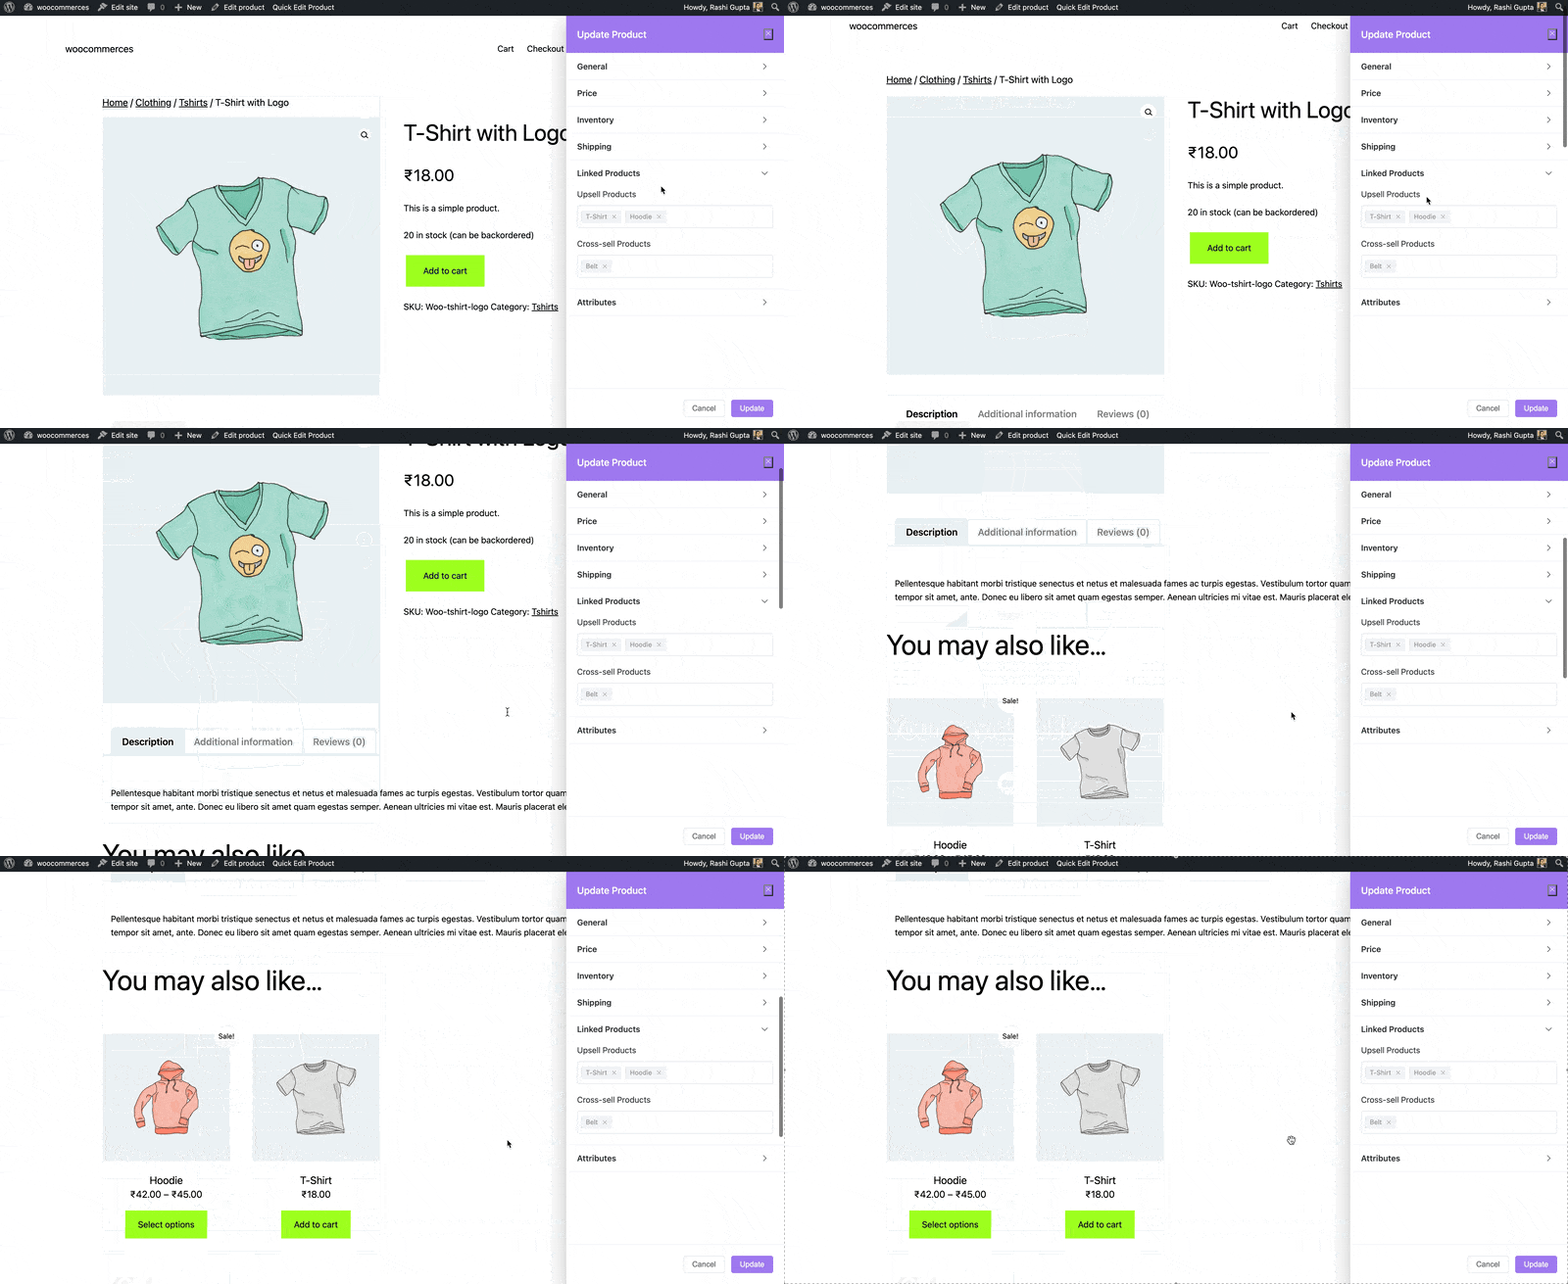
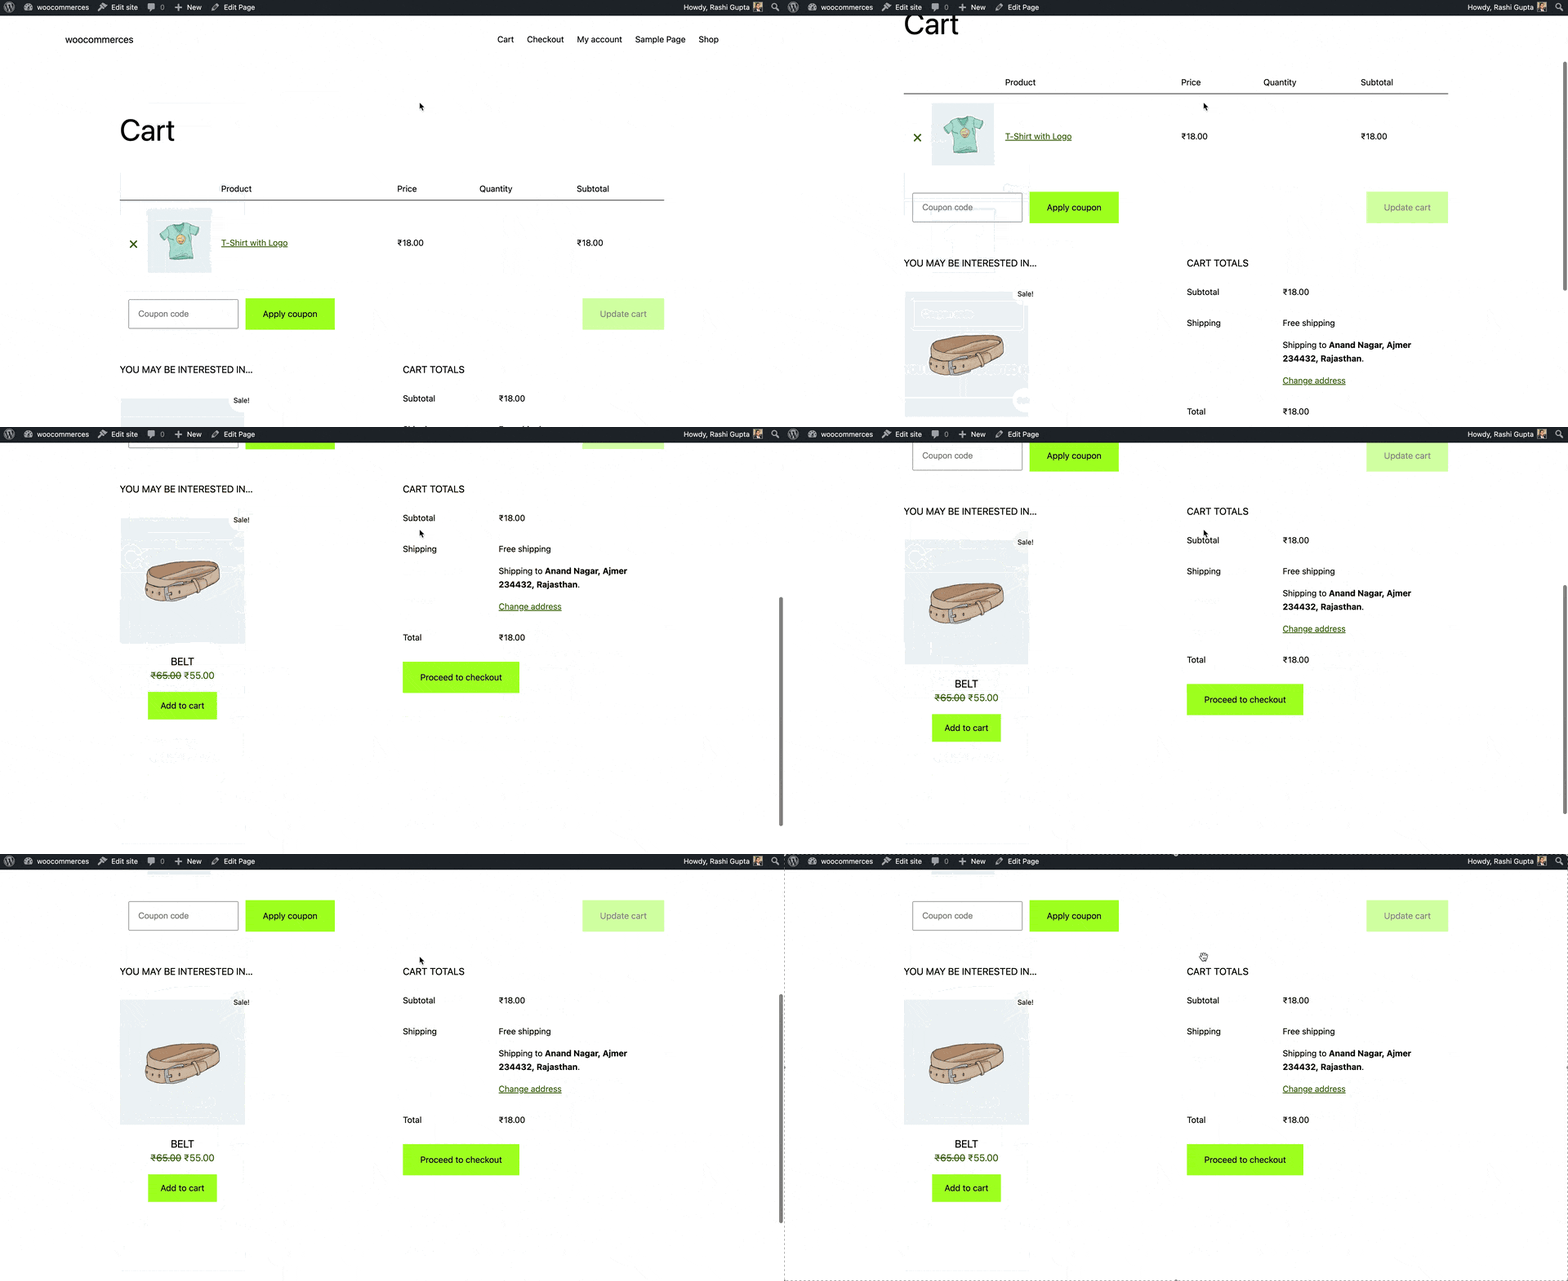
- Cross-sell Products: Cross-sells are products that are presented along with the cart and are related to the items in the user’s cart. For instance, if a user adds a smartphone to their cart, you may suggest they consider purchasing a phone case when they reach the cart page.
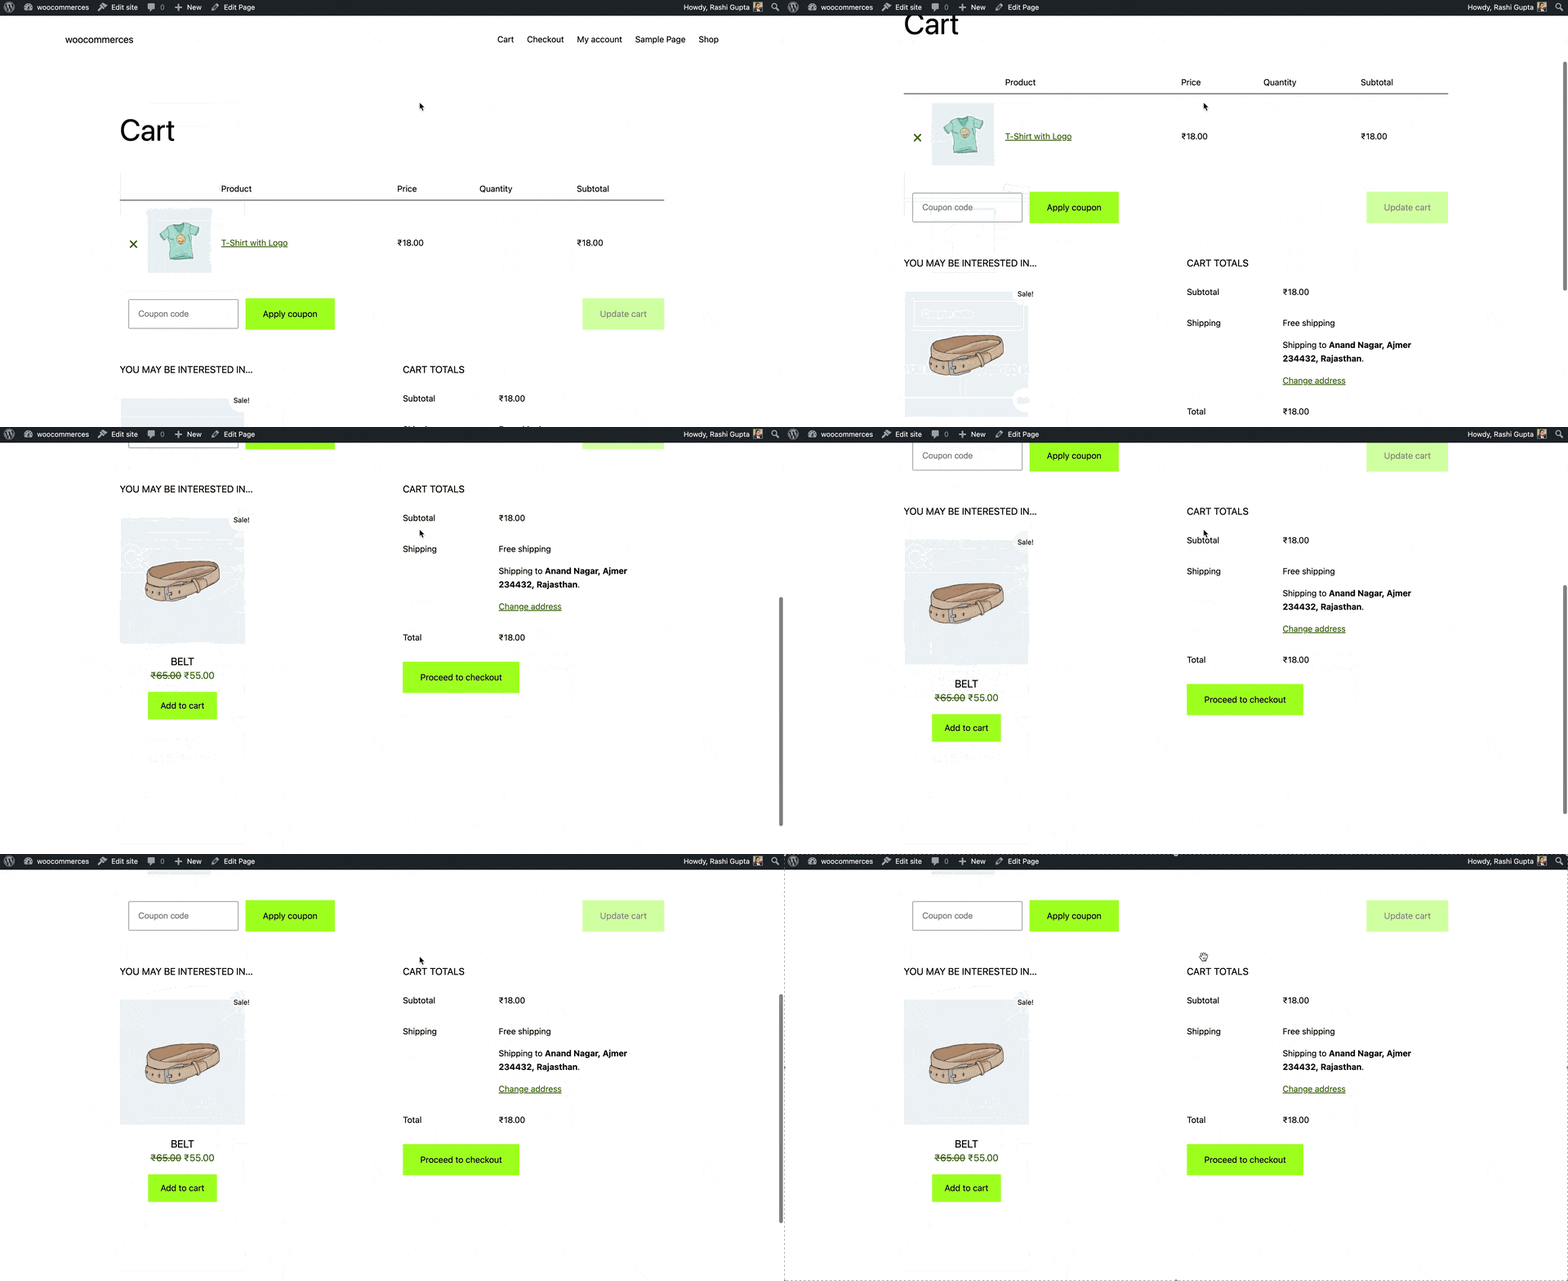
Please check our detailed article on Upsell & Cross-sell. It will provide you with a deeper understanding of these techniques and how they can be effectively implemented in your business.
Attributes
- Custom Attribute: Add the custom attributes by clicking on the “Add Attribute” option, and you can also hide the attribute on the frontend by keeping the “Visible on Product Page” option disabled.
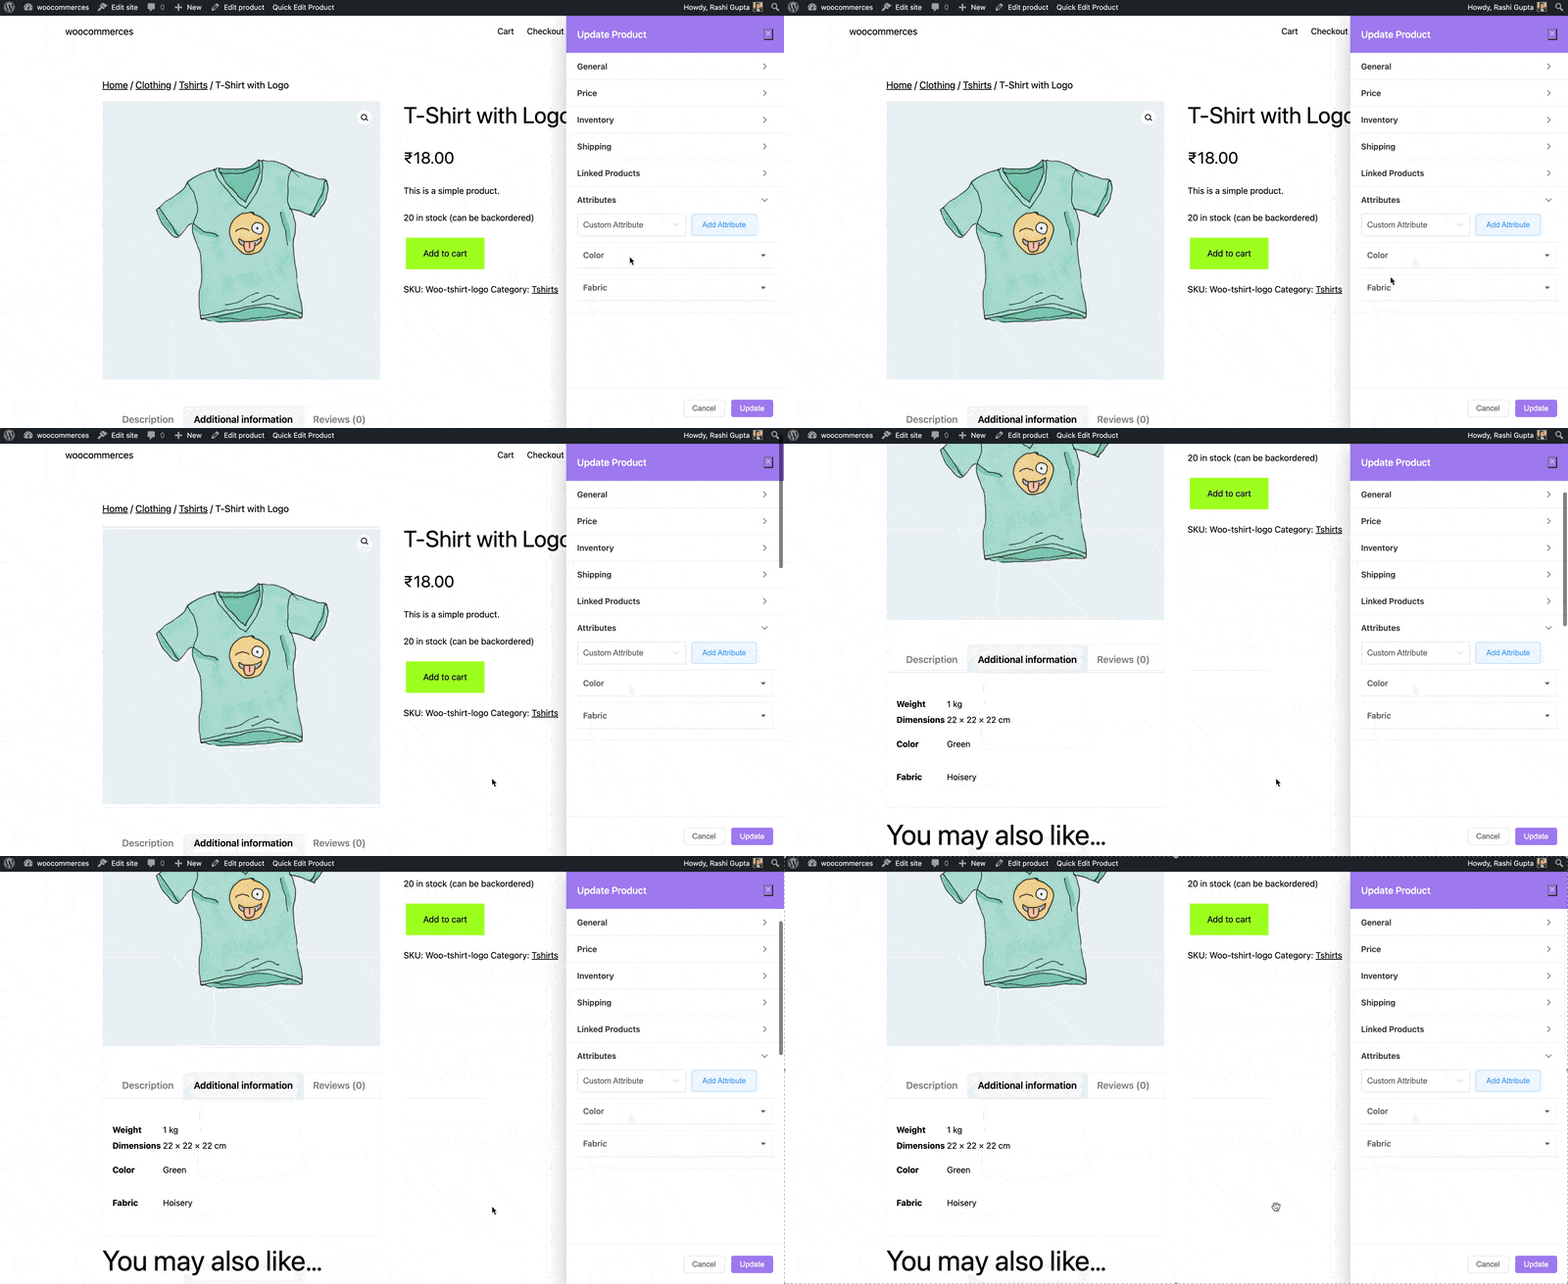
How to Edit External & Affiliate Products on Frontend
External or Affiliate Products in WooCommerce are used to redirect your user to external websites or platforms. Instead of purchasing the product directly from your website, customers are redirected to another website/platform to complete the purchase. This allows you to promote and earn a commission from affiliate products or showcase products from other sellers. These types of products can be edited using the pro version of our Frontend Product Editor plugin.
Once you click on the edit button, you will have access to a set of settings that allow you to edit the product details. Here, you will learn about How to Edit Products On Frontend?
General
- Product Name: Enter the name of a product.
- Description: Set the description for a product.
- Short Description: Enter the short description of a product.
- Catalog Visibility: Select the catalog visibility from the available options.
- Is Featured: Enable the option if needed.
- Categories: Select the categories for a product.
- Tags: Add the tags for a product, if any.
- Product Image: Add an image of a product.
- Product Gallery: Add a gallery of product images, if needed.
- Product URL: Enter the link from where users can purchase a product.
- Buy Text: Change the Add To Cart button text to your preferred text.
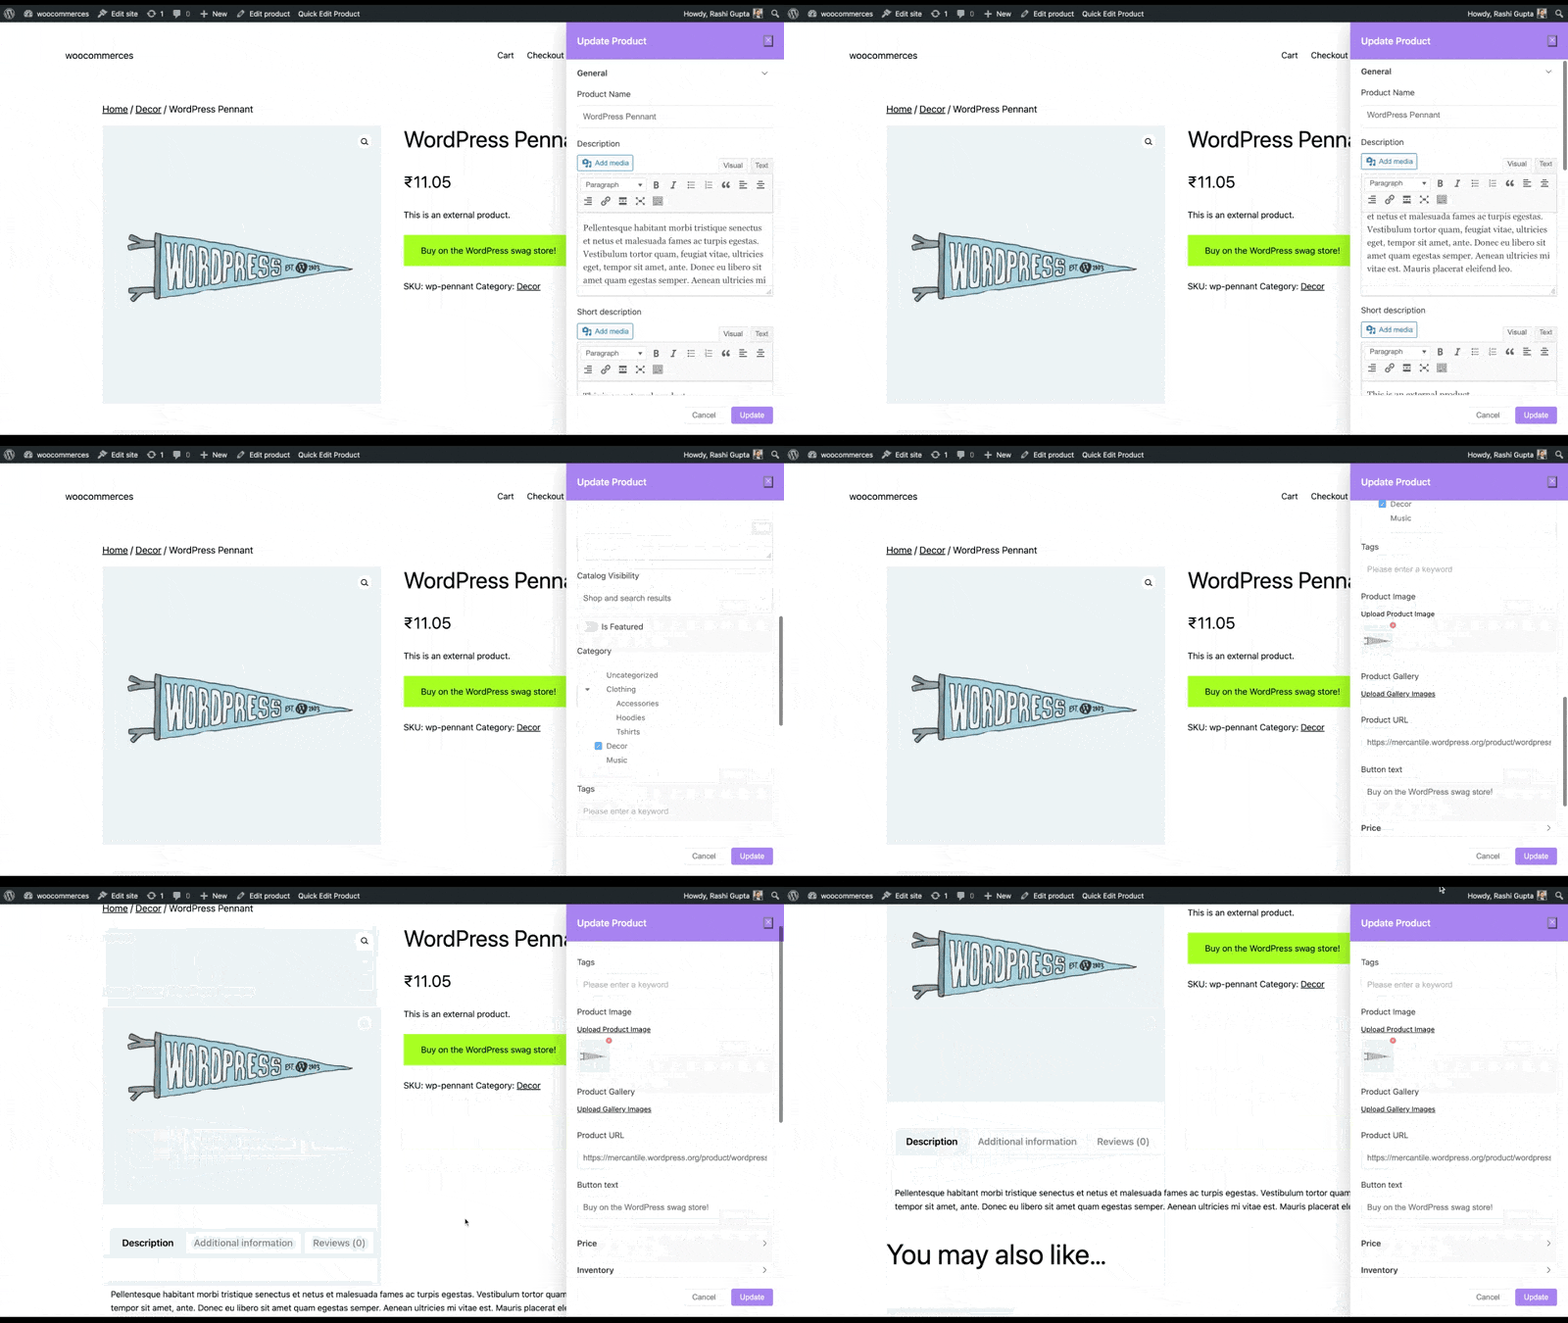
Price
- Regular Price: Set the price of a product.
- Sale Price: Enter the sale price.
- Schedule Sale: Enable the option if you wish to allow the sale of a product.
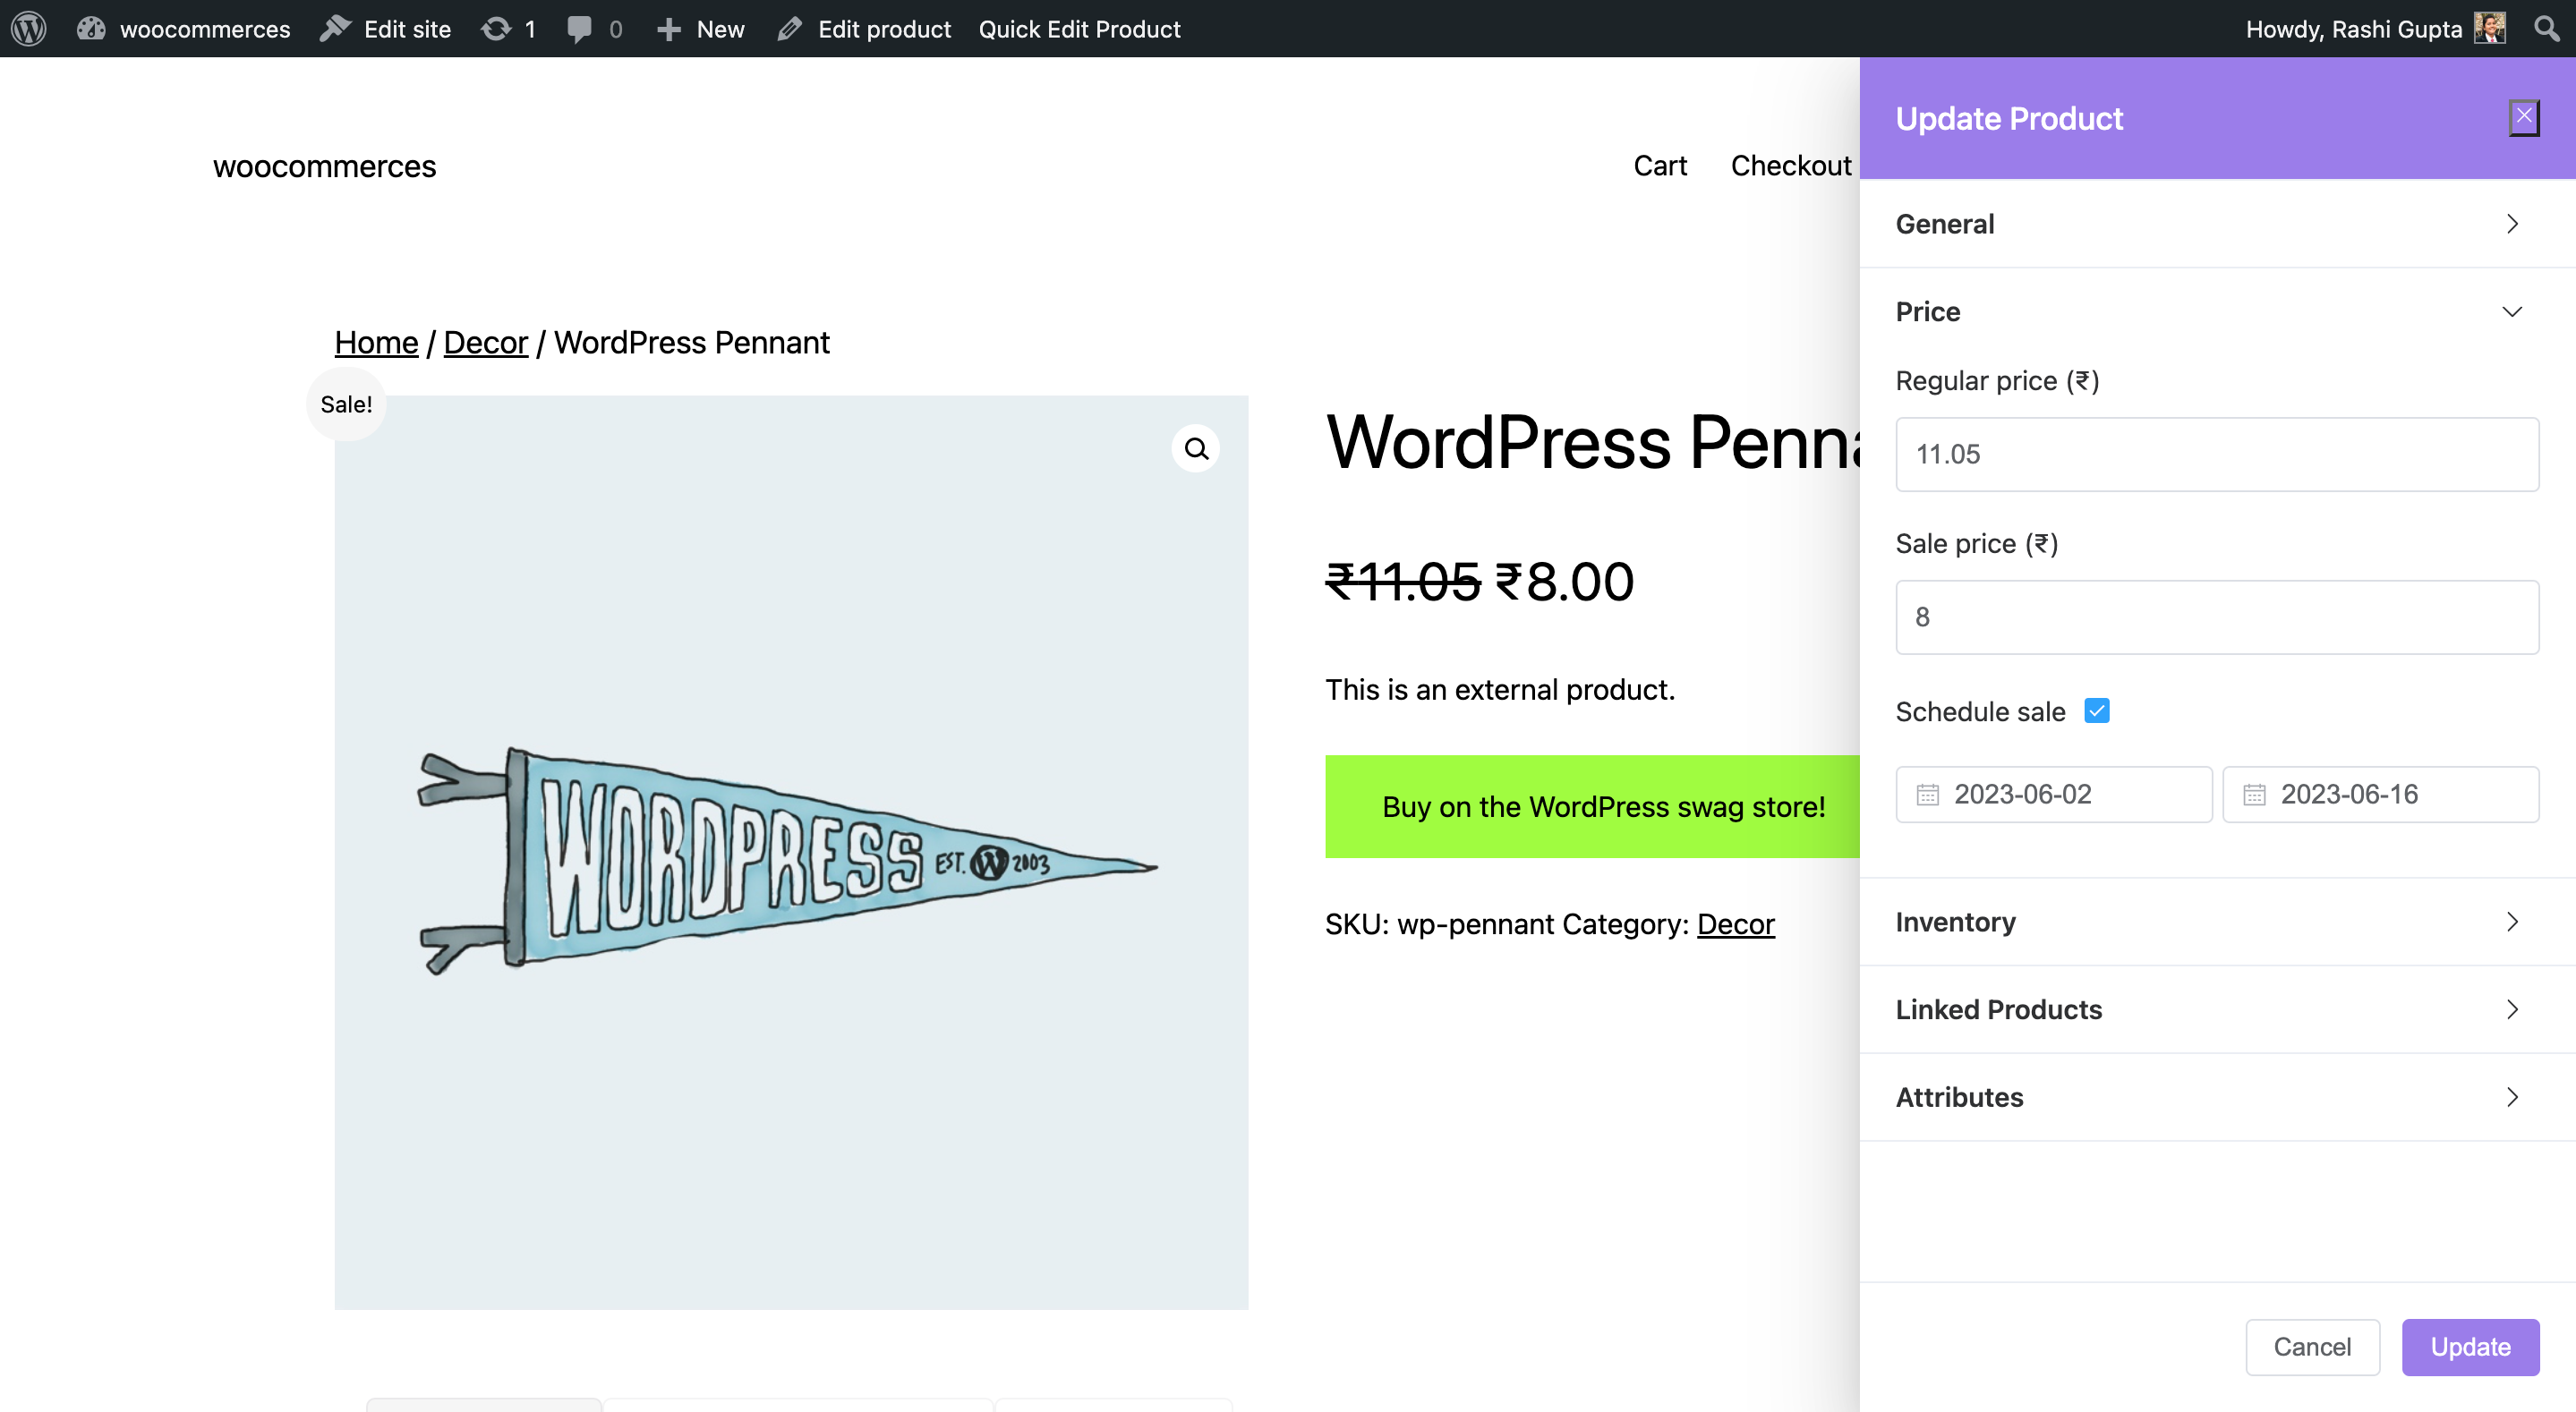
Inventory
- SKU: Enter the unique SKU for that product.
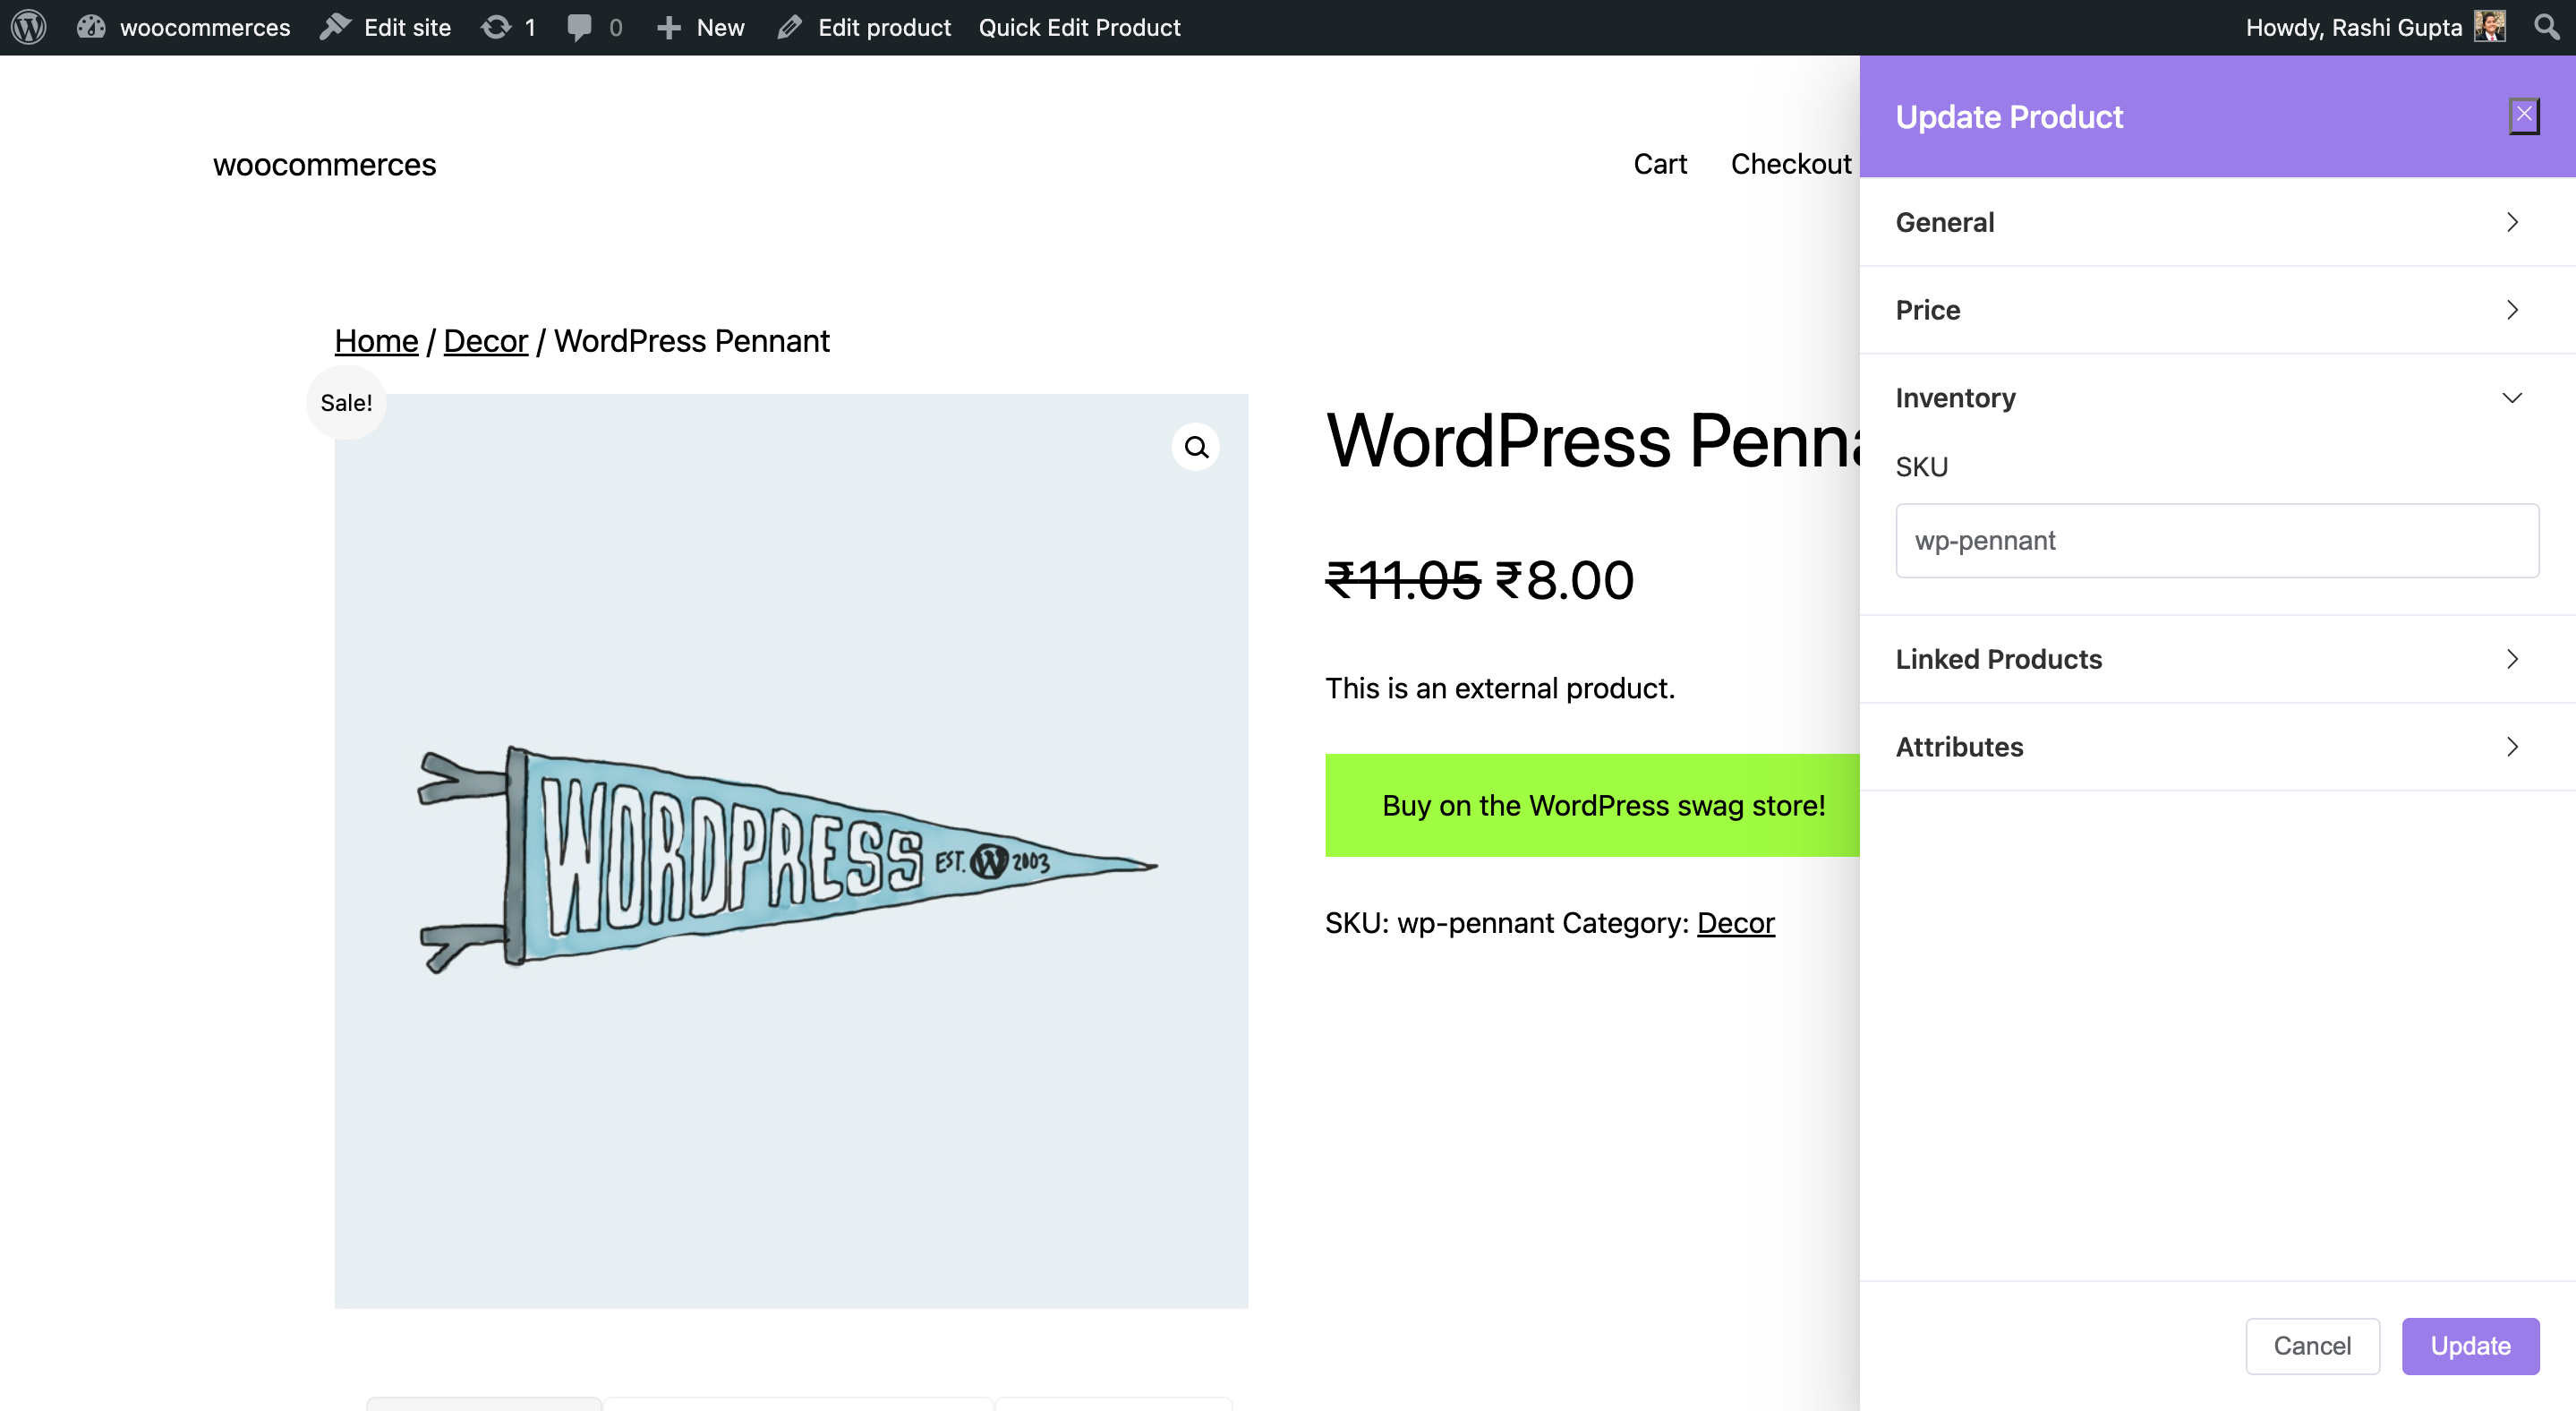
Linked Products
- Upsell Products: These products in WooCommerce are displayed on the product details page as recommendations for users to consider as upgrades to the product they are currently viewing. For example, if a user is browsing the WordPress Pennant, you can display the album on that same page as an up-sell.
Please check our detailed article on Upsell & Cross-sell. It will provide you with a deeper understanding of these techniques and how they can be effectively implemented in your business.
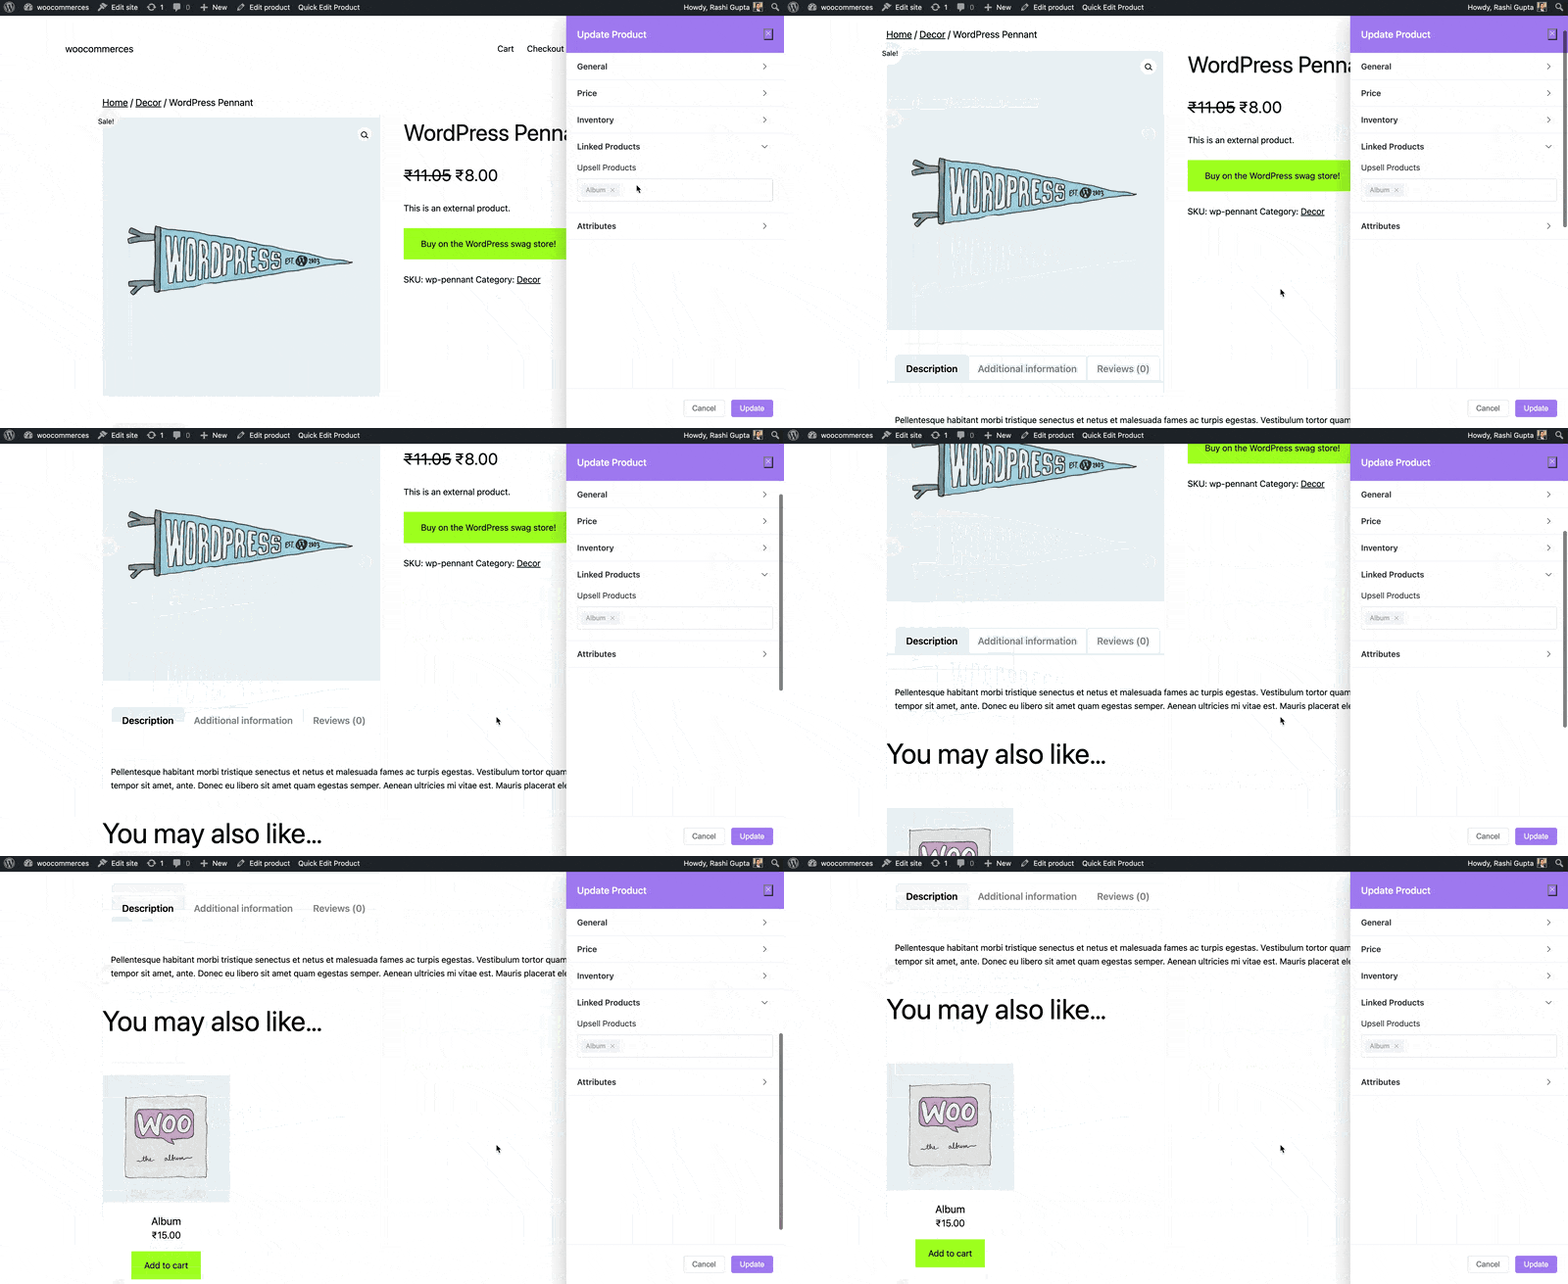
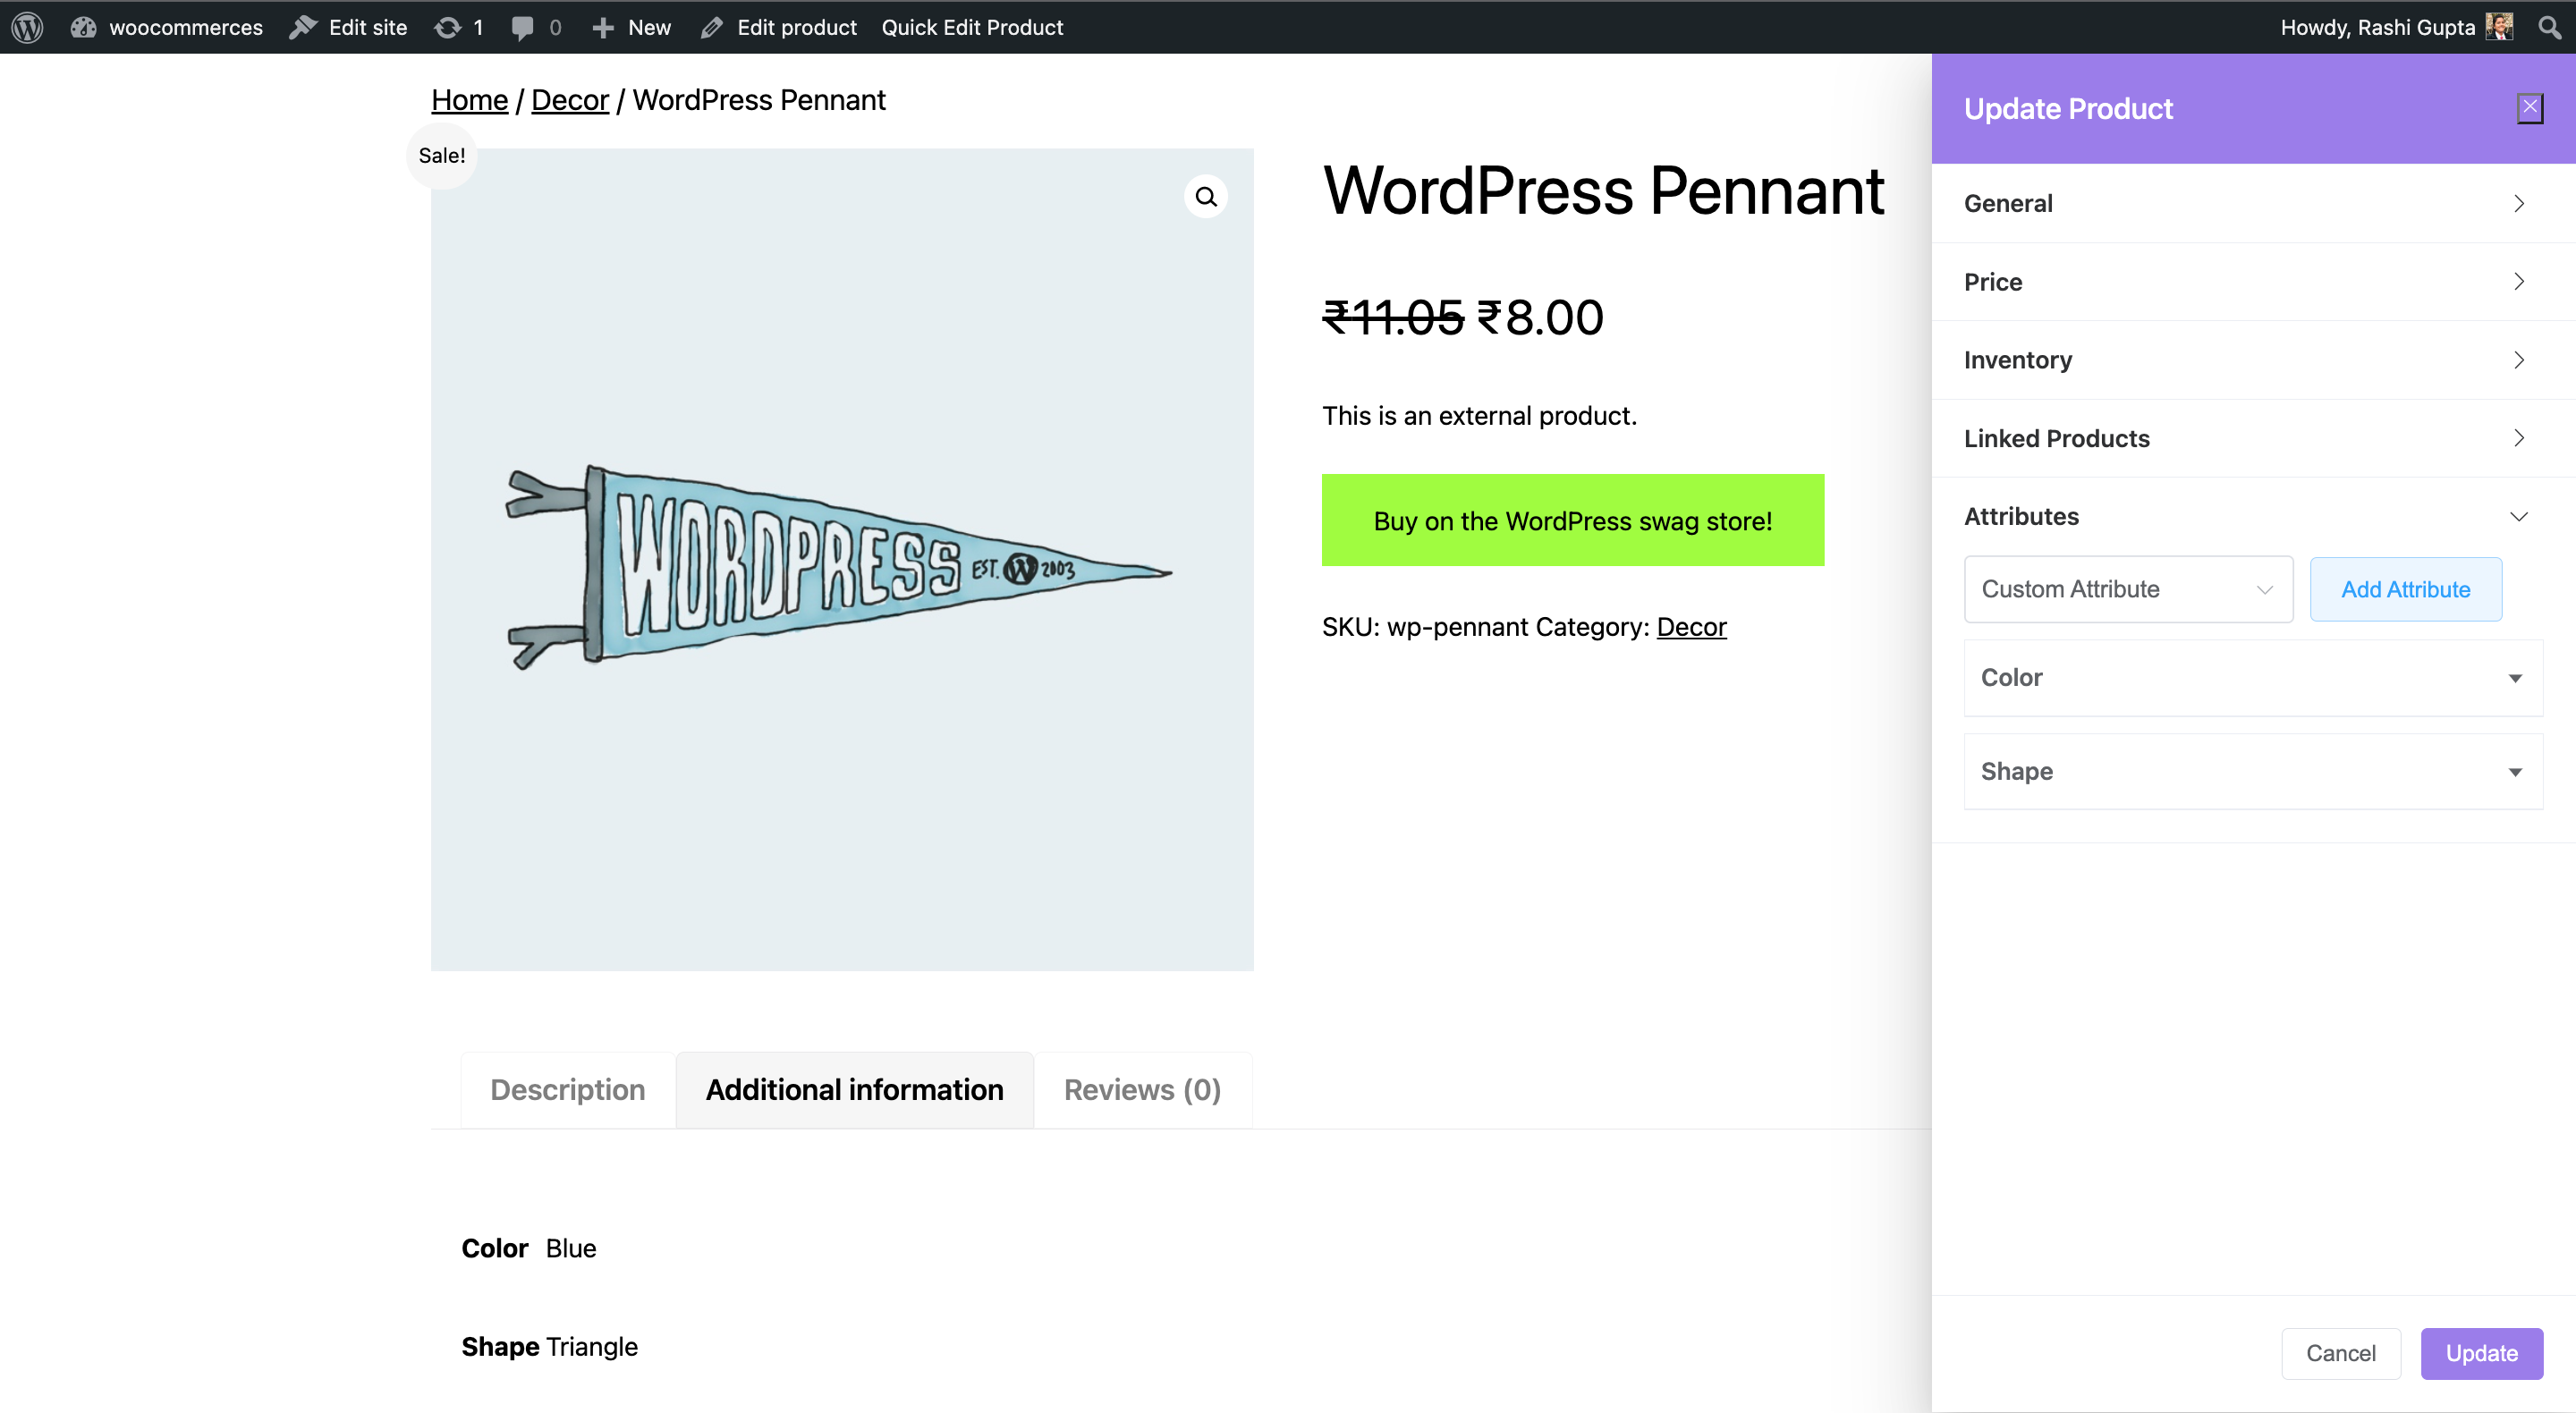
Attributes
To add custom attributes, you can click on the “Add Attribute” option, which will be displayed in the Additional Information section of the product. You can also hide the attribute on the frontend by keeping the “Visible on Product Page” option disabled.
How to Edit Grouped Products on Frontend
It allows users to combine multiple related products together as a single offering. This feature is particularly useful when you want to sell a collection of items as a bundle or offer options for customers to choose from within a product group. By grouping products, you can provide customers with the convenience of purchasing multiple items in one go, encouraging upsells and increasing customer satisfaction.
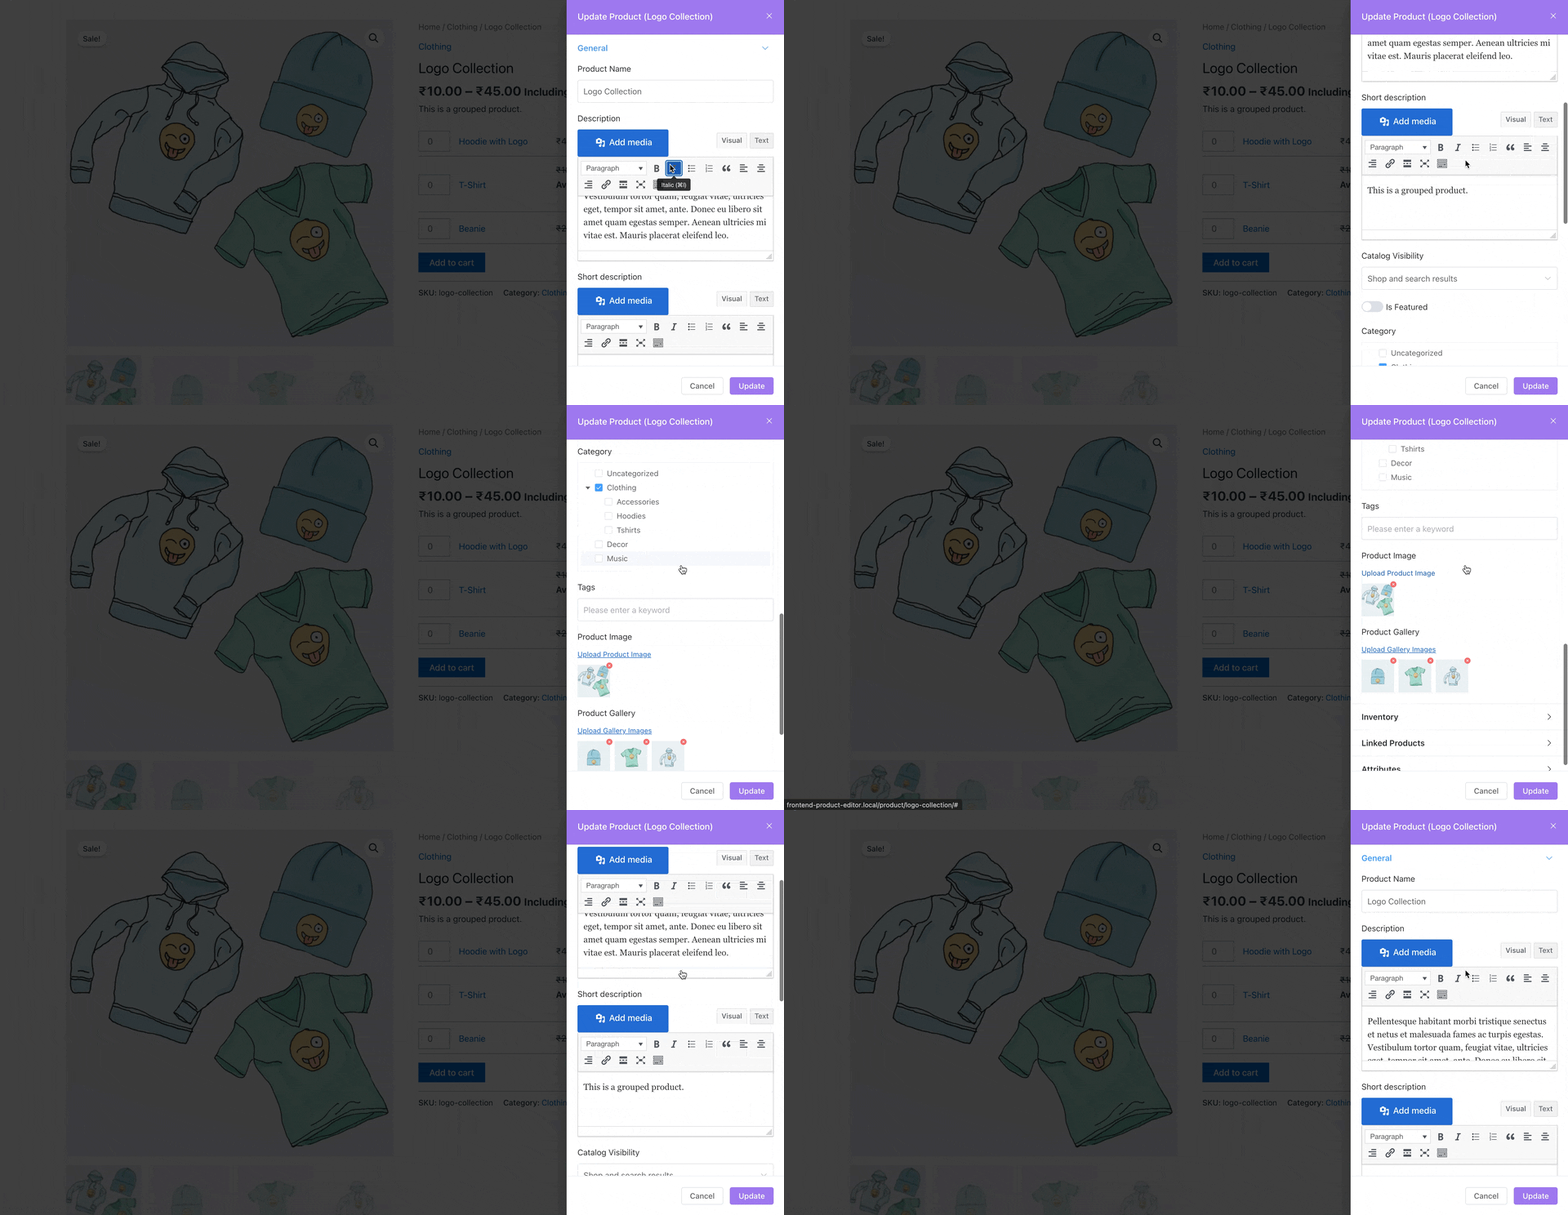
Once you click on the edit button, you will have access to a set of settings that allow you to edit grouped products on frontend. Here, you will learn about How to Edit Products On Frontend?
General
- Product Name: Enter name of the product.
- Description: Set the description for product.
- Short Description: Enter the short description of product.
- Catalog Visibility: Select the catalog visibility from available options.
- Is Featured: Enable the option if needed.
- Categories: Select the categories for product.
- Tags: Add the tags for product, if any.
- Product Image: Add the image of product.
- Product Gallery: Add the gallery of product images, if needed.
Inventory
- SKU: Enter the unique SKU for that product.
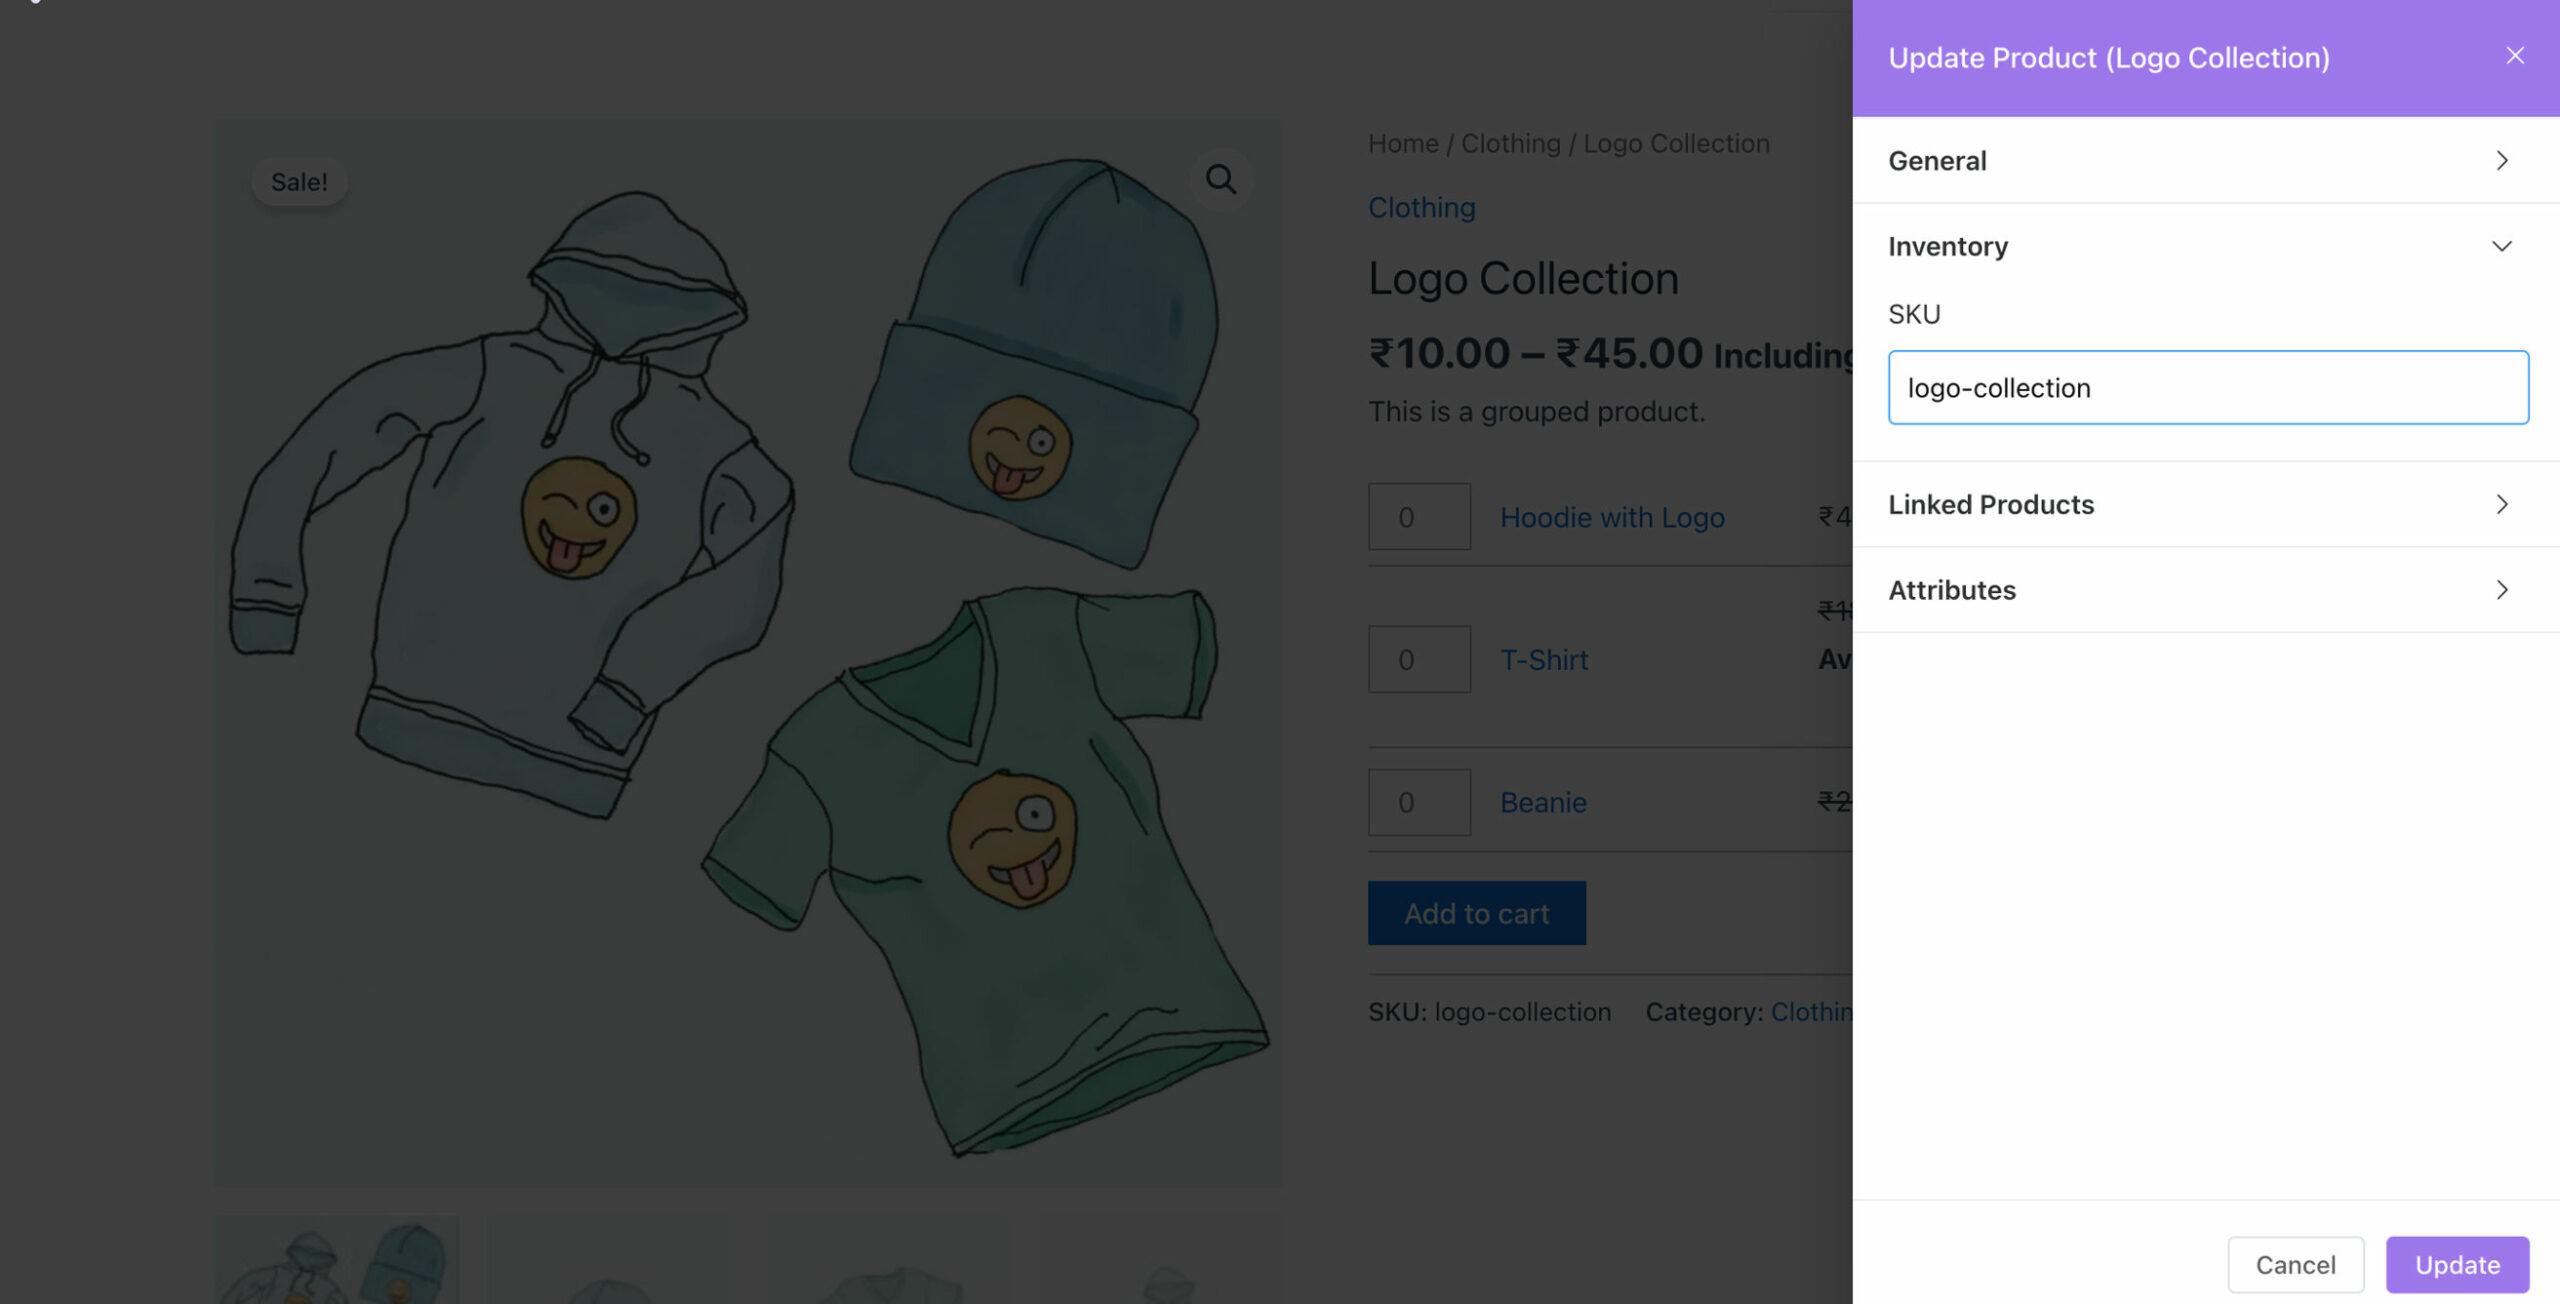
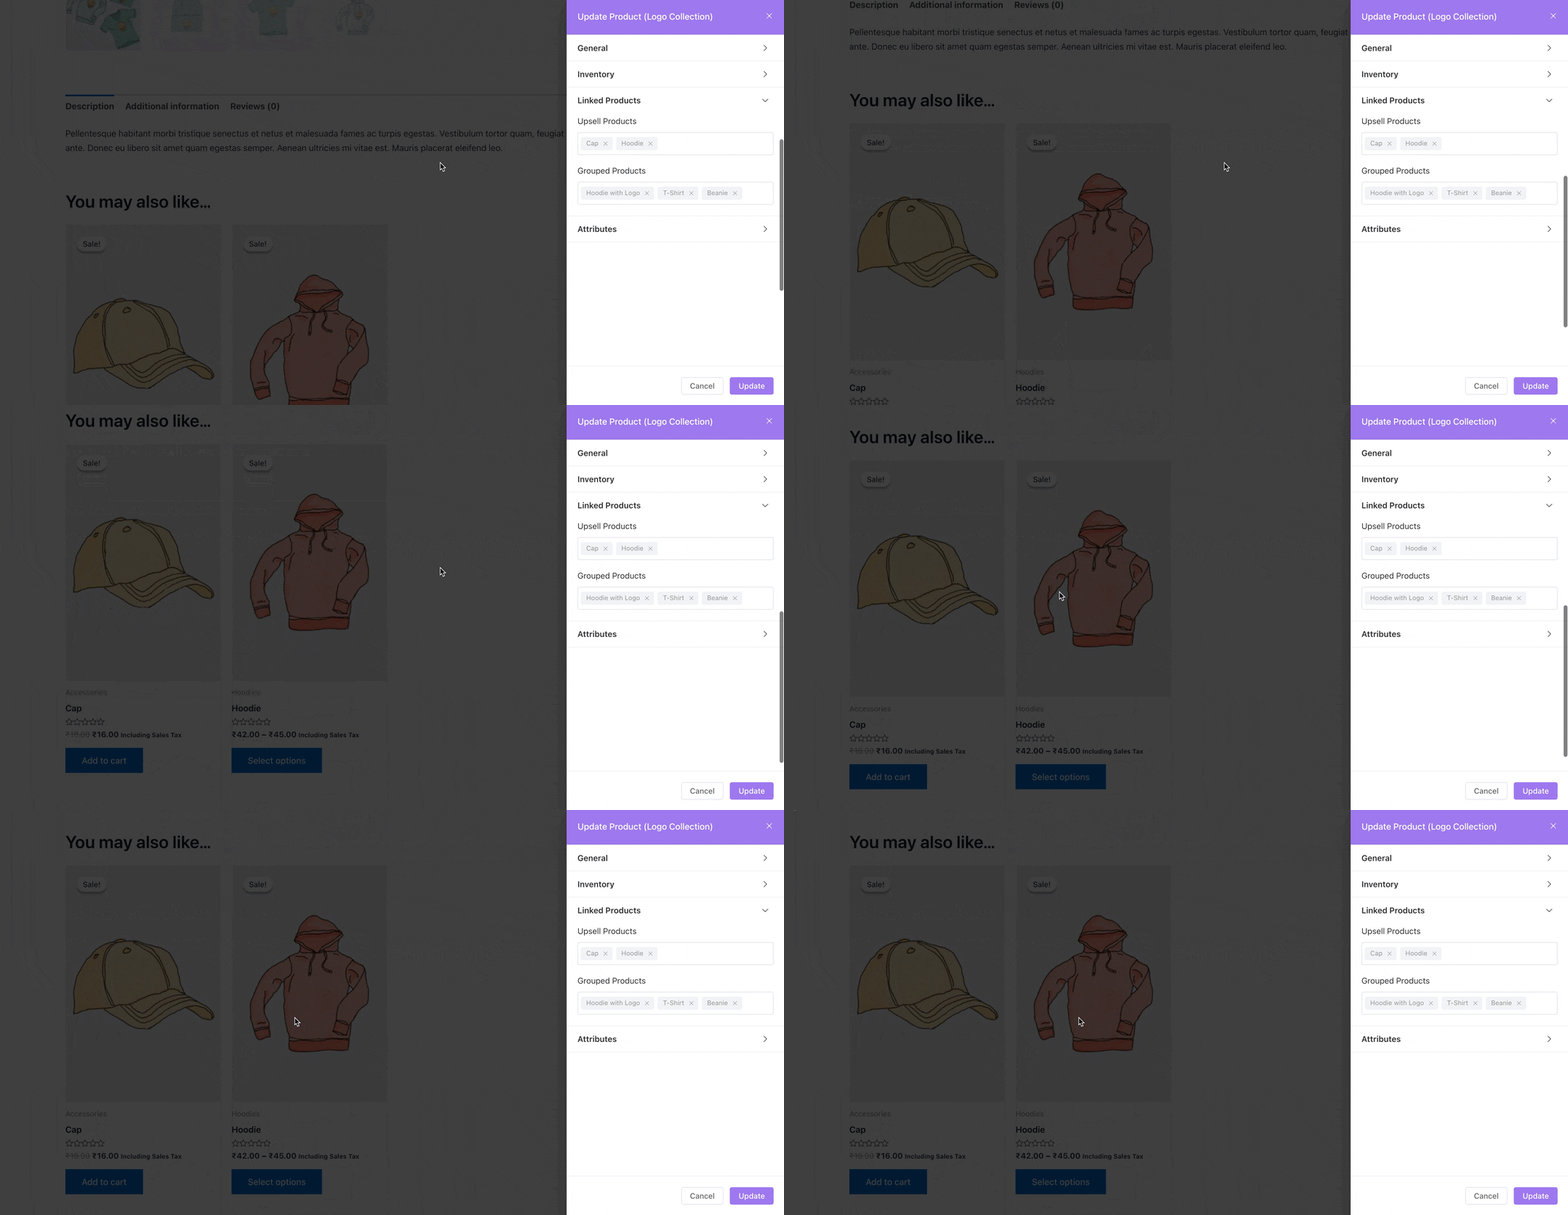
Linked Products
- Upsell Products: These products are displayed on the product details page with the intention of encouraging users to upgrade their purchases and increase sales.
- Grouped Products: Add the products that you want to include in group.
Please check our detailed article on Upsell & Cross-sell. It will provide you with a deeper understanding of these techniques and how they can be effectively implemented in your business.
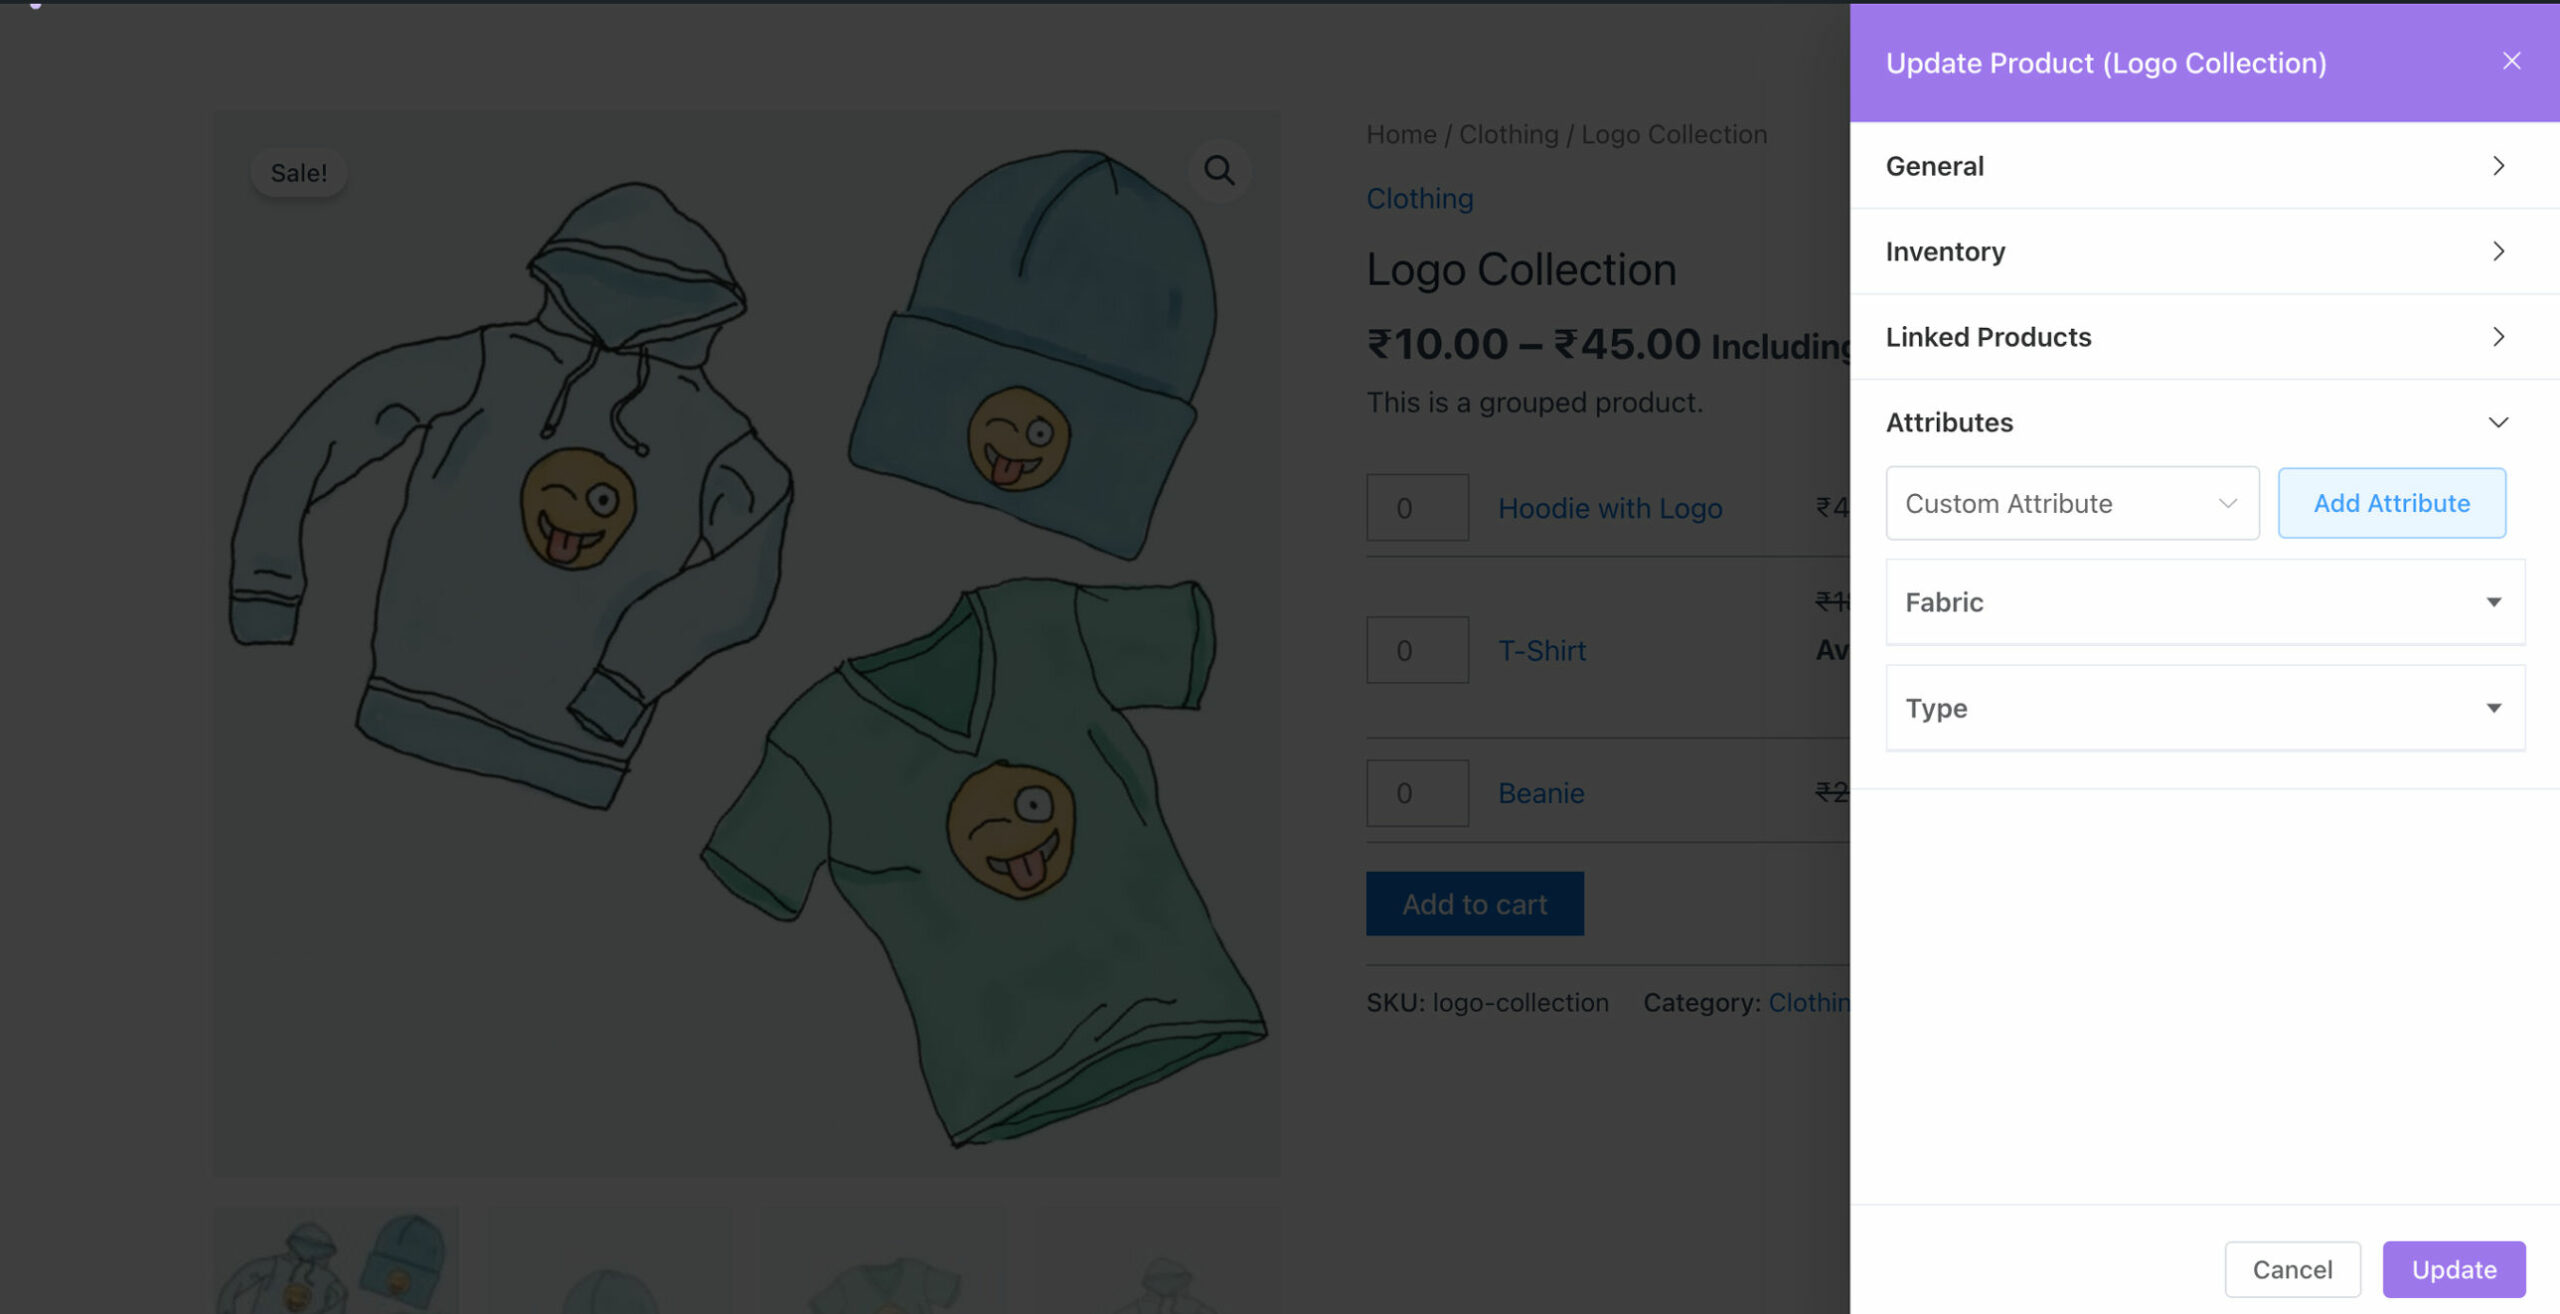
Attributes
- Custom Attributes: Add the custom attributes by clicking on “Add Attribute” option, and you can also hide the attribute on the frontend by keeping the “Visible on Product Page” option disabled.
How to Edit Product Data from the Product Archive Page
Editing your products directly from the product archive page (Shop page or Category archives) saves you valuable time and streamlines your workflow. Imagine the convenience of making quick changes without the need to navigate through multiple backend menus. Whether modifying prices, updating descriptions, or adding new images, the Frontend Product Editor has got you covered. No more delays or interruptions—click, edit, and save!
Its user-friendly interface allows you to quickly locate the specific items you wish to modify, ensuring a smooth and efficient editing process. With just a few clicks, you can enhance your product listings, keeping them up-to-date and captivating for your customers.
Let’s discuss how you can efficiently edit your products on the product archive page (Shop page or Category archives) directly from the frontend.
Navigate to WooCommerce -> Frontend Product Editor.
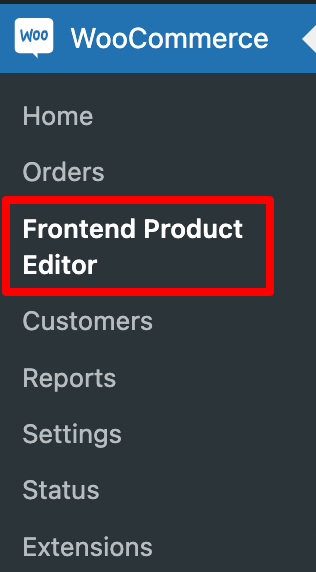
Next, upon clicking on the Frontend Product Editor, you will be directed to the FPE settings page. Here, enable the “Edit from Archives” option, which allows you to conveniently edit the product details directly from the product archive page (Shop page or Category archives).
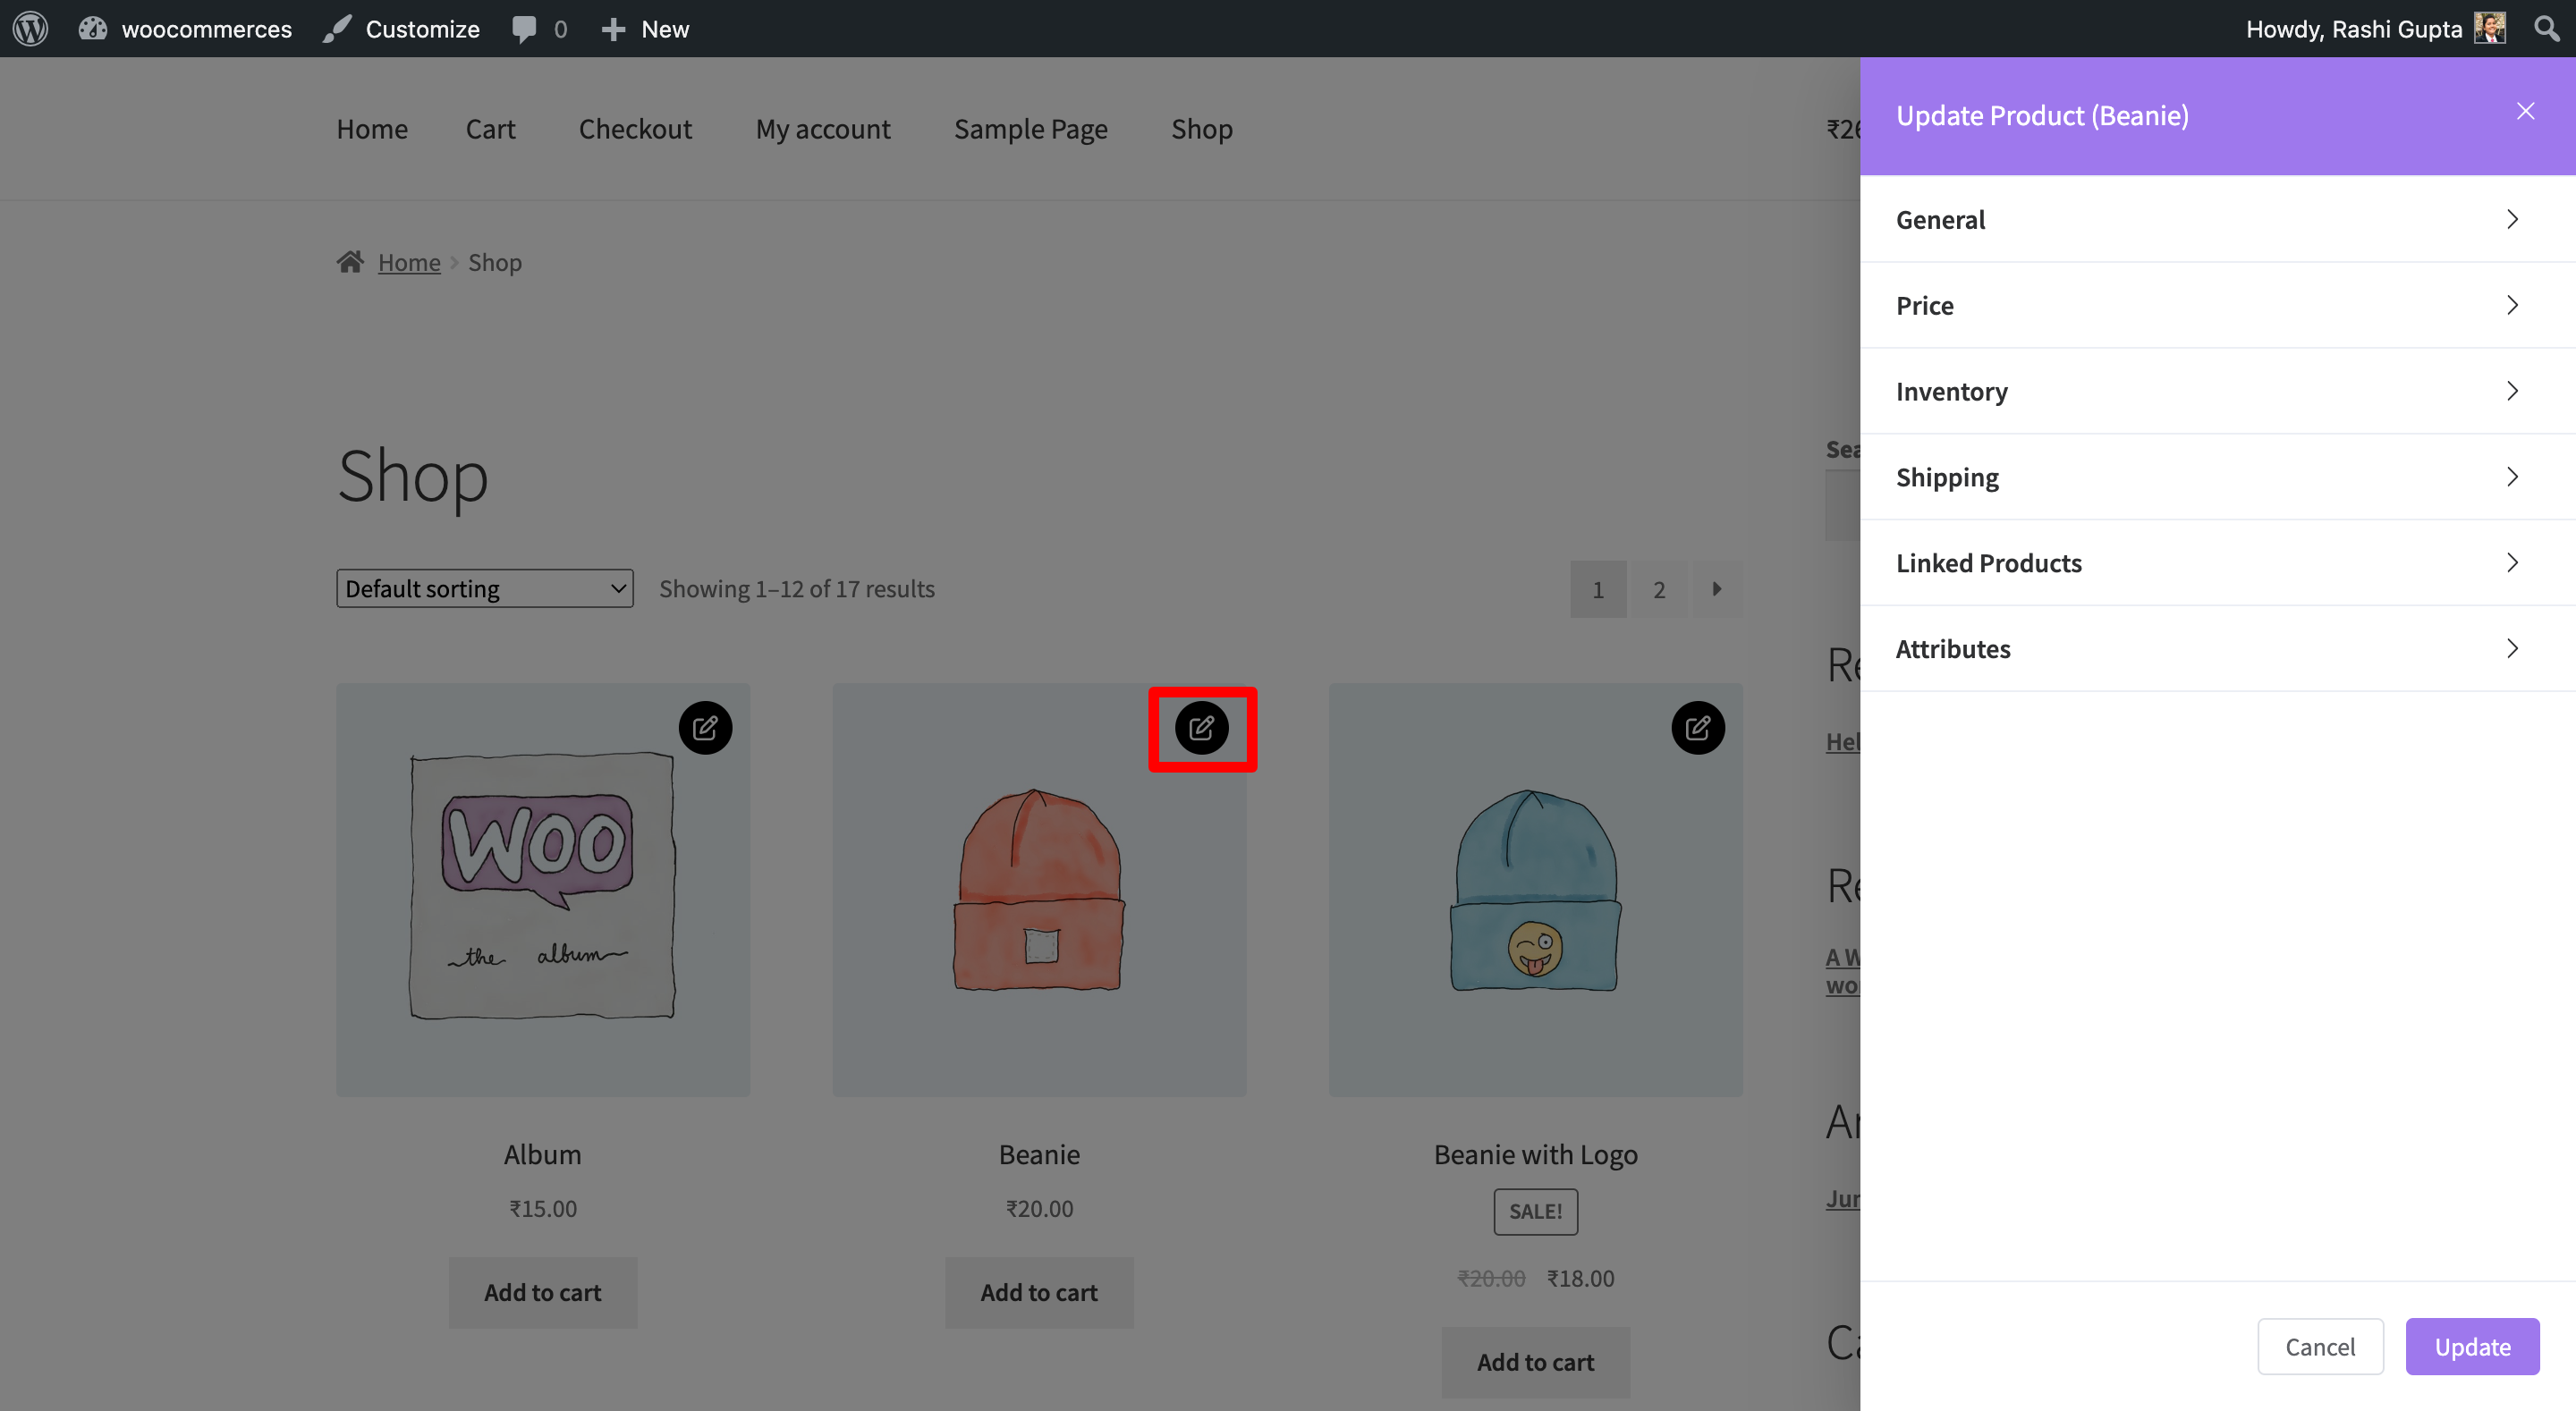
After enabling the “Edit from Archives” option, locate the shop page on your website. On the shop page, you will now see an Edit button displayed alongside each product. Click on the button corresponding to the product you wish to modify, and it will open up the edit interface.
Please check our detailed doc to learn how to Edit Products from Single Product Page.
How to Edit Upsell and Cross-Sell Products from Frontend?
Editing upsell and cross-sell products directly from the frontend empowers users to customize their offerings, fine-tune product recommendations, and boost average order values. Frontend Product Editor provides a user-friendly interface that is accessible to non-technical users; it allows businesses to effortlessly optimize their product catalog and tailor suggestions to suit individual customer preferences.
Whether it’s highlighting related products during the checkout process or suggesting upgrades and add-ons on product pages, the ability to edit, upsell, and cross-sell products from the frontend ensures a seamless shopping experience for customers, leading to increased conversion rates and customer satisfaction.
Please check our detailed article on How to Edit Products on Frontend.
After clicking the edit button, a range of settings will become available, allowing you to edit upsell and cross-sell products. Within these settings, you can navigate to the Linked Products section, where you can modify the information related to Upsell and Cross-Sell Products. Once you have finalized the edits, simply save the updated details by clicking the “Update” button.
Linked Products
Upsell Products: They are shown on the single product page. These are products that you may want to promote to users as upgrades based on the product they are currently viewing. For example, if a user is browsing the T-Shirt product listing page, you can display the Plain T-Shirt and Hoodie on that same page as an up-sell.
Cross-sell Products: Cross-sells are products that are presented along with the cart and are related to the items in the user’s cart. For instance, if a user adds a smartphone to their cart, you may suggest they consider purchasing a phone case when they reach the cart page.
Please check our detailed article on Upsell & Cross-sell. It will provide you with a deeper understanding of these techniques and how they can be effectively implemented in your business.
Explore our detailed article for step-by-step guidance on Editing Upsell and Cross-Sell product data directly from the Product Archive page.